.png?table=block&id=5ab09172-97bb-4784-b136-fac5db194022&cache=v2)
Do not index
This guide showcases a Versium extension for Airtable a powerful combination that will help you enrich customer profiles, qualify leads, and segment users for targeted marketing campaigns. Versium is a data technology company with an identity resolution engine that accesses over two billion contact points from 20 million businesses and 270 million households across North America.
Airtable is a cloud platform blending spreadsheets and databases. It lets users store, organize, and collaborate on projects. Using Versium with Airtable enhances sales and marketing workflows directly within your existing Airtable setup
By following this guide, you'll also gain the skills and knowledge to build your own extensions for the Airtable marketplace. Here’s what you’ll learn:
What is an Airtable extension?
Extensions are mini-apps within Airtable that enhance bases by adding visuals or functionality. These are React applications, and you can access Airtable-specific utilities through the Blocks SDK. You can create extensions for your own use or share them with the community. By building public extensions for Airtable, you can reach over 450,000 organizations that rely on Airtable, including global companies like West Elm, Shopify, Intuit, and GitHub.
What are you building?
Versium offers numerous powerful APIs for data enrichment. This extension concentrates on a small slice of Versium's capabilities by using the Consumer to Business (C2B) Append API to enrich LinkedIn URLs

With this extension, users can:
- Add and save Versium API keys.
- Set up the Airtable table and view for enrichment.
- Choose the field for enrichment.
- Map output fields including first name, last name, email, company domain, and business name.
Before starting, ensure you have:
- An Airtable account (Pro version required to publish, free trial available).
- An Airtable base with LinkedIn URLs ready for enrichment, including fields for First Name, Last Name, Email, Title, Business, and Company Domain. Copy this base to clone an example with the necessary formatting.
- Basic knowledge of React, as Airtable extensions are built using this framework.
To see all the code we'll build in this tutorial, visit the GitHub repository here.
Remix the extension from GitHub
You can build the extension from scratch by following this step-by-step guide, or if you prefer, you can install the finished extension directly into your Airtable base. Here’s how you remix it from GitHub:
- Click on the
Extensionstab in your Airtable base to go to theAirtable Extensionspage.
- Click
Add an extension, then chooseRemix from GitHub.
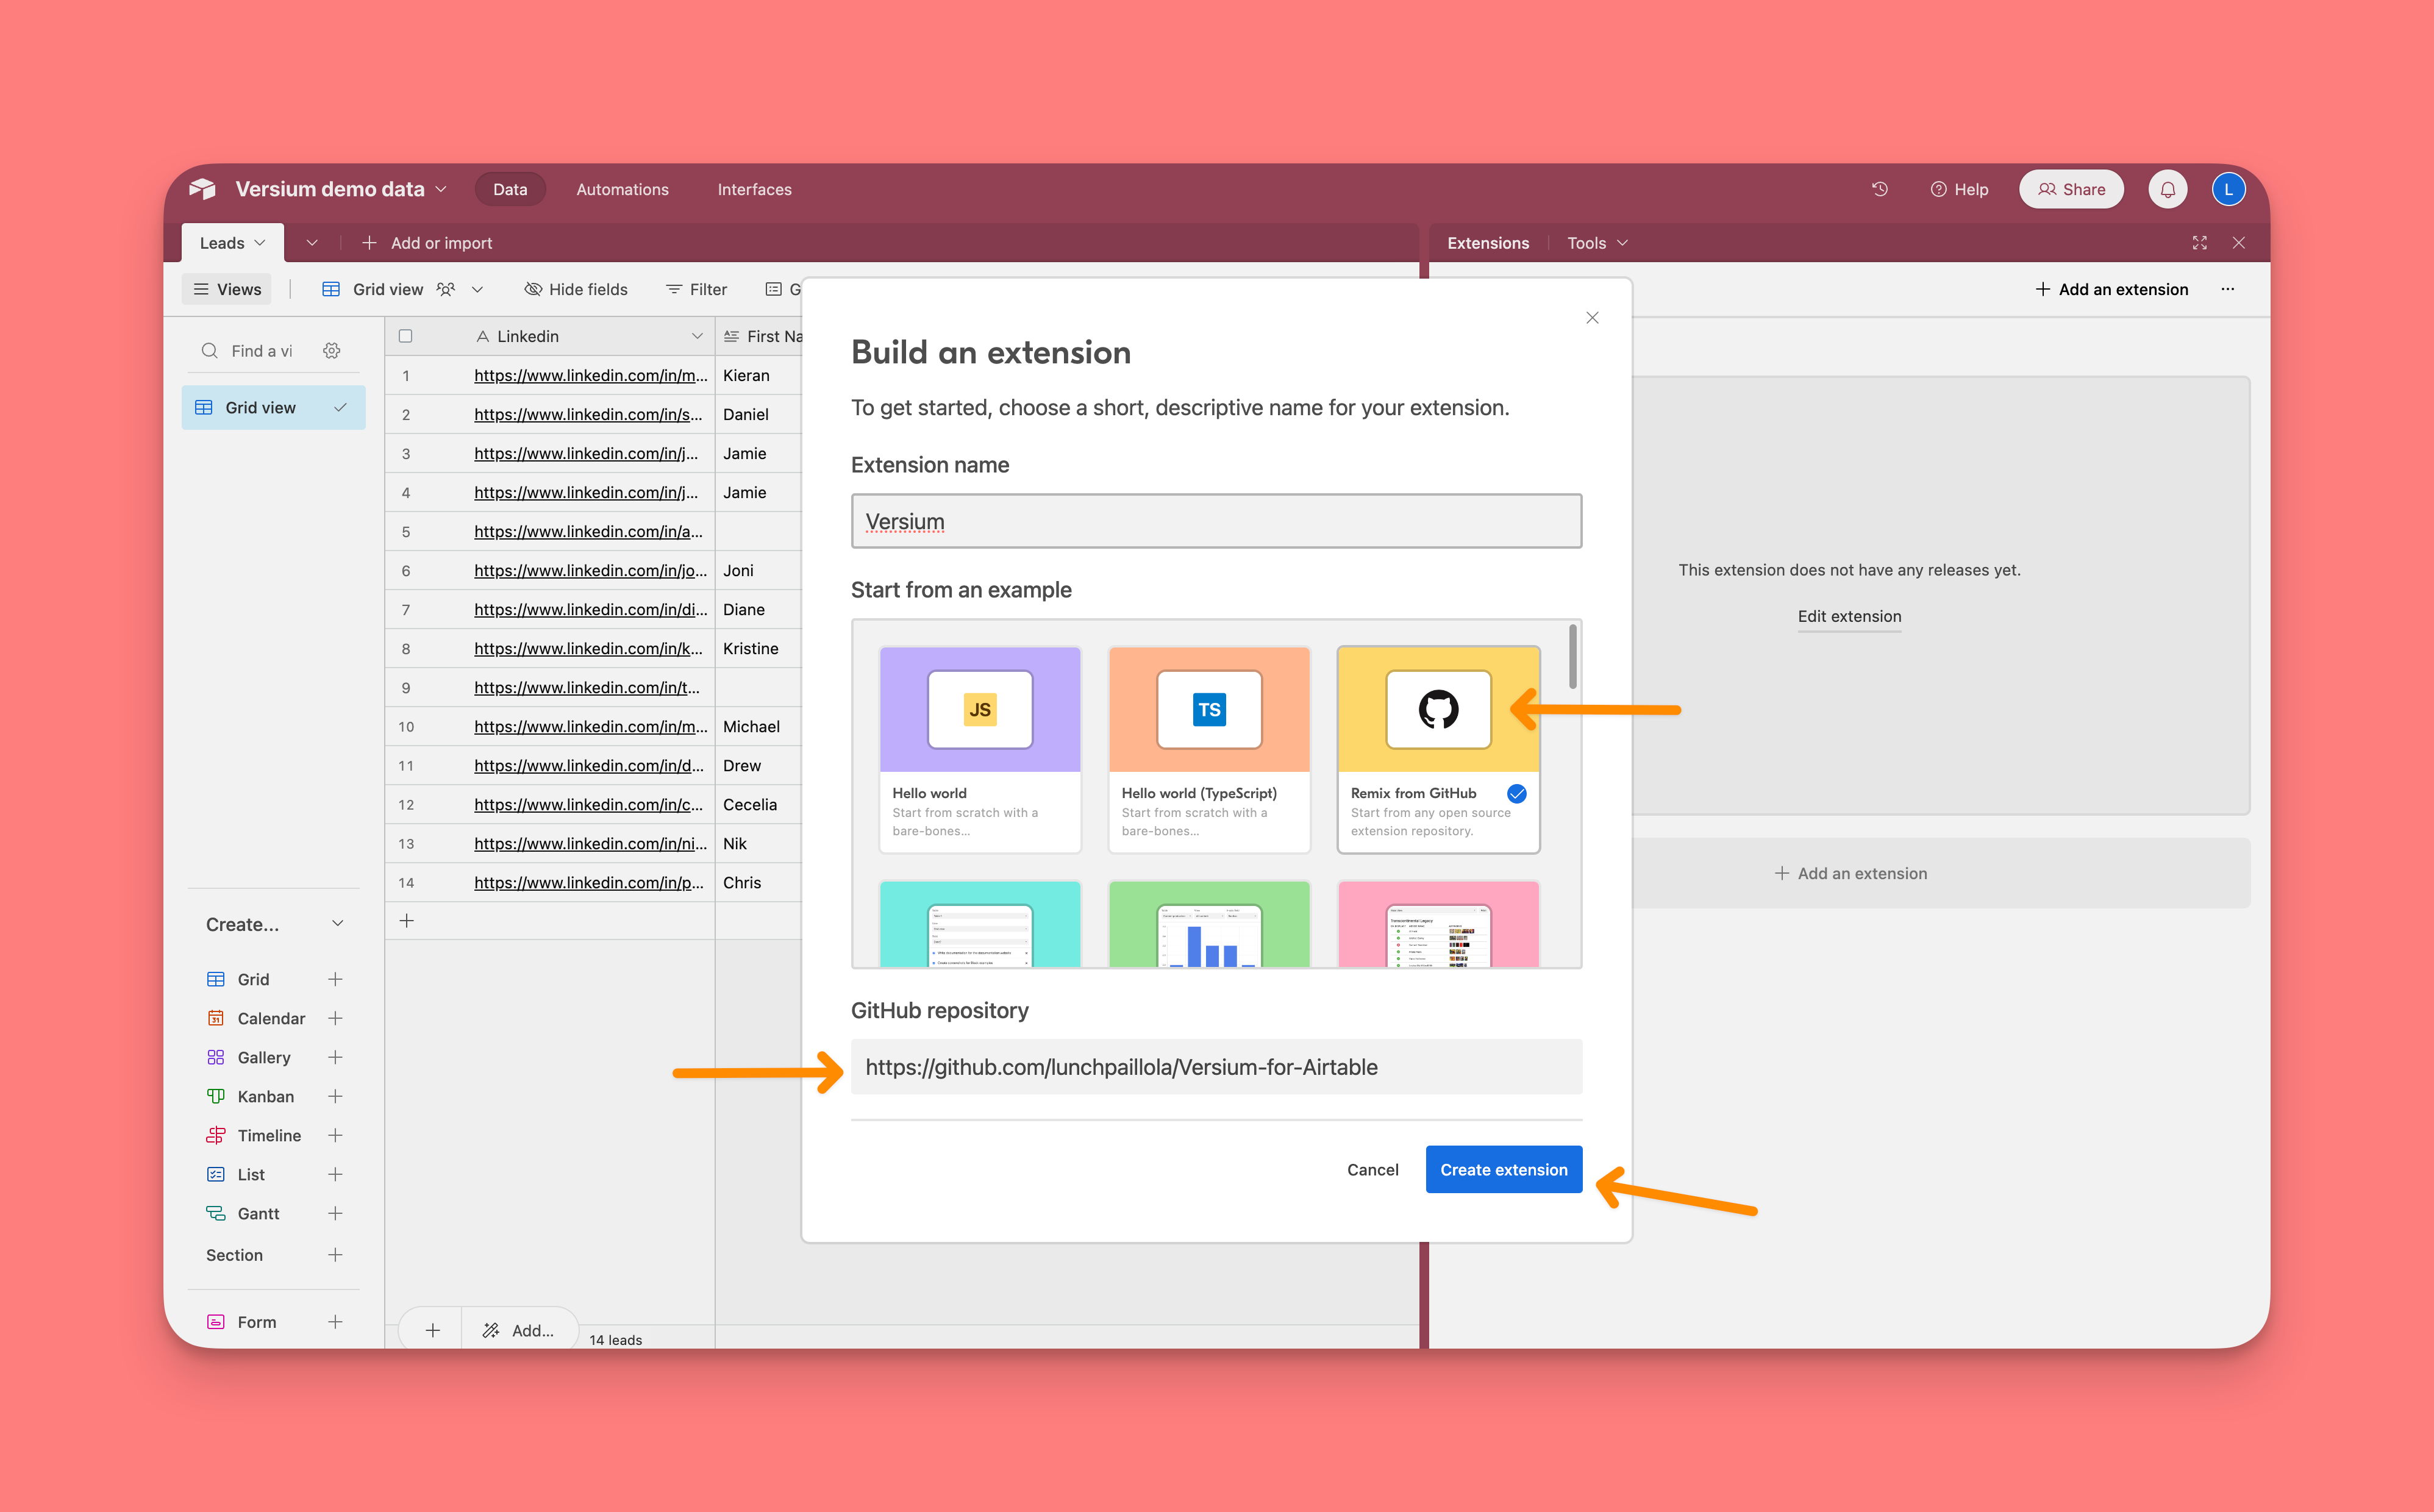
- Type in the repository URL:
https://github.com/lunchpaillola/Versium-for-Airtable
For a more detailed guide, visit Remixing Extensions from GitHub.
How to build a Versium extension for Airtable
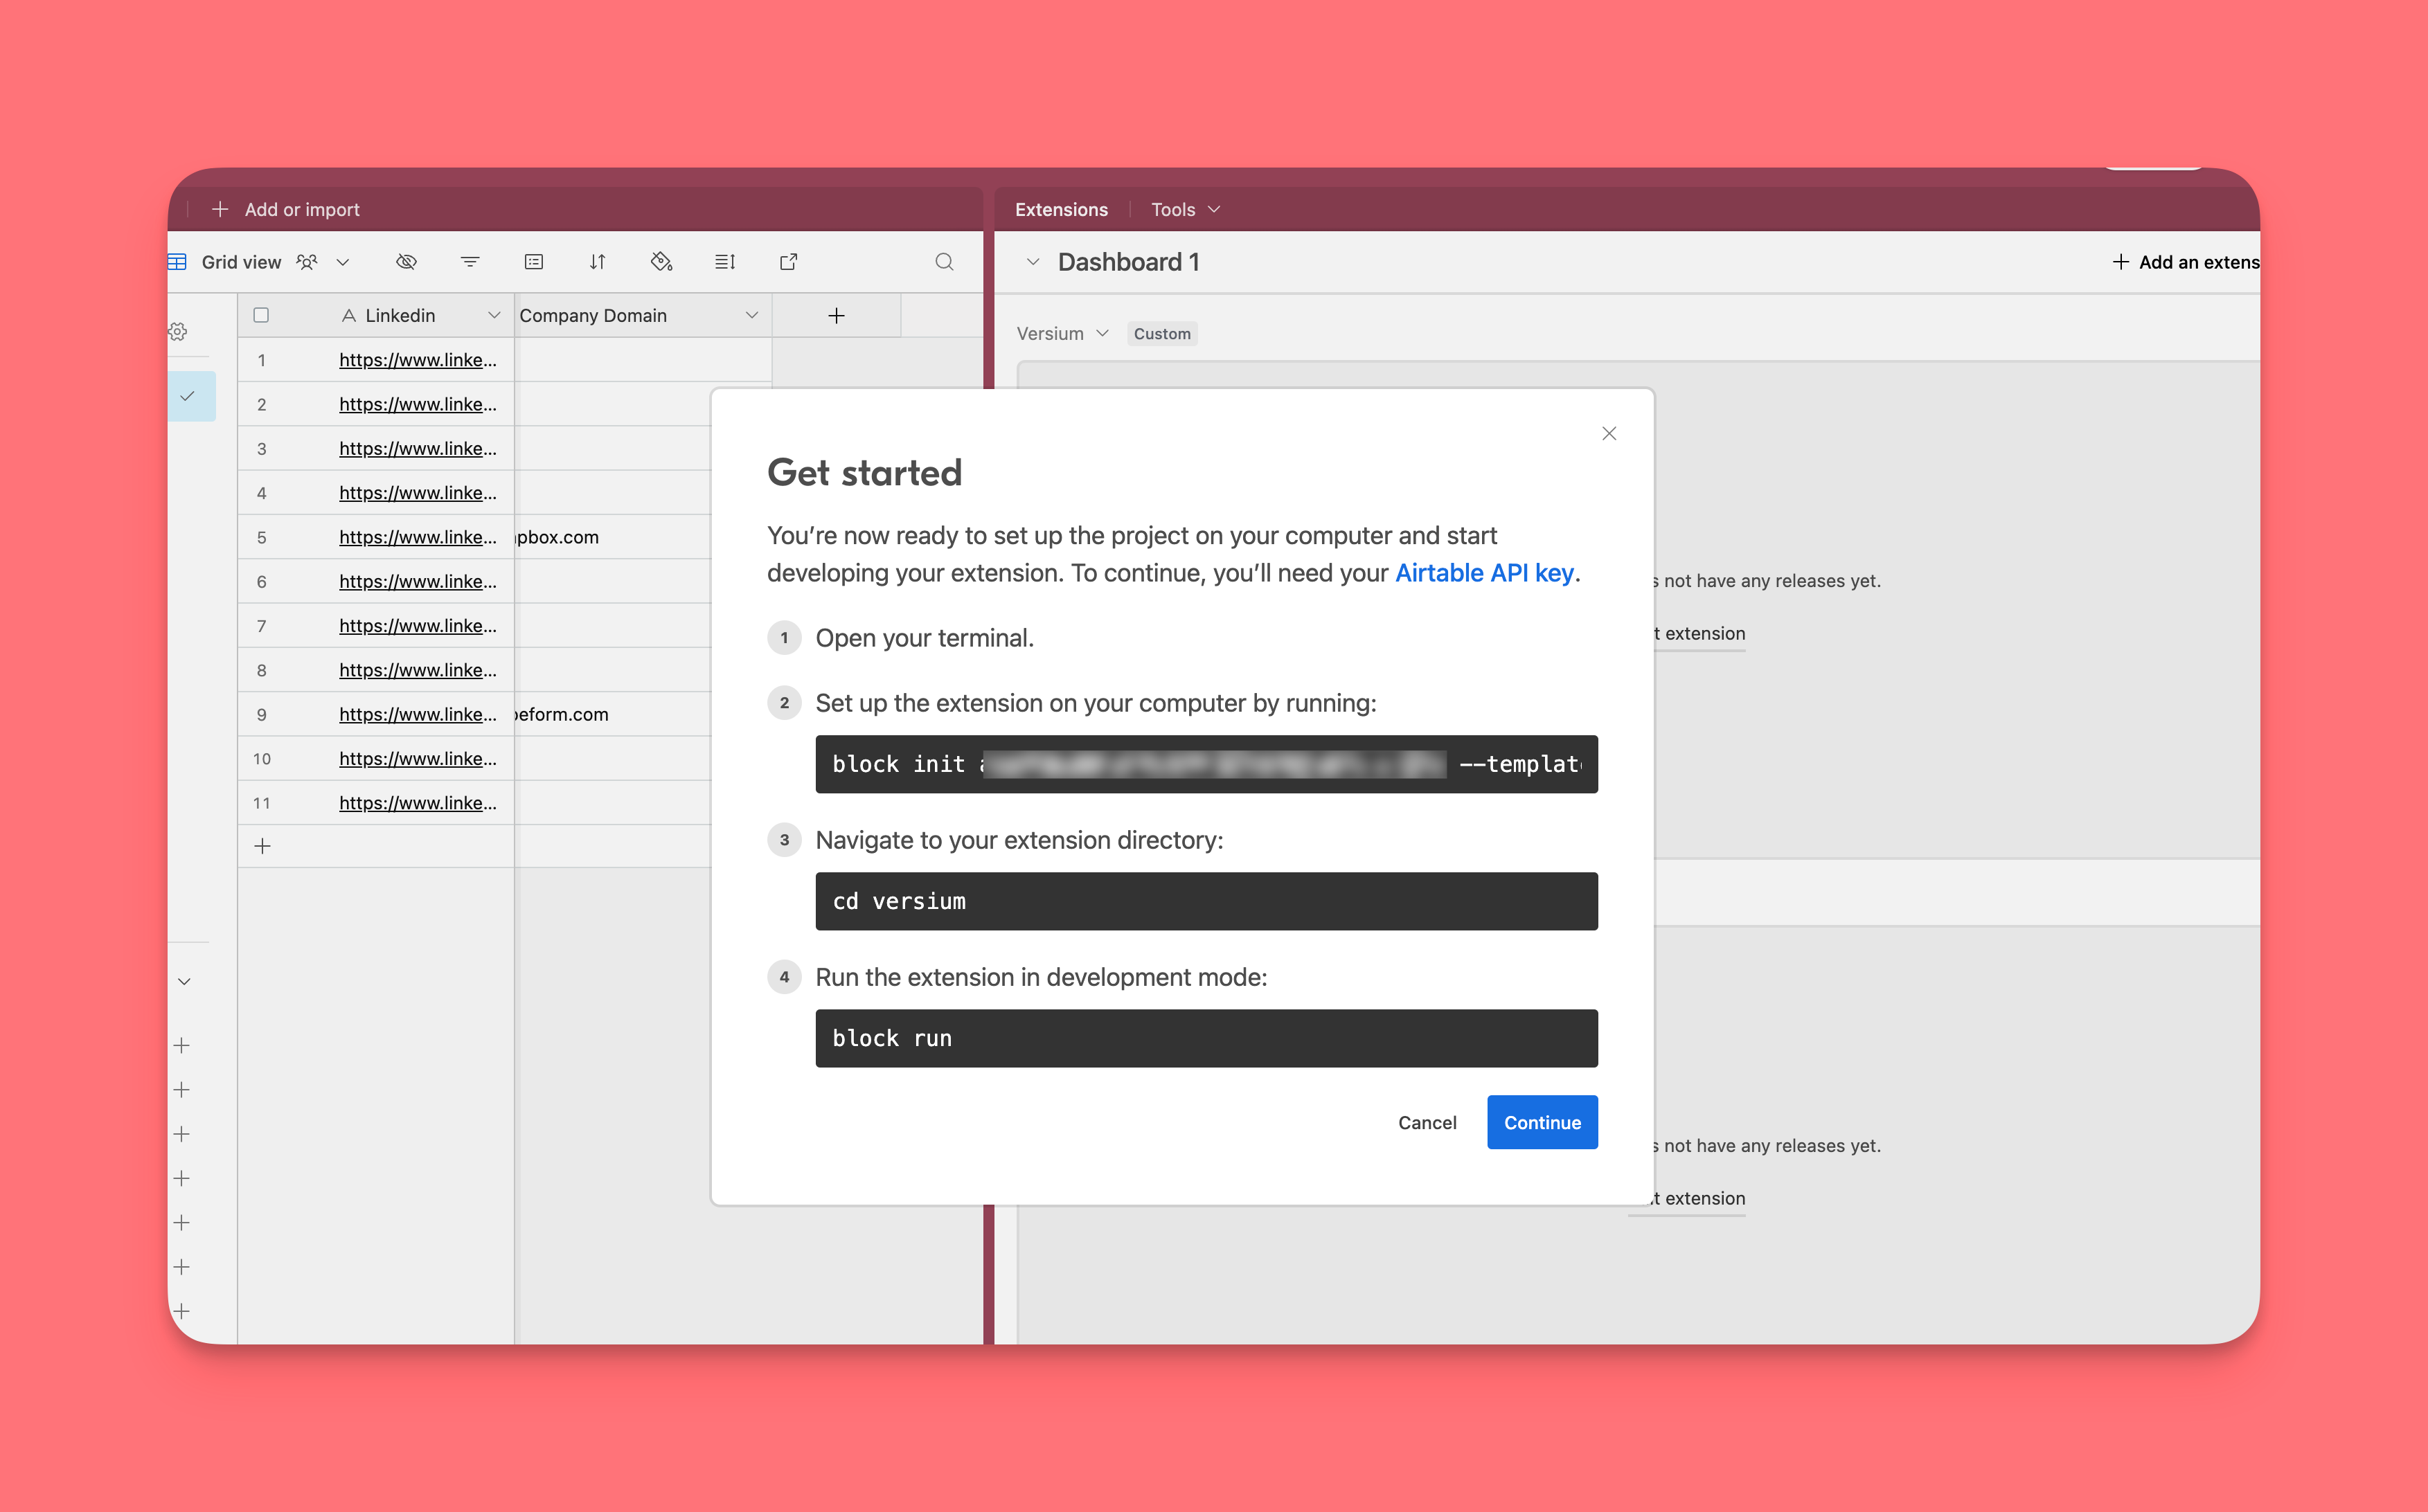
1. Create a new extension
Go to your base, click
add an extension, and then select build a custom extension.
Name your extension and click
create extension.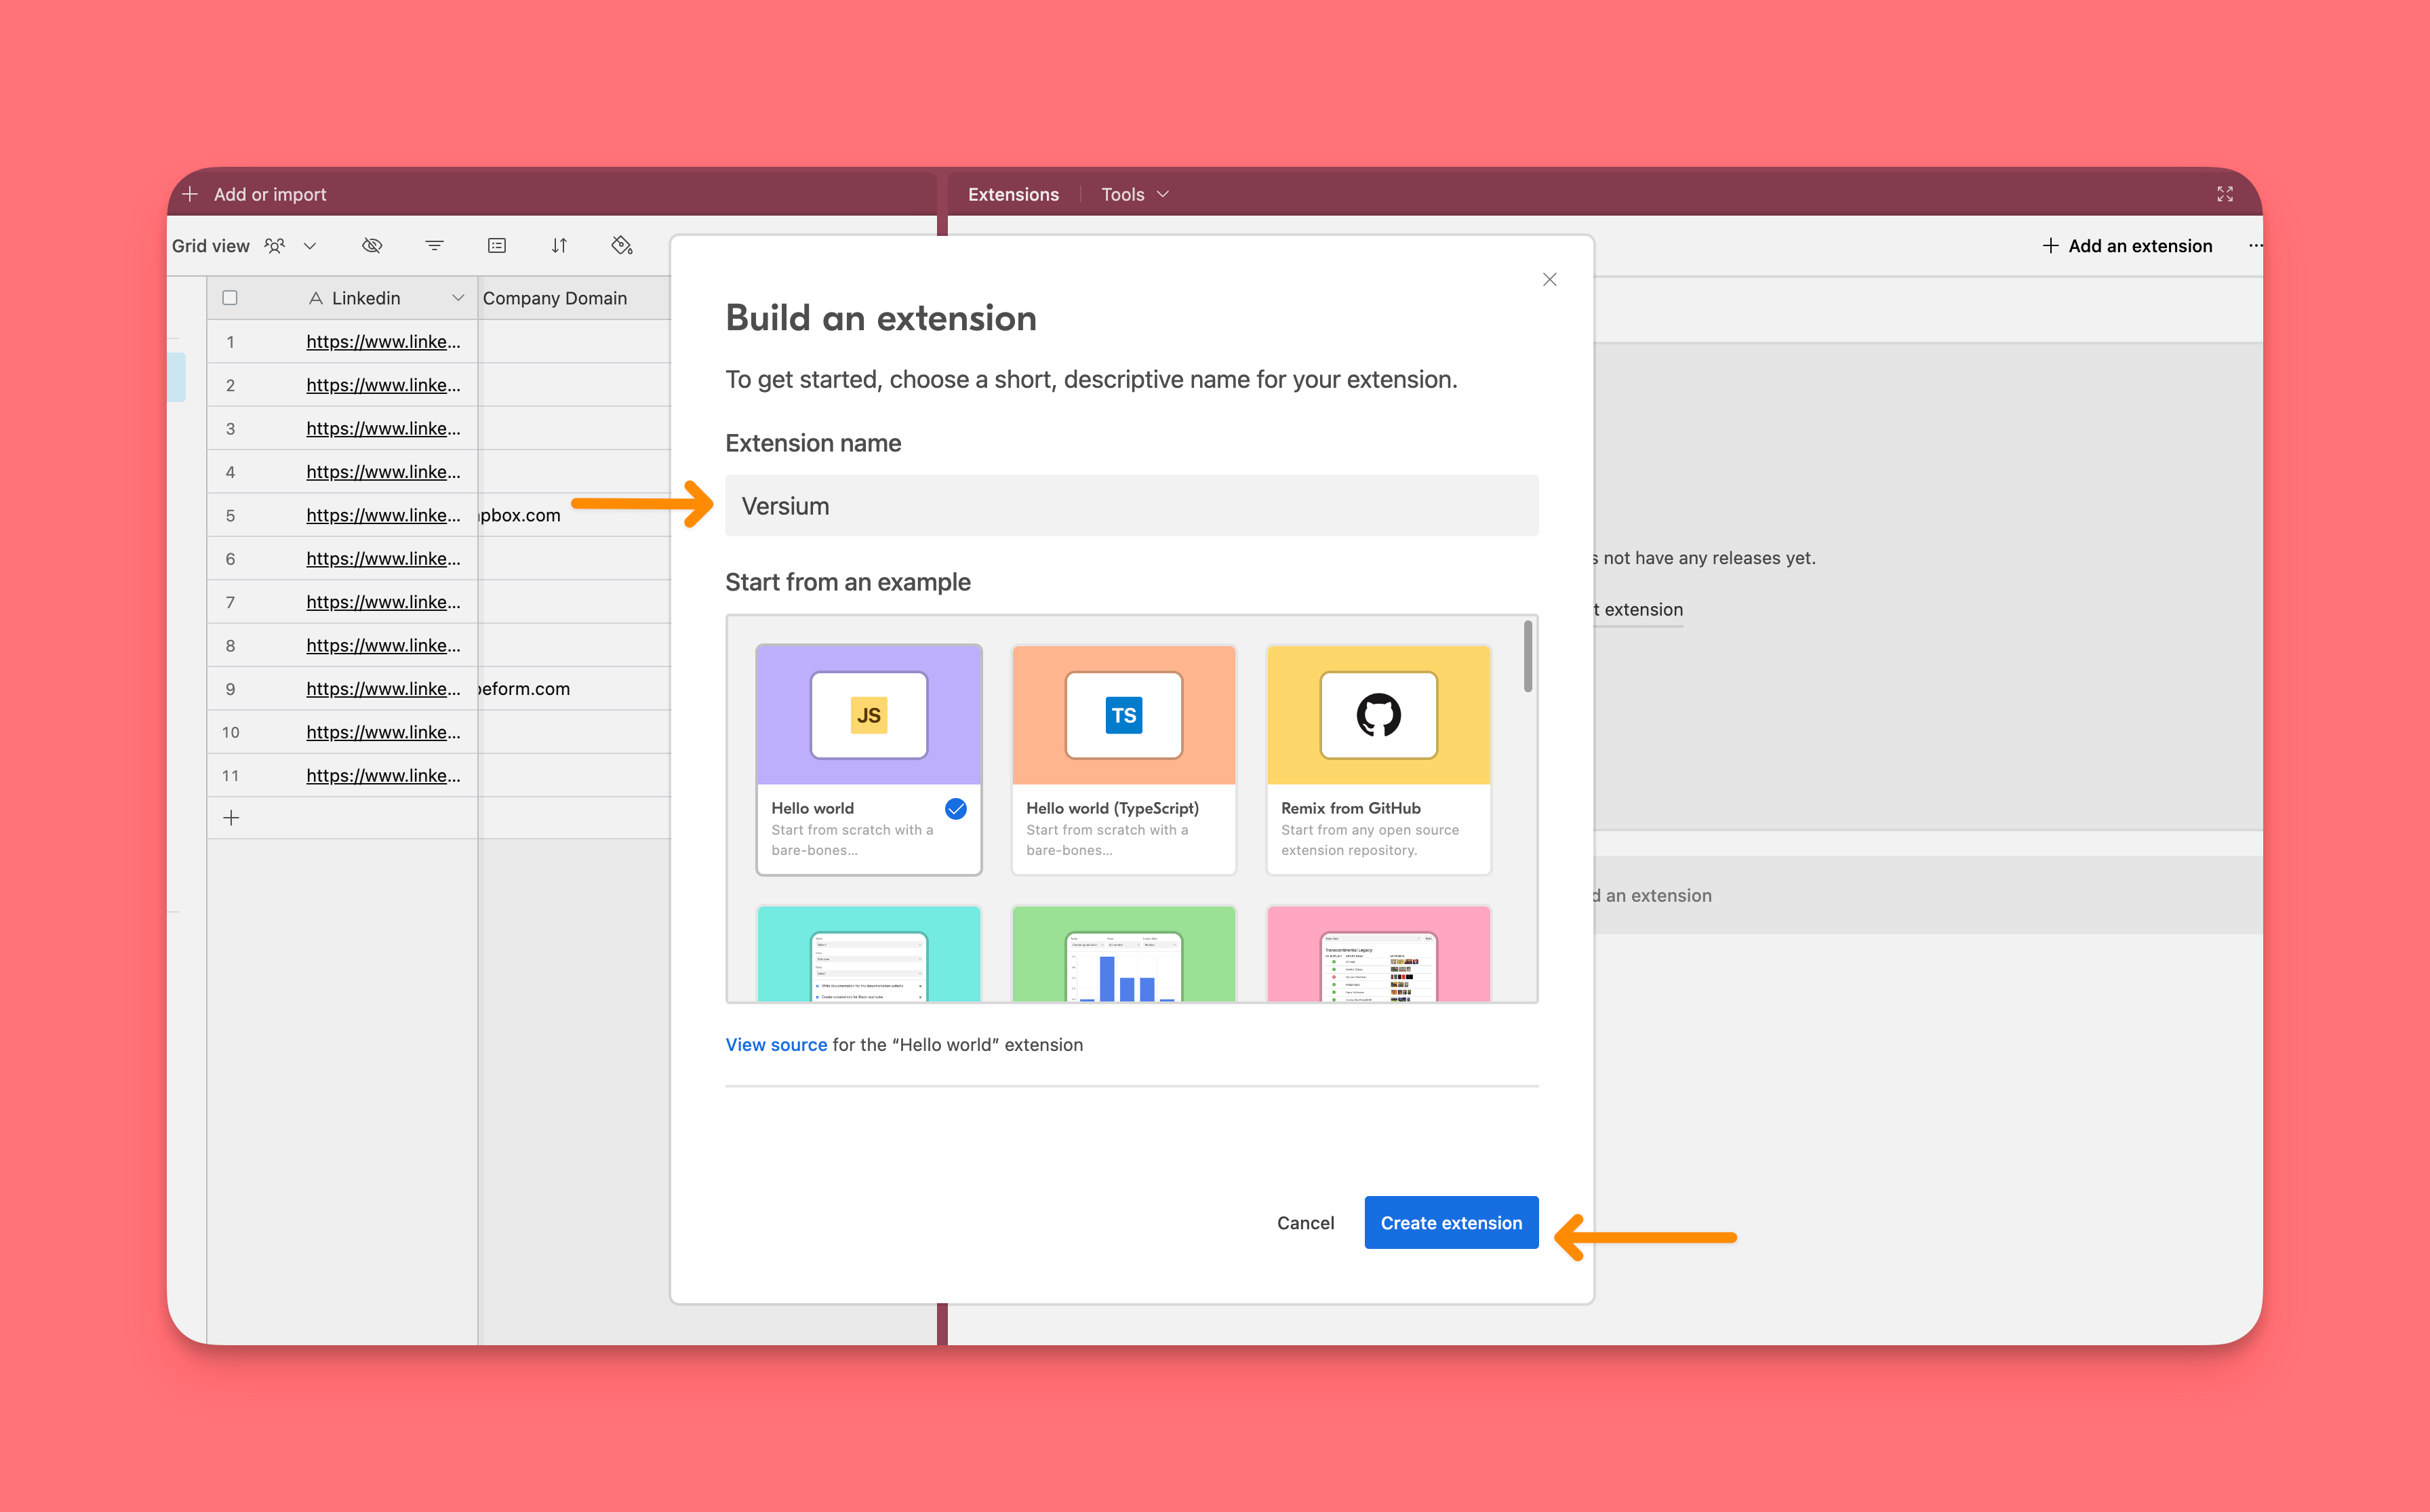
Then, open your preferred IDE and run this command in the terminal:
npm install -g @airtable/blocks-cli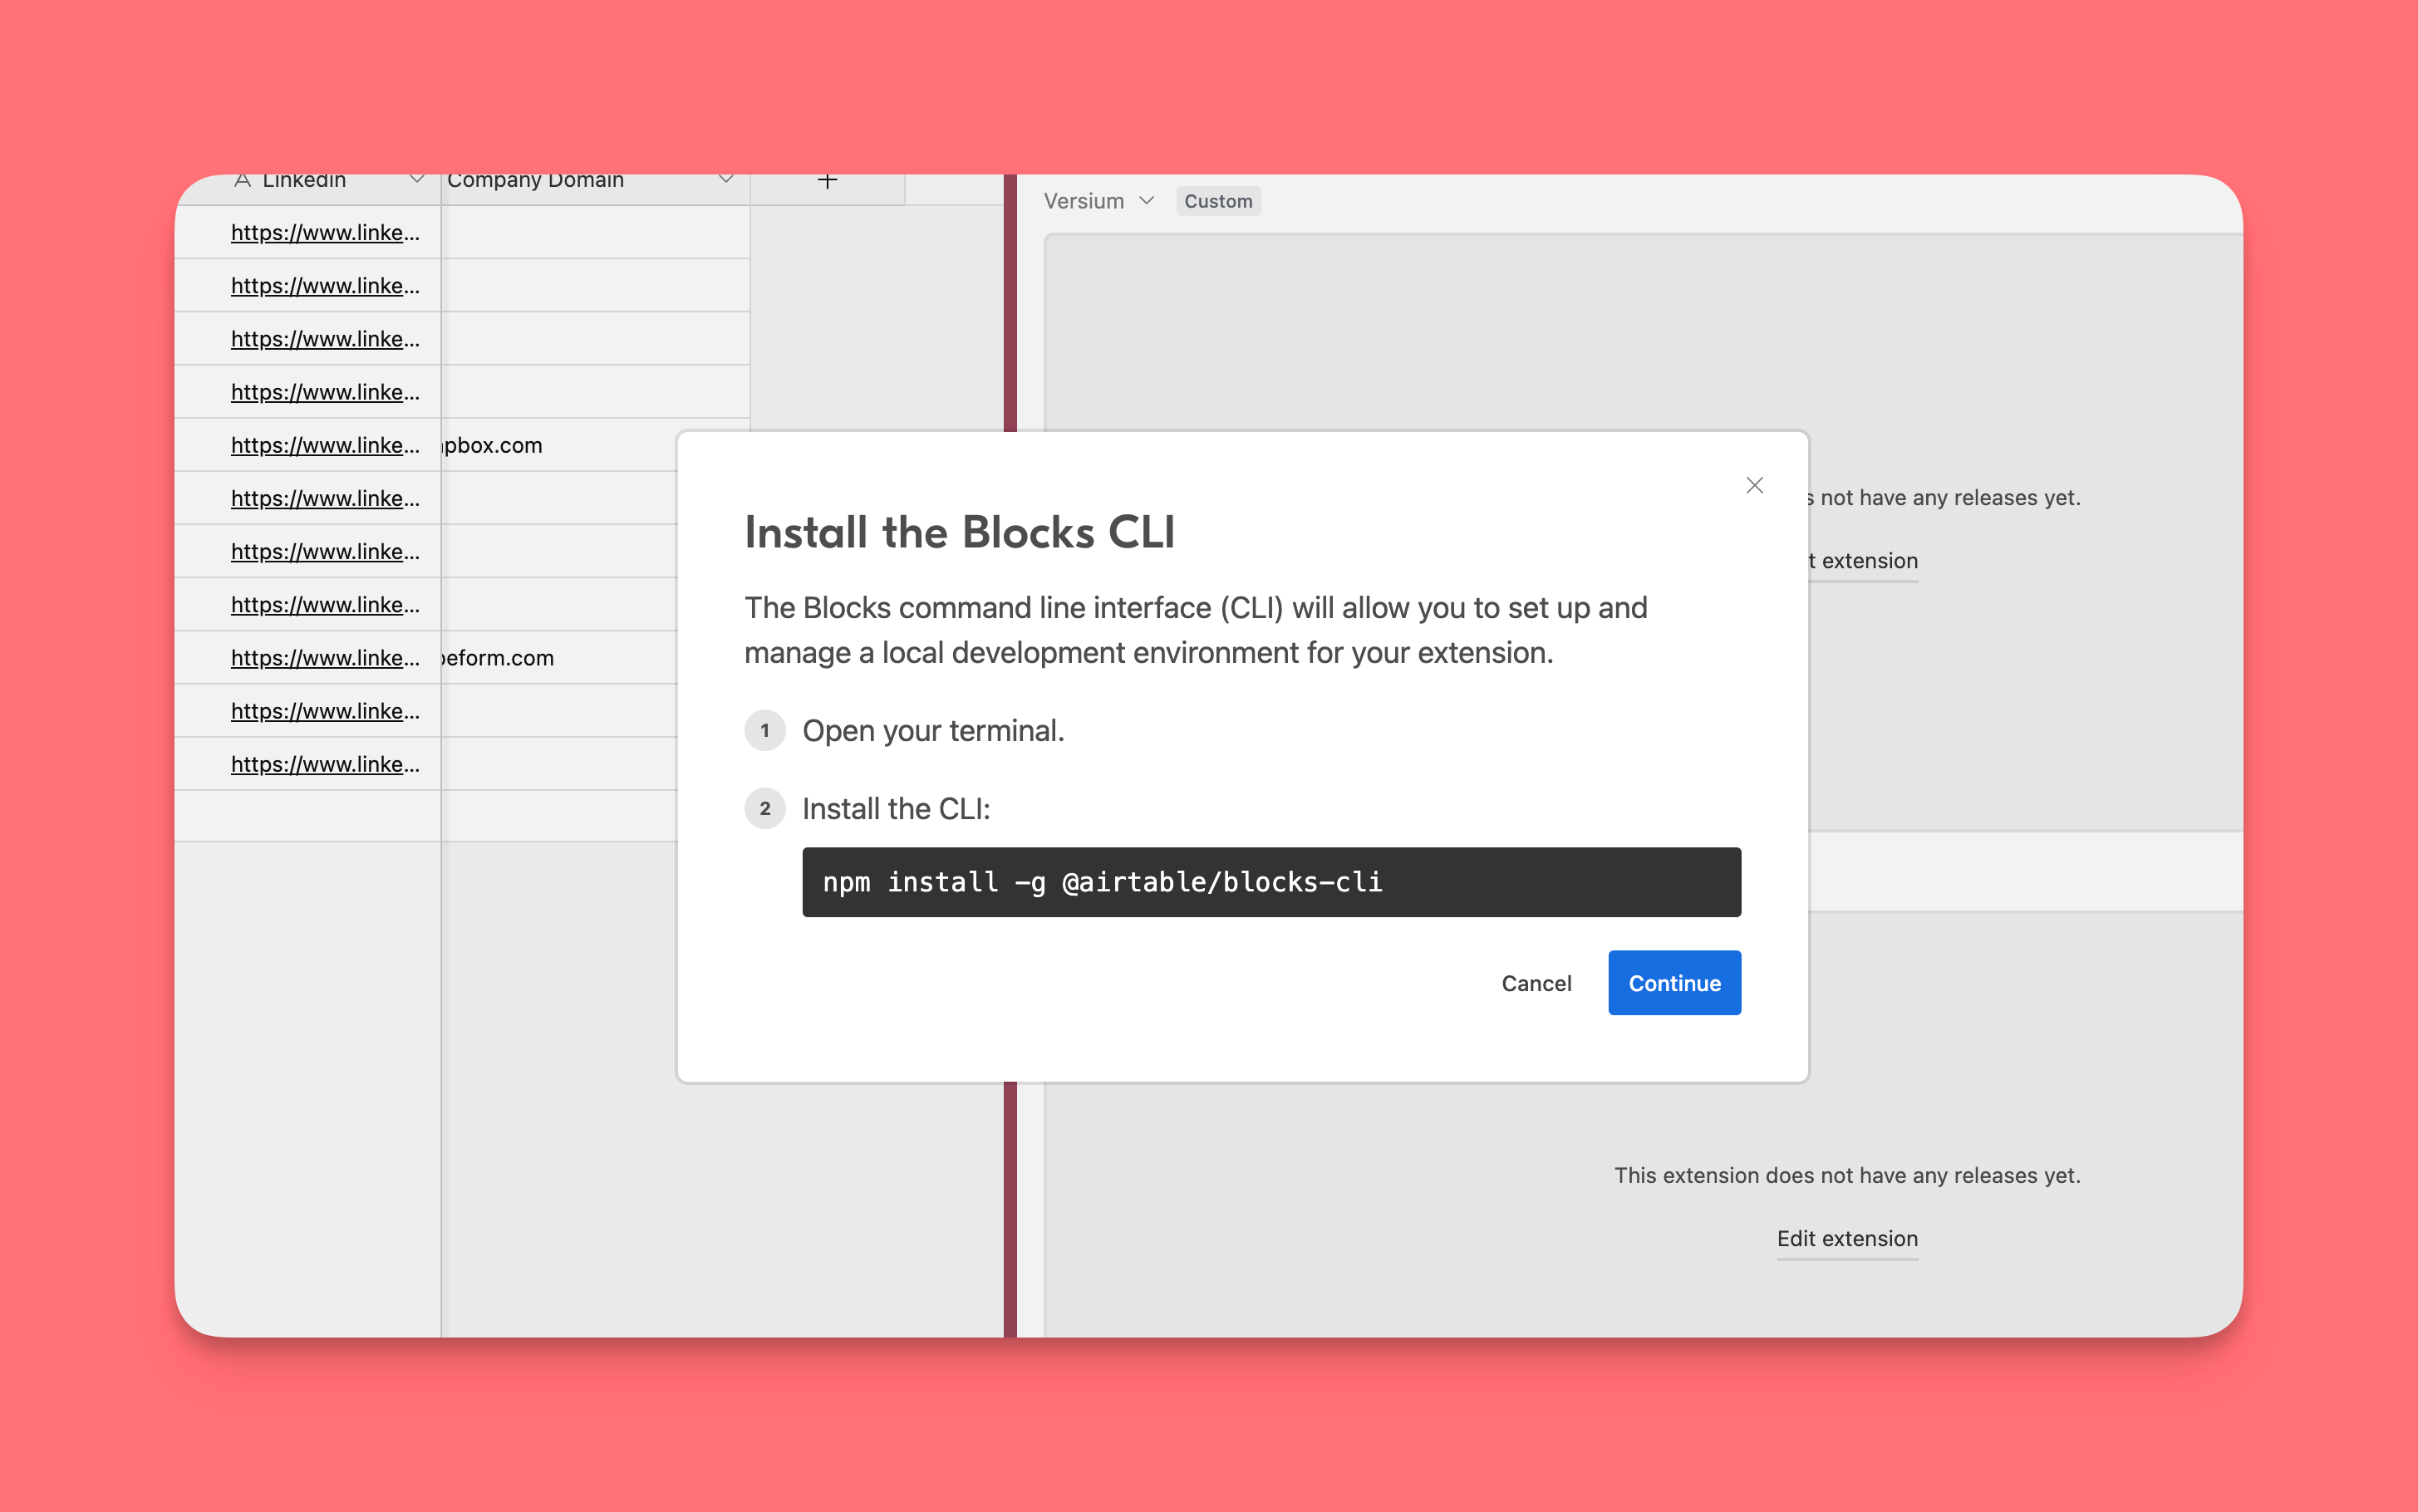
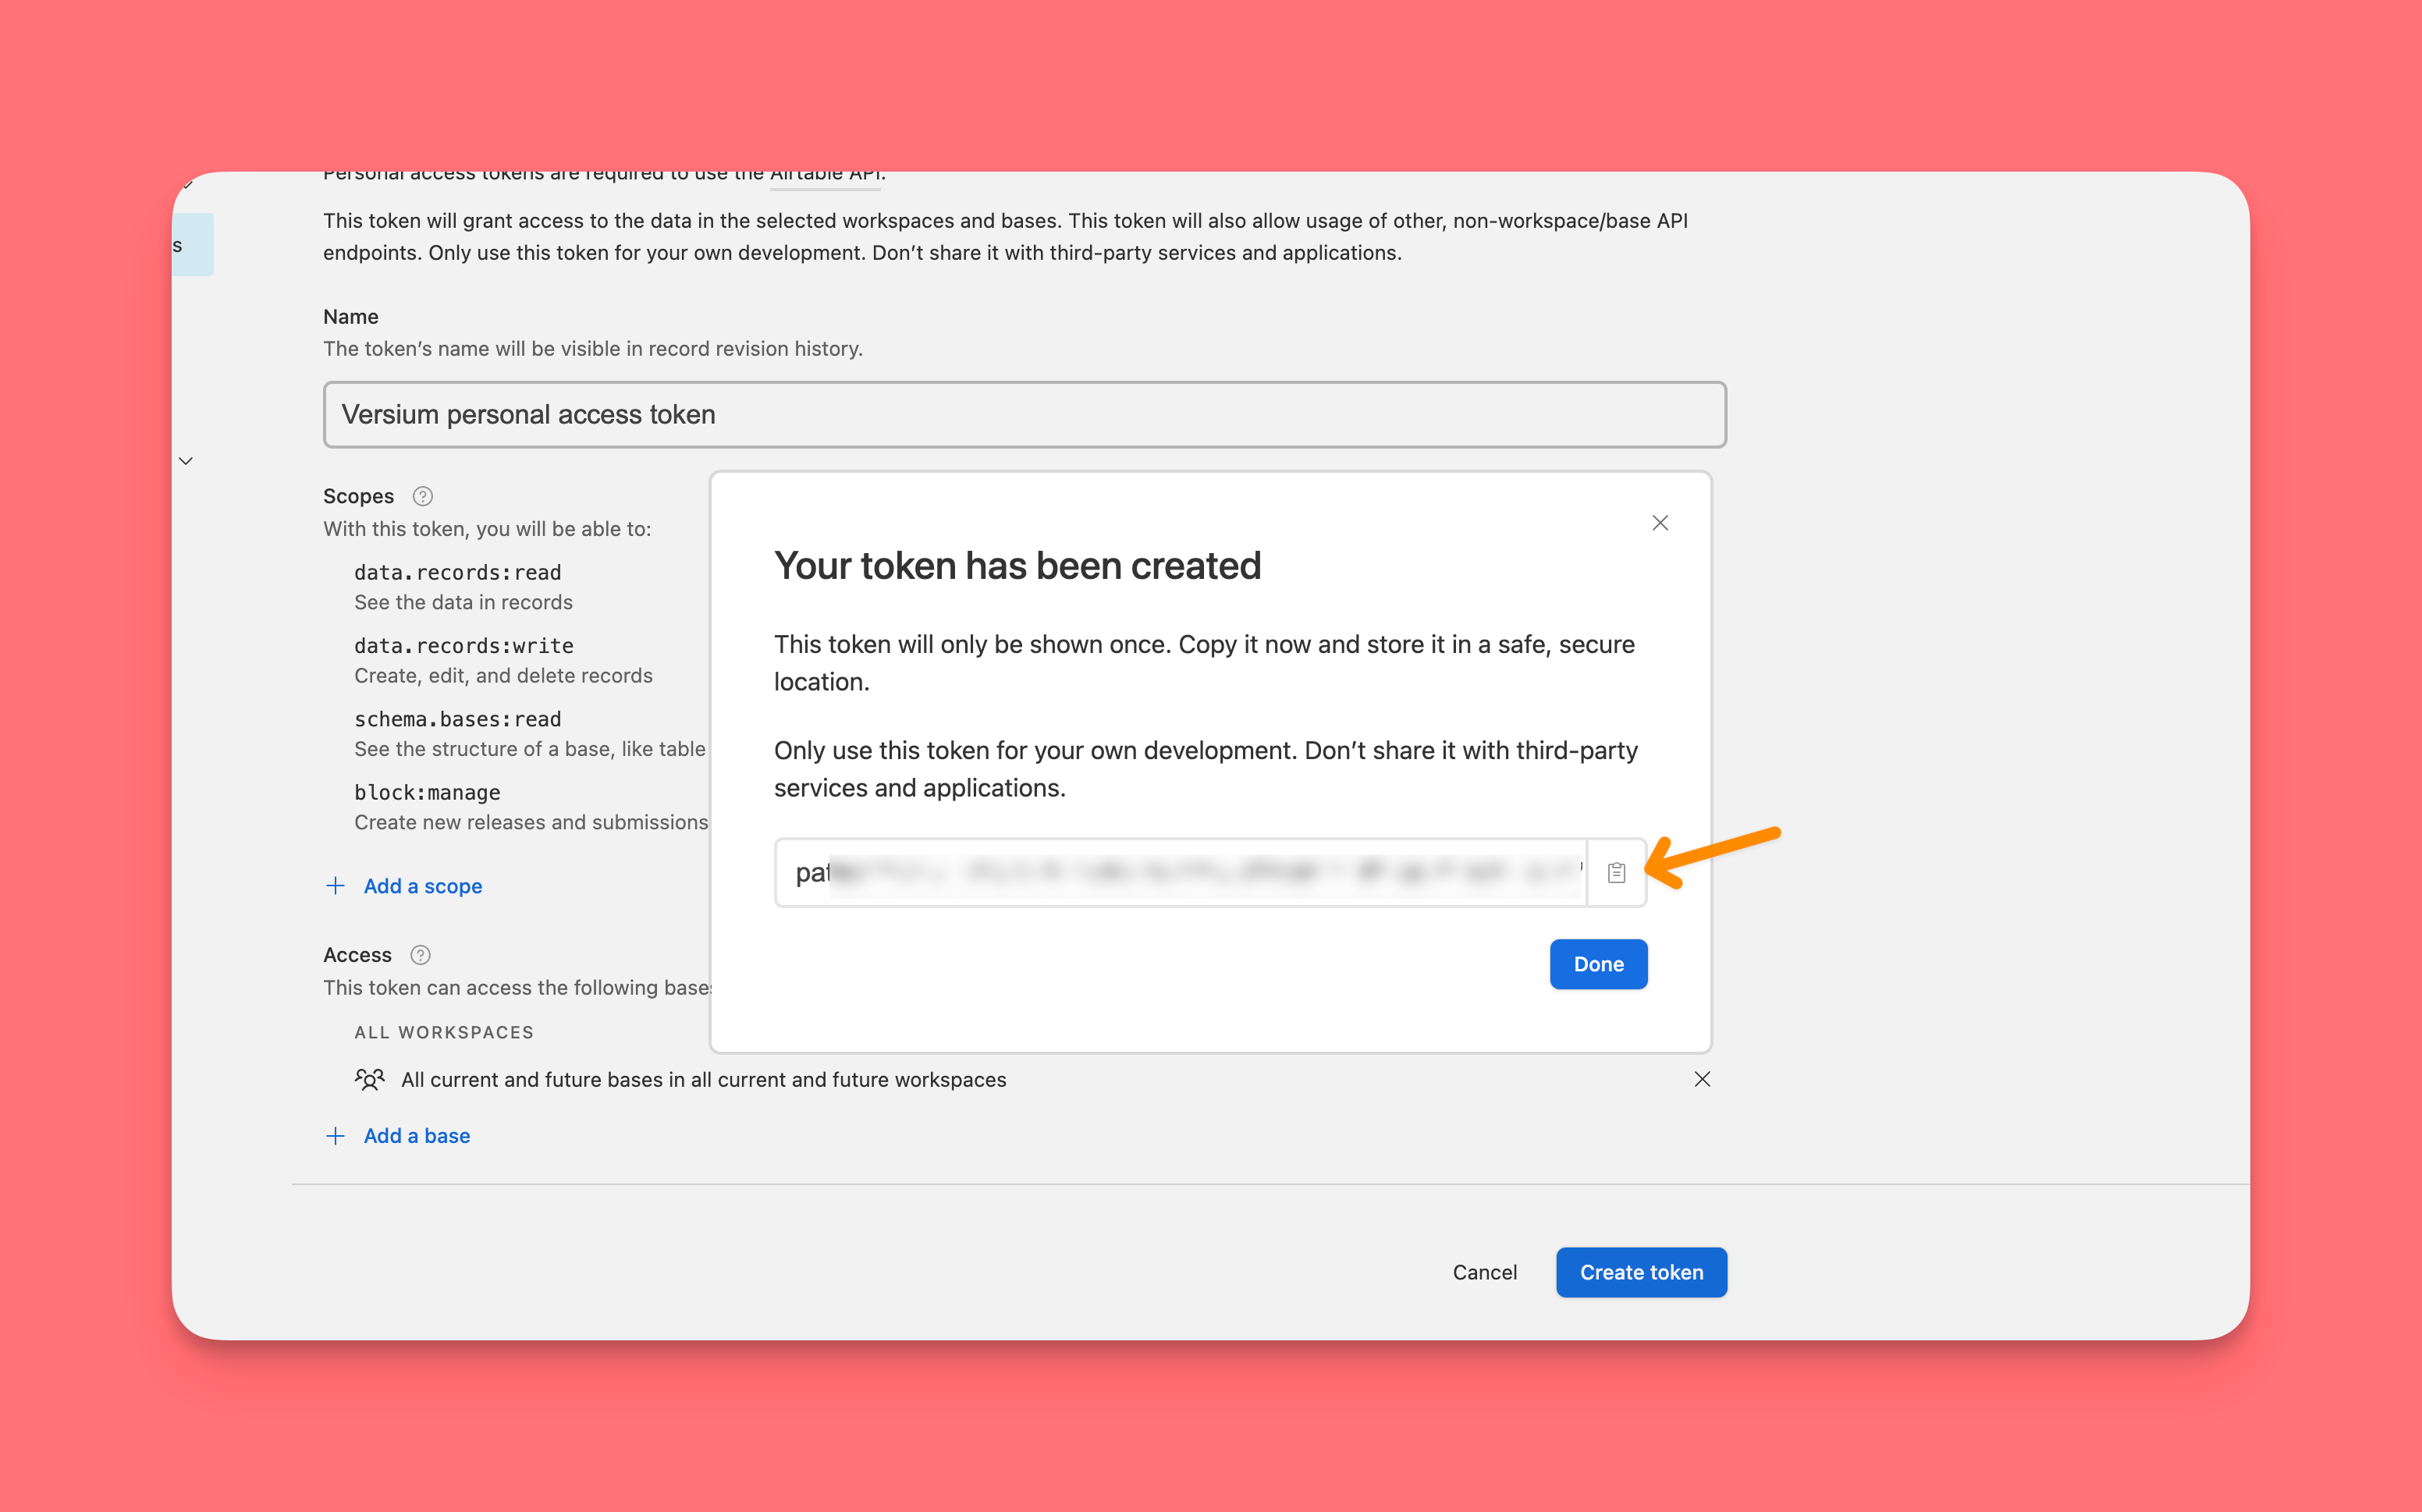
Next, create a personal access token here with scopes for data.records:read, data.records:write, schema.bases:read, and block:manage. You can choose to allow access to just one base or all bases.
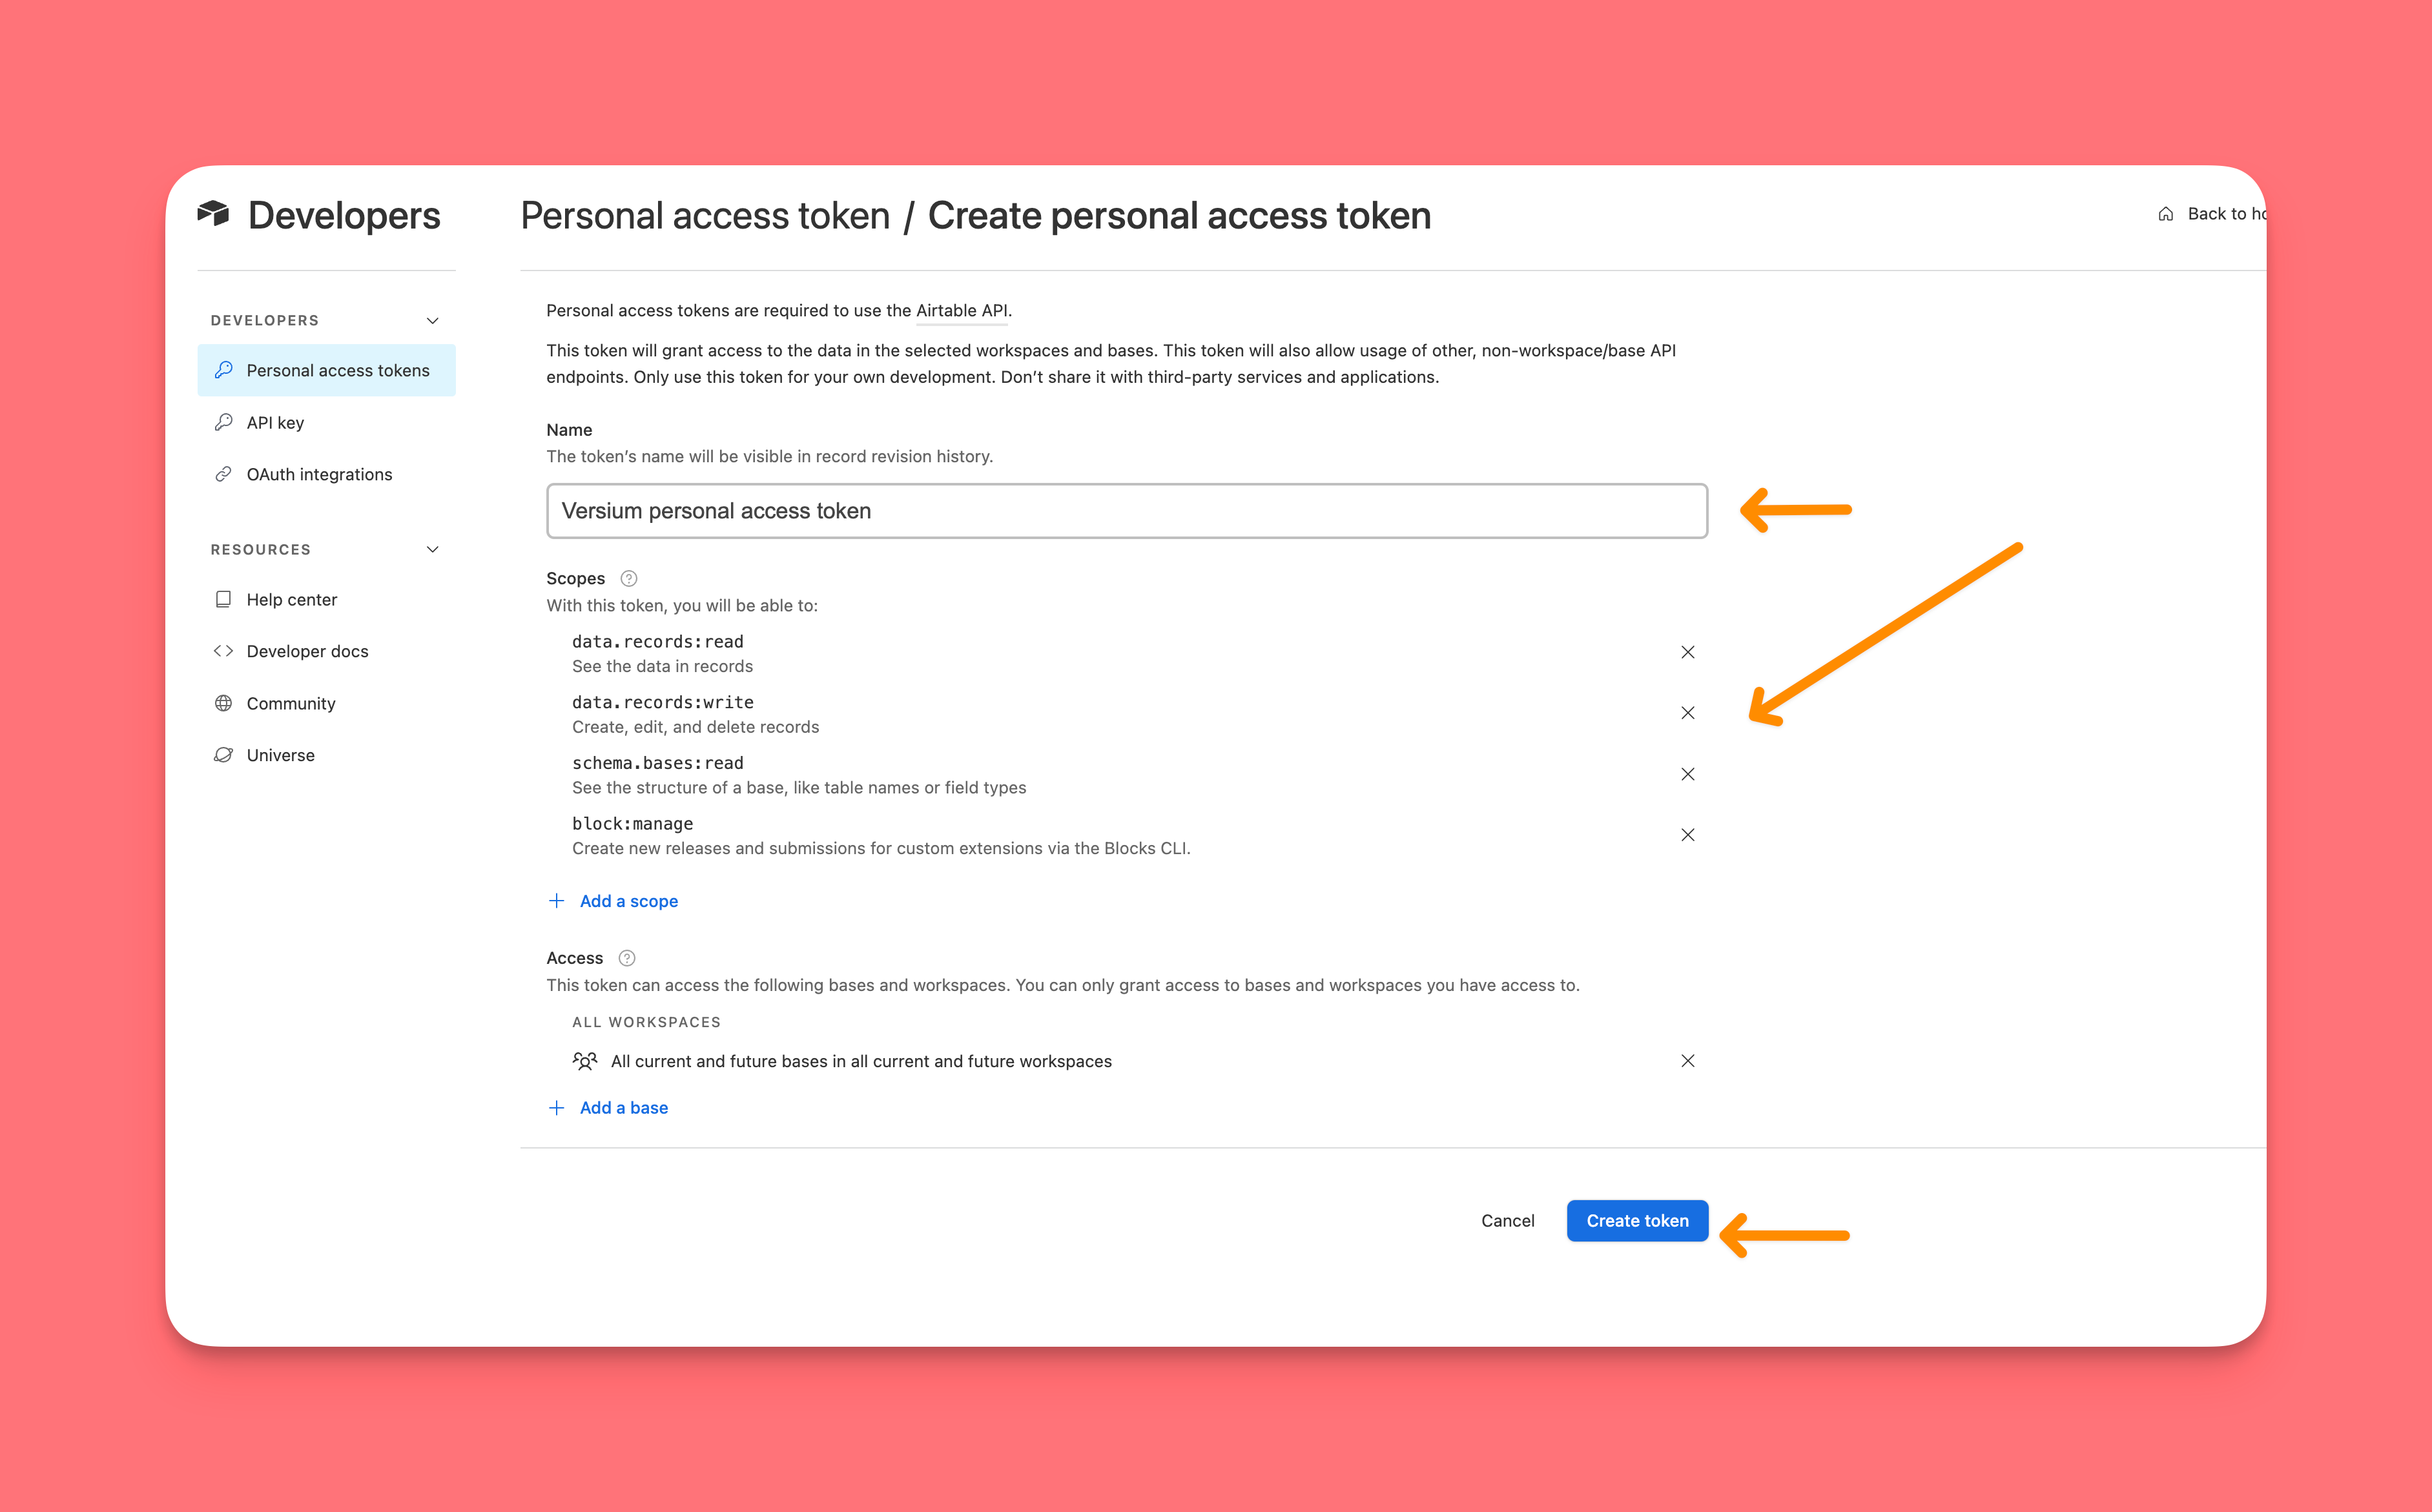
Save your token for later use.
Then follow the commands to set up your base. If you previously added an API key, make sure to reset it using
block set-api-key.
block set-api-key <api key>
Finally, enter your extension URL, typically
http://localhost:9000/.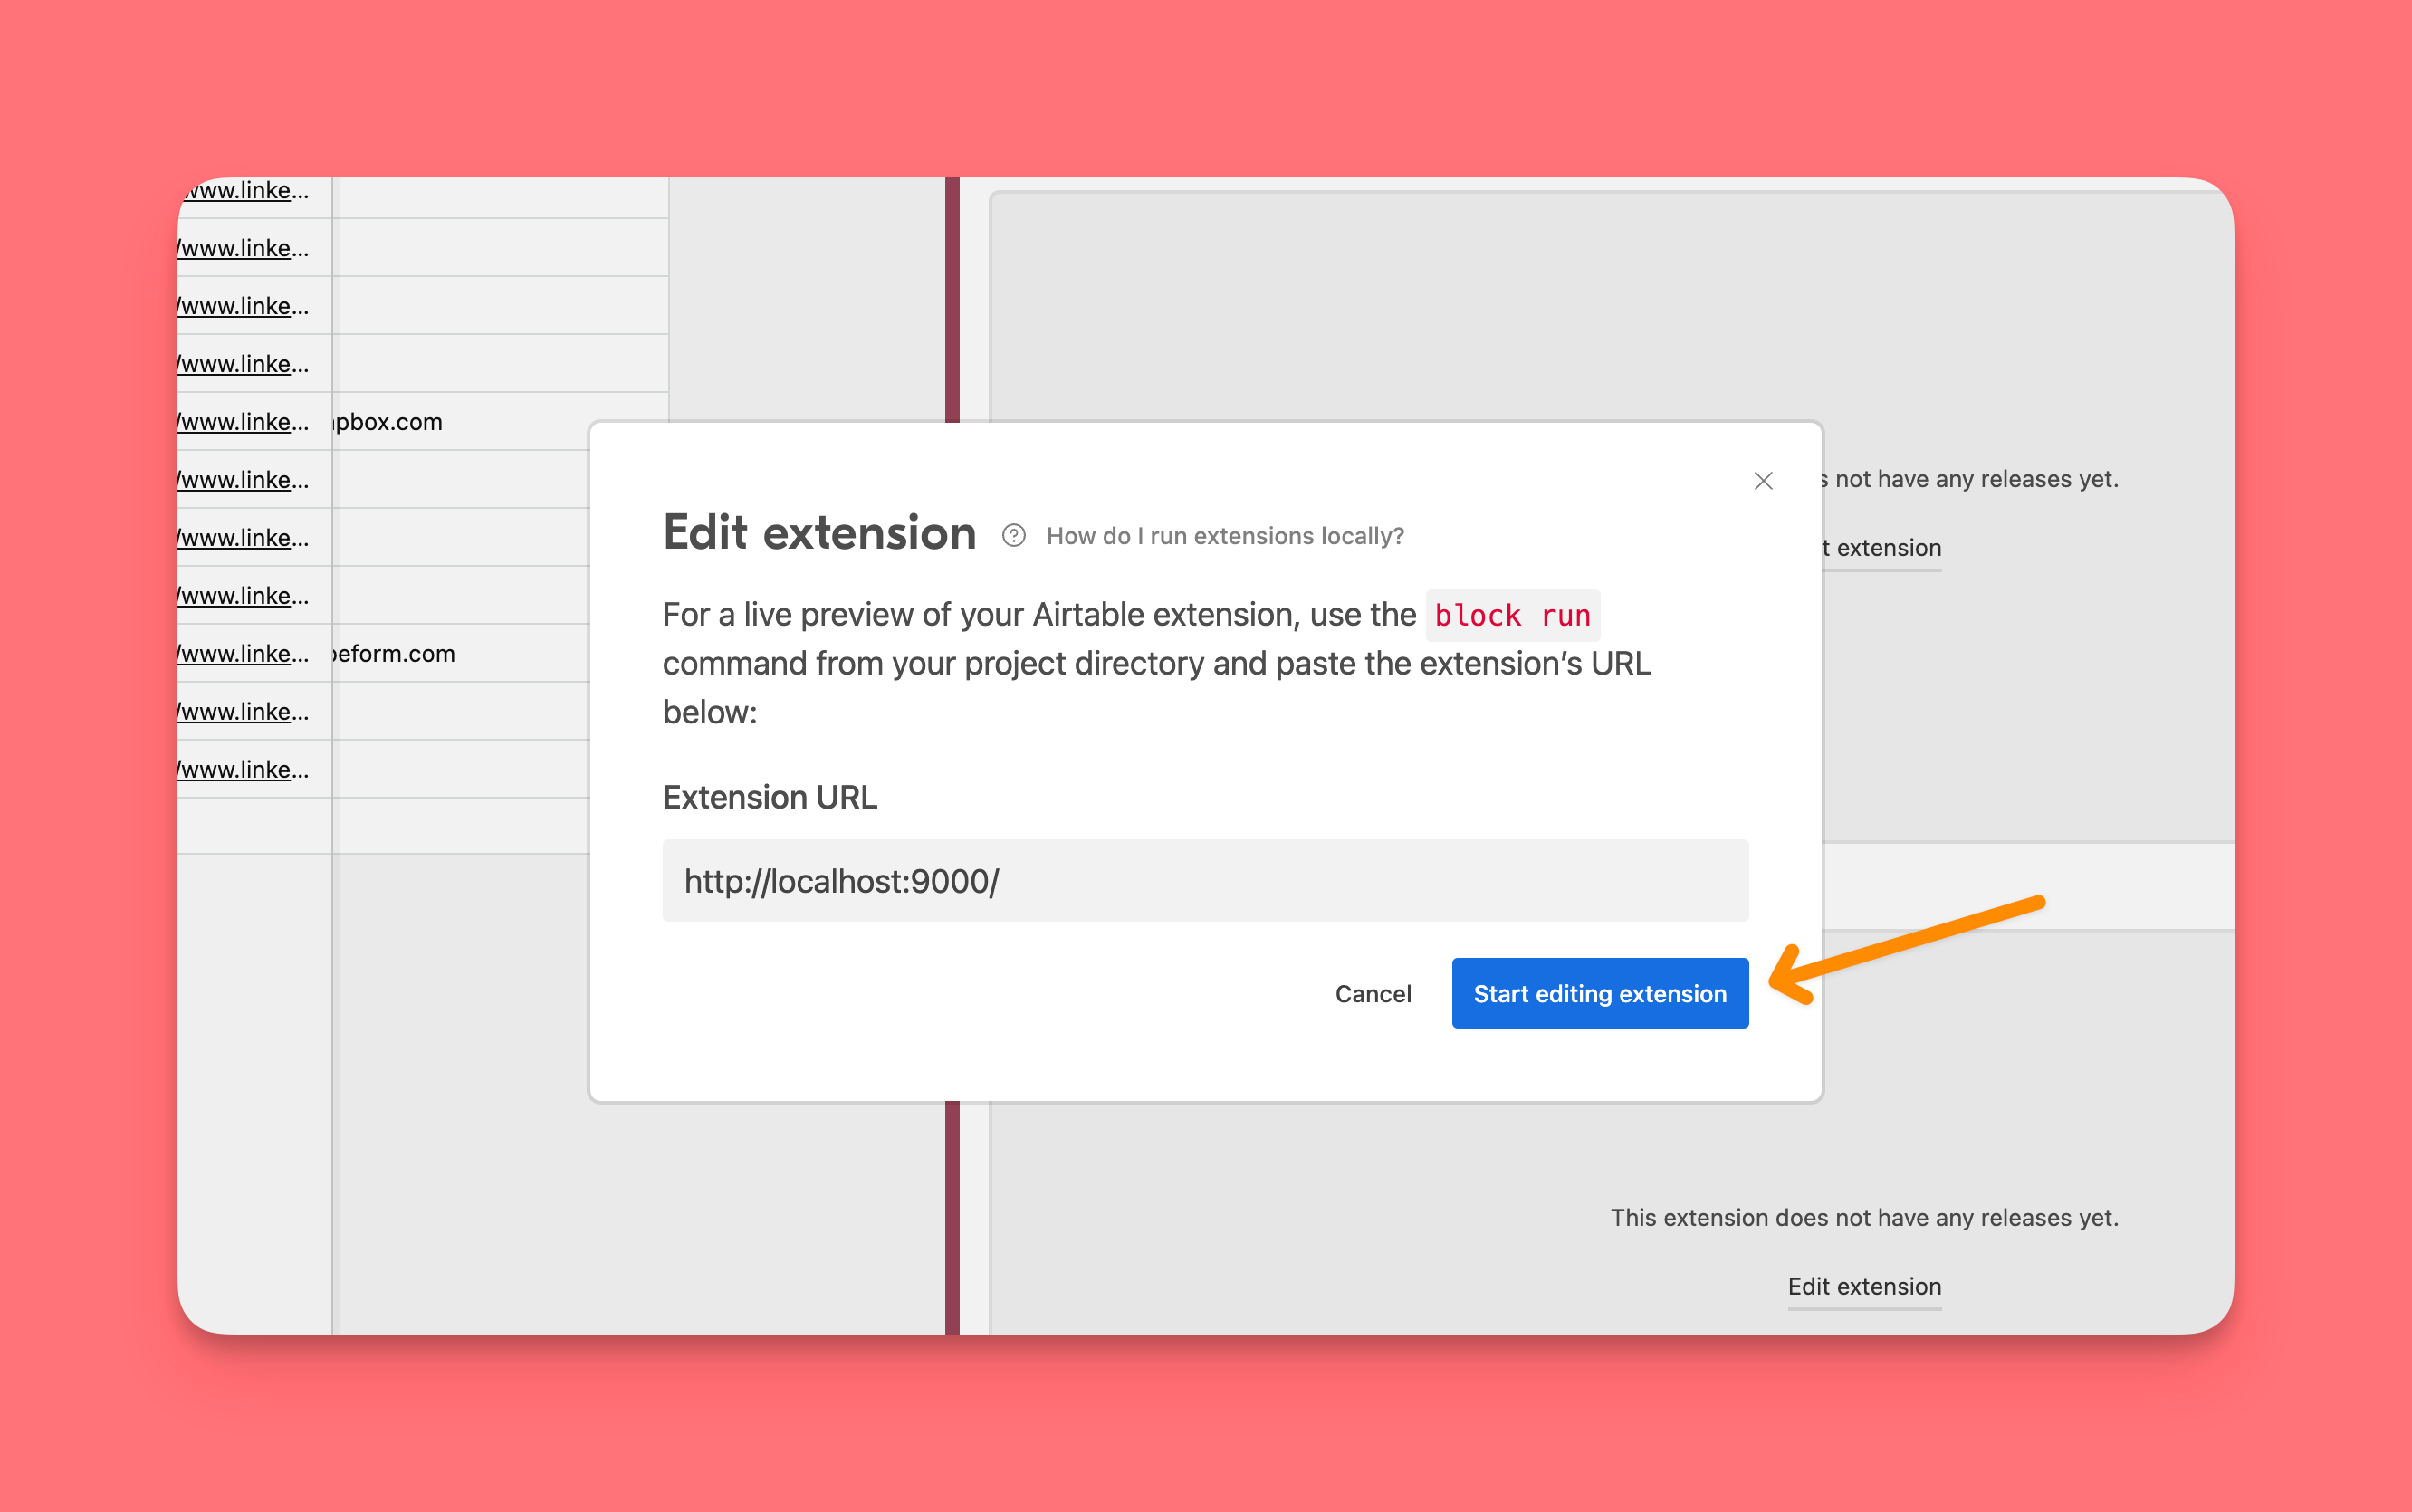
You've now set up your extension! In the next section, you'll start using Airtable’s Blocks SDK.
2. Set up the onboarding screen
Start by creating a new file named
onboardingScreen.js in the frontend folder of your project. This file is essential for setting up initial interactions needed to configure API keys and integrate tables and records with Versium’s API.Import necessary modules
Import necessary modules from Airtable blocks and React to create UI elements, manage state, and render components. To keep the onboarding file organized, move the UI components into separate files and import them as needed. You can access these components here.
import {
  Box,
  Button,
  Loader,
  useGlobalConfig,
  useBase,
} from "@airtable/blocks/ui";
import { APIKeyInput, CustomDialog, SettingsComponent } from "./components";
import React, { useState } from "react";
Set up state management
Define a new function called
OnboardingScreen . Initialize the internal state by leveraging React’suseState hook. The state holds API keys, table selections, permissions, loading statuses, and error messages.
Populate the extension with any existing values from GlobalConfig , a key-value store to persist configuration options for the extension installation. When users complete onboarding, you will store variables in GlobalConfig, which we will highlight later. See full state management code here.function OnboardingScreen() {
// Initialize state with configuration values
const base = useBase();
const globalConfig = useGlobalConfig();
const tableId = globalConfig.get("Table");
const table = base.getTableByIdIfExists(tableId);
const initialState = {
apiKey: globalConfig.get("API Key") || "",
isLoading: false,
error: "",
selectedTable: table,
// other initial state variables
};
const [state, setState] = useState(initialState);
//rest of code
return (
<Box>
{/* Render your UI components here based on the state */}
</Box>
);
}Check Permissions
Only base owners and editors can change settings in extensions, so you need to check user permissions before allowing users to make any changes. View the full code for checking permissions here.
async function checkGlobalConfigPermissions() {
  const setUnknownKeyCheckResult = globalConfig.checkPermissionsForSet();
  if (!setUnknownKeyCheckResult.hasPermission) {
    updateState({
      error: setUnknownKeyCheckResult.reasonDisplayString,
    });
    return false;
  }
  return true;
}
Validate the API Key
Write a function to validate the API Key against Versium’s contacts endpoint to ensure it is valid before saving it to the global configuration. The function checks for errors related to invalid API keys before saving the key. View the API key validation implementation here.
// Validate API Key against Versium's contact endpoint
const testUrl = "https://api.versium.com/v2/contact";

try {
  const response = await fetch(testUrl, {
    method: "GET",
    headers: { "x-versium-api-key": apiKey },
  });
  // Set apiKey
  await globalConfig.setAsync("API Key", apiKey);
} catch (err) {
  // Handle error
}
Render the UI
Update UI components dynamically based on the current state. You’ll show different components for each onboarding step. View the competed code for the UI.
return (
  <Box display="flex" flexDirection="column" padding={3}>
    {(currentStep === 0 || !apiKey) && (
      // Render API Key input
    )}
    {currentStep === 1 && (
      // Render API Key input
      // Render SettingsComponent
    )}
    {error && (
      // Render error dialog
    )}
    {isLoading && (
      // Render loader
    )}
  </Box>
);
Save user settings
Store the user’s selection for the Table, View, input fields and output fields inside Global config. View the complete code for saving configurations here.
await globalConfig.setPathsAsync([
  { path: ["Table"], value: selectedTable.id },
  { path: ["View"], value: selectedView.id },
  { path: ["LinkedIn"], value: selectedLinkedin.id },
  { path: ["fieldMappings", "firstName"], value: selectedFirstName.id },
  { path: ["fieldMappings", "lastName"], value: selectedLastName.id },
  { path: ["fieldMappings", "email"], value: selectedEmail.id },
  { path: ["fieldMappings", "title"], value: selectedTitle.id },
  { path: ["fieldMappings", "business"], value: selectedBusiness.id },
  { path: ["fieldMappings", "domain"], value: selectedDomain.id },
]);
Onboarding is complete! You can see the full
onboardingScreen.js implementation here.3. Implement API integration and Data handling
Go to the
index.js file in your frontend folder. Here, you'll set up the code to enrich records with data from Versium's API.Import required modules
Start by importing necessary modules to create UI elements, manage state, and render components. View the full code for this section here.
import {
  initializeBlock,
  useBase,
  useRecords,
  Loader,
  Button,
  Box,
  Text,
  Heading,
  useGlobalConfig,
} from "@airtable/blocks/ui";
import React, { Fragment, useState } from "react";
import OnboardingScreen from "./OnboardingScreen";
import { CustomDialog } from "./components";
Manage state
Handle your app's data flow and UI states in a new function called VersiumEnrichment(). Load API keys and table settings from Airtable's global config to use with Versium’s API. If necessary settings aren’t present in the onboardingScreen, guide the user back to onboarding. View the full code for this section here.
function VersiumEnrichment() {
  const base = useBase();
  const globalConfig = useGlobalConfig();
  const [isUpdateInProgress, setIsUpdateInProgress] = useState(false);
  const [isDialogOpen, setIsDialogOpen] = useState(false);

  const apiKey = globalConfig.get("API Key");
  const tableId = globalConfig.get("Table");
  // Additional configurations loaded here...
}
Check user permissions
Check if the user has the necessary permissions to update records.
 const permissionCheck = table.checkPermissionsForUpdateRecord(undefined, {
    [FIRST_NAME_OUTPUT_FIELD_NAME]: undefined,
    [LAST_NAME_OUTPUT_FIELD_NAME]: undefined,
    [EMAIL_OUTPUT_FIELD_NAME]: undefined,
    [TITLE_OUTPUT_FIELD_NAME]: undefined,
    [BUSINESS_OUTPUT_FIELD_NAME]: undefined,
    [COMPANY_DOMAIN_FIELD_NAME]: undefined,
  });
When you render the UI if permissions are lacking, you will show an appropriate message; otherwise, allow them to proceed with enriching records.
  {!permissionCheck.hasPermission && (
            <p style={{ color: "red", marginTop: "10px", textAlign: "center" }}>
              {permissionCheck.reasonDisplayString}
            </p>
          )}
Enrich records
Set up a function to update records when a button is clicked. View the complete code for this section here.
async function onButtonClick() {
  setIsUpdateInProgress(true);
  const recordUpdates = await getEnrichment(apiKey, records);
  await updateRecordsInBatchesAsync(table, recordUpdates);
  setIsUpdateInProgress(false);
  setIsDialogOpen(true);
}
Render UI
Show buttons to start record enrichment and handle dialogs. Indicate progress with a loader. View the complete code for this section here.
return (
  <Box display="flex" flexDirection="column" justifyContent="center" padding={3}>
    <Heading>Enrich Records in {tableName}</Heading>
    {isUpdateInProgress ? (
      <Loader />
    ) : (
      <Fragment>
        <Button onClick={onButtonClick} disabled={!permissionCheck.hasPermission}>
          Begin enrichment
        </Button>
        <Button onClick={() => setIsDialogOpen(false)}>Close</Button>
      </Fragment>
    )}
  </Box>
);
The extension is finished! Now you’re ready to test it out.
4. Test the extension
To test the extension, open your terminal and run the following command:
block run
Navigate to the extension interface, click
Edit extension, enter the extension URL (usually https://localhost:9000), select Start editing extension, complete the onboarding steps, then proceed to run the enrichment.
Congratulations, you did it!
To release the extension for use in your Airtable base, run:
block release
Please note that a Pro plan is required to use the extension outside of development mode.
Conclusion
That's a wrap! In this article, you learned how to create an Airtable extension using Versium's API for data enrichment. But why stop there? Consider taking your project to the next level by:
- Adding more endpoints from Versium’s APIs to handle different types of enrichment.
- Enhancing the UI to allow selection of specific records.
- Implementing features for larger bases to selectively enrich records.
Are you working on an Airtable extension? Have questions or ideas for expanding your project? I'd love to hear about it! Reach out to me at hello@lunchpaillabs.com and let's chat further.
.png?table=block&id=9ba33ac6-8e12-48f6-b980-4333b612ec56&cache=v2)
.png?table=block&id=3cf3a16e-b2ed-4e99-acfb-c0fd77d633d0&cache=v2)