.png?table=block&id=b31033e3-c374-4954-8f8c-5d275689d853&cache=v2)
Do not index
A/B testing is crucial for making data-driven improvements to your product. While it's complex to execute from scratch, tools like PostHog simplifies the process. Pair that with Bubble, a no-code platform for building SaaS applications, and you've got a powerful combination for both creating and optimizing your product. Today's tutorial will guide you through developing a custom Bubble plugin for A/B testing with PostHog. You have the flexibility to keep it private or further modify and extend it and make it available to the entire Bubble community.
What we’ll build
In this tutorial, we'll use PostHog's Node SDK to create server-side actions in Bubble. Our custom plugin will enable you (or your users if you decide to share this) to:
- Integrate your project's API key.
- Identify the user variant assigned by PostHog for UI adjustments in Bubble.
- Record goal-related events for PostHog's analytics and significance calculations.
Prerequisites
To follow this tutorial, you'll need:
- A PostHog experiment
- A Bubble app you'd like to A/B test
Basic familiarity with JavaScript and Bubble's plugin editor is useful for modifications. If you're just here for the step-by-step guide, tune in!
Building the plugin: step by step
Setting up the plugin
Log into Bubble and navigate to the 'Plugins' tab. Click on 'Create a Plugin’ and give our plugin a name.

You'll land on the 'General Settings' tab. Here, set your plugin's name, URL, and icons. Choose relevant categories for your plugin.
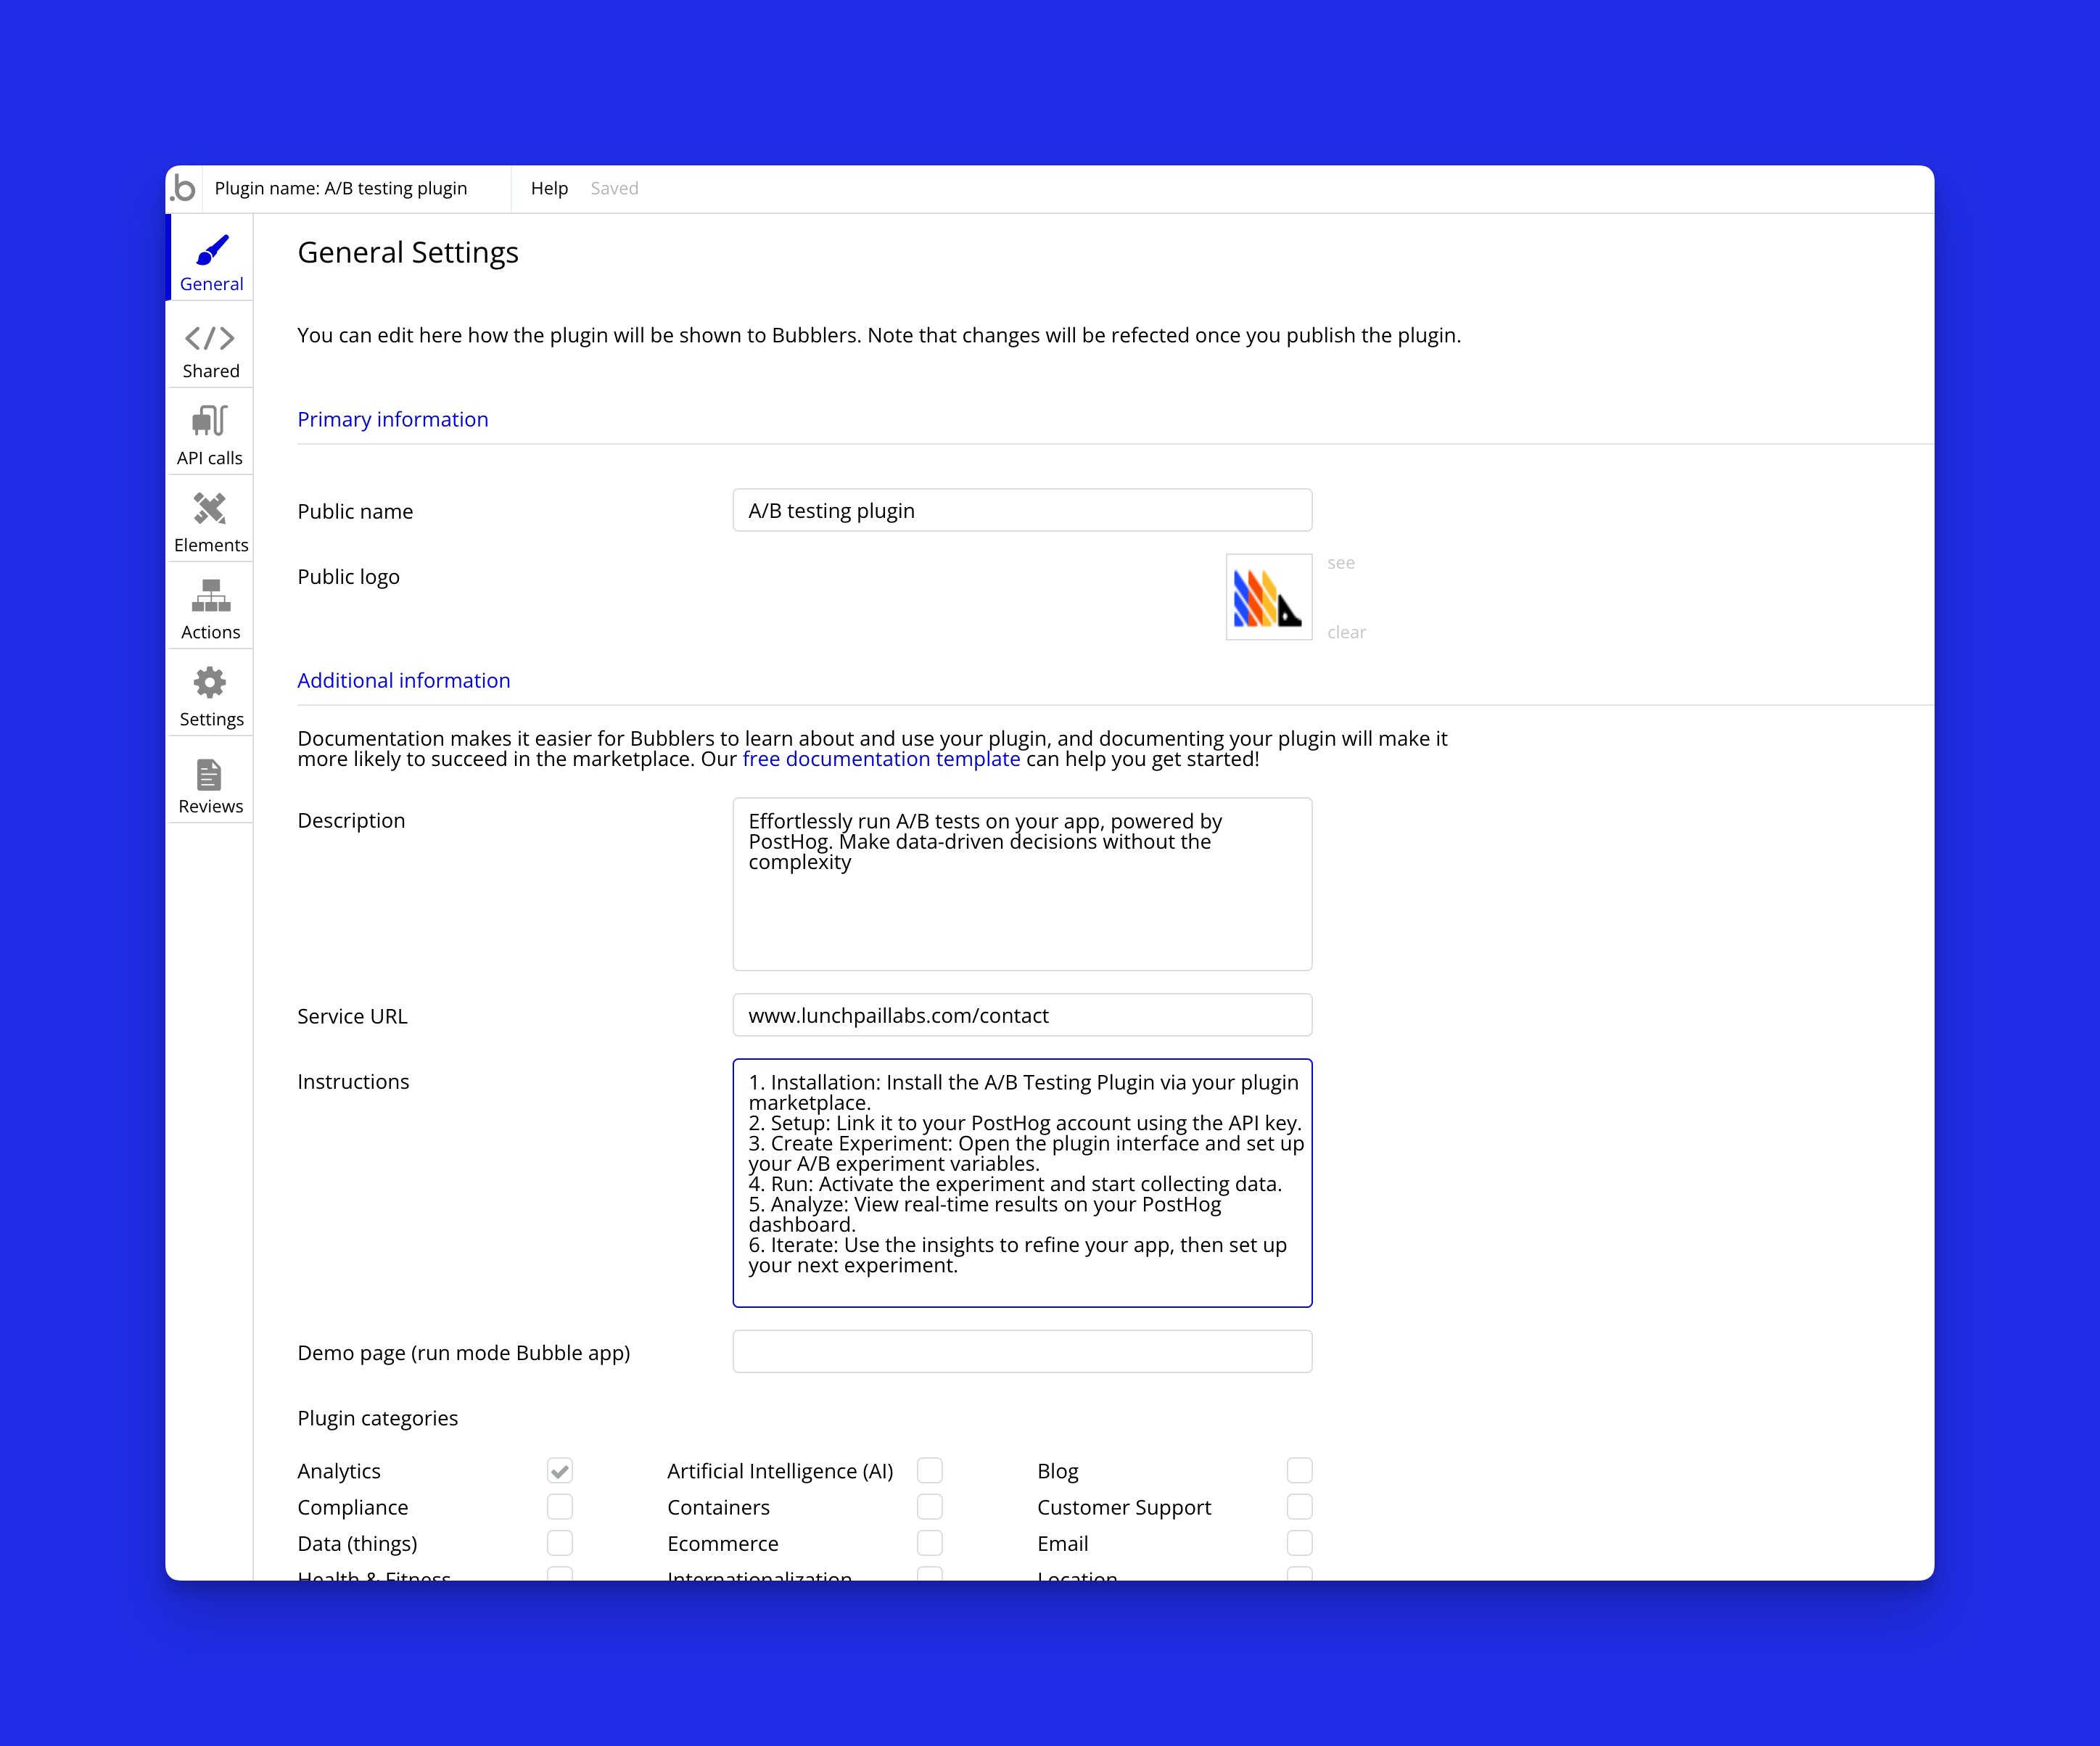
Move on to 'Shared Technical Settings.' We’re going to create a private key for our project's API key. This will appear in the plugins tab for users to input when installing.

Creating the capture event action
Setting up general settings and input fields
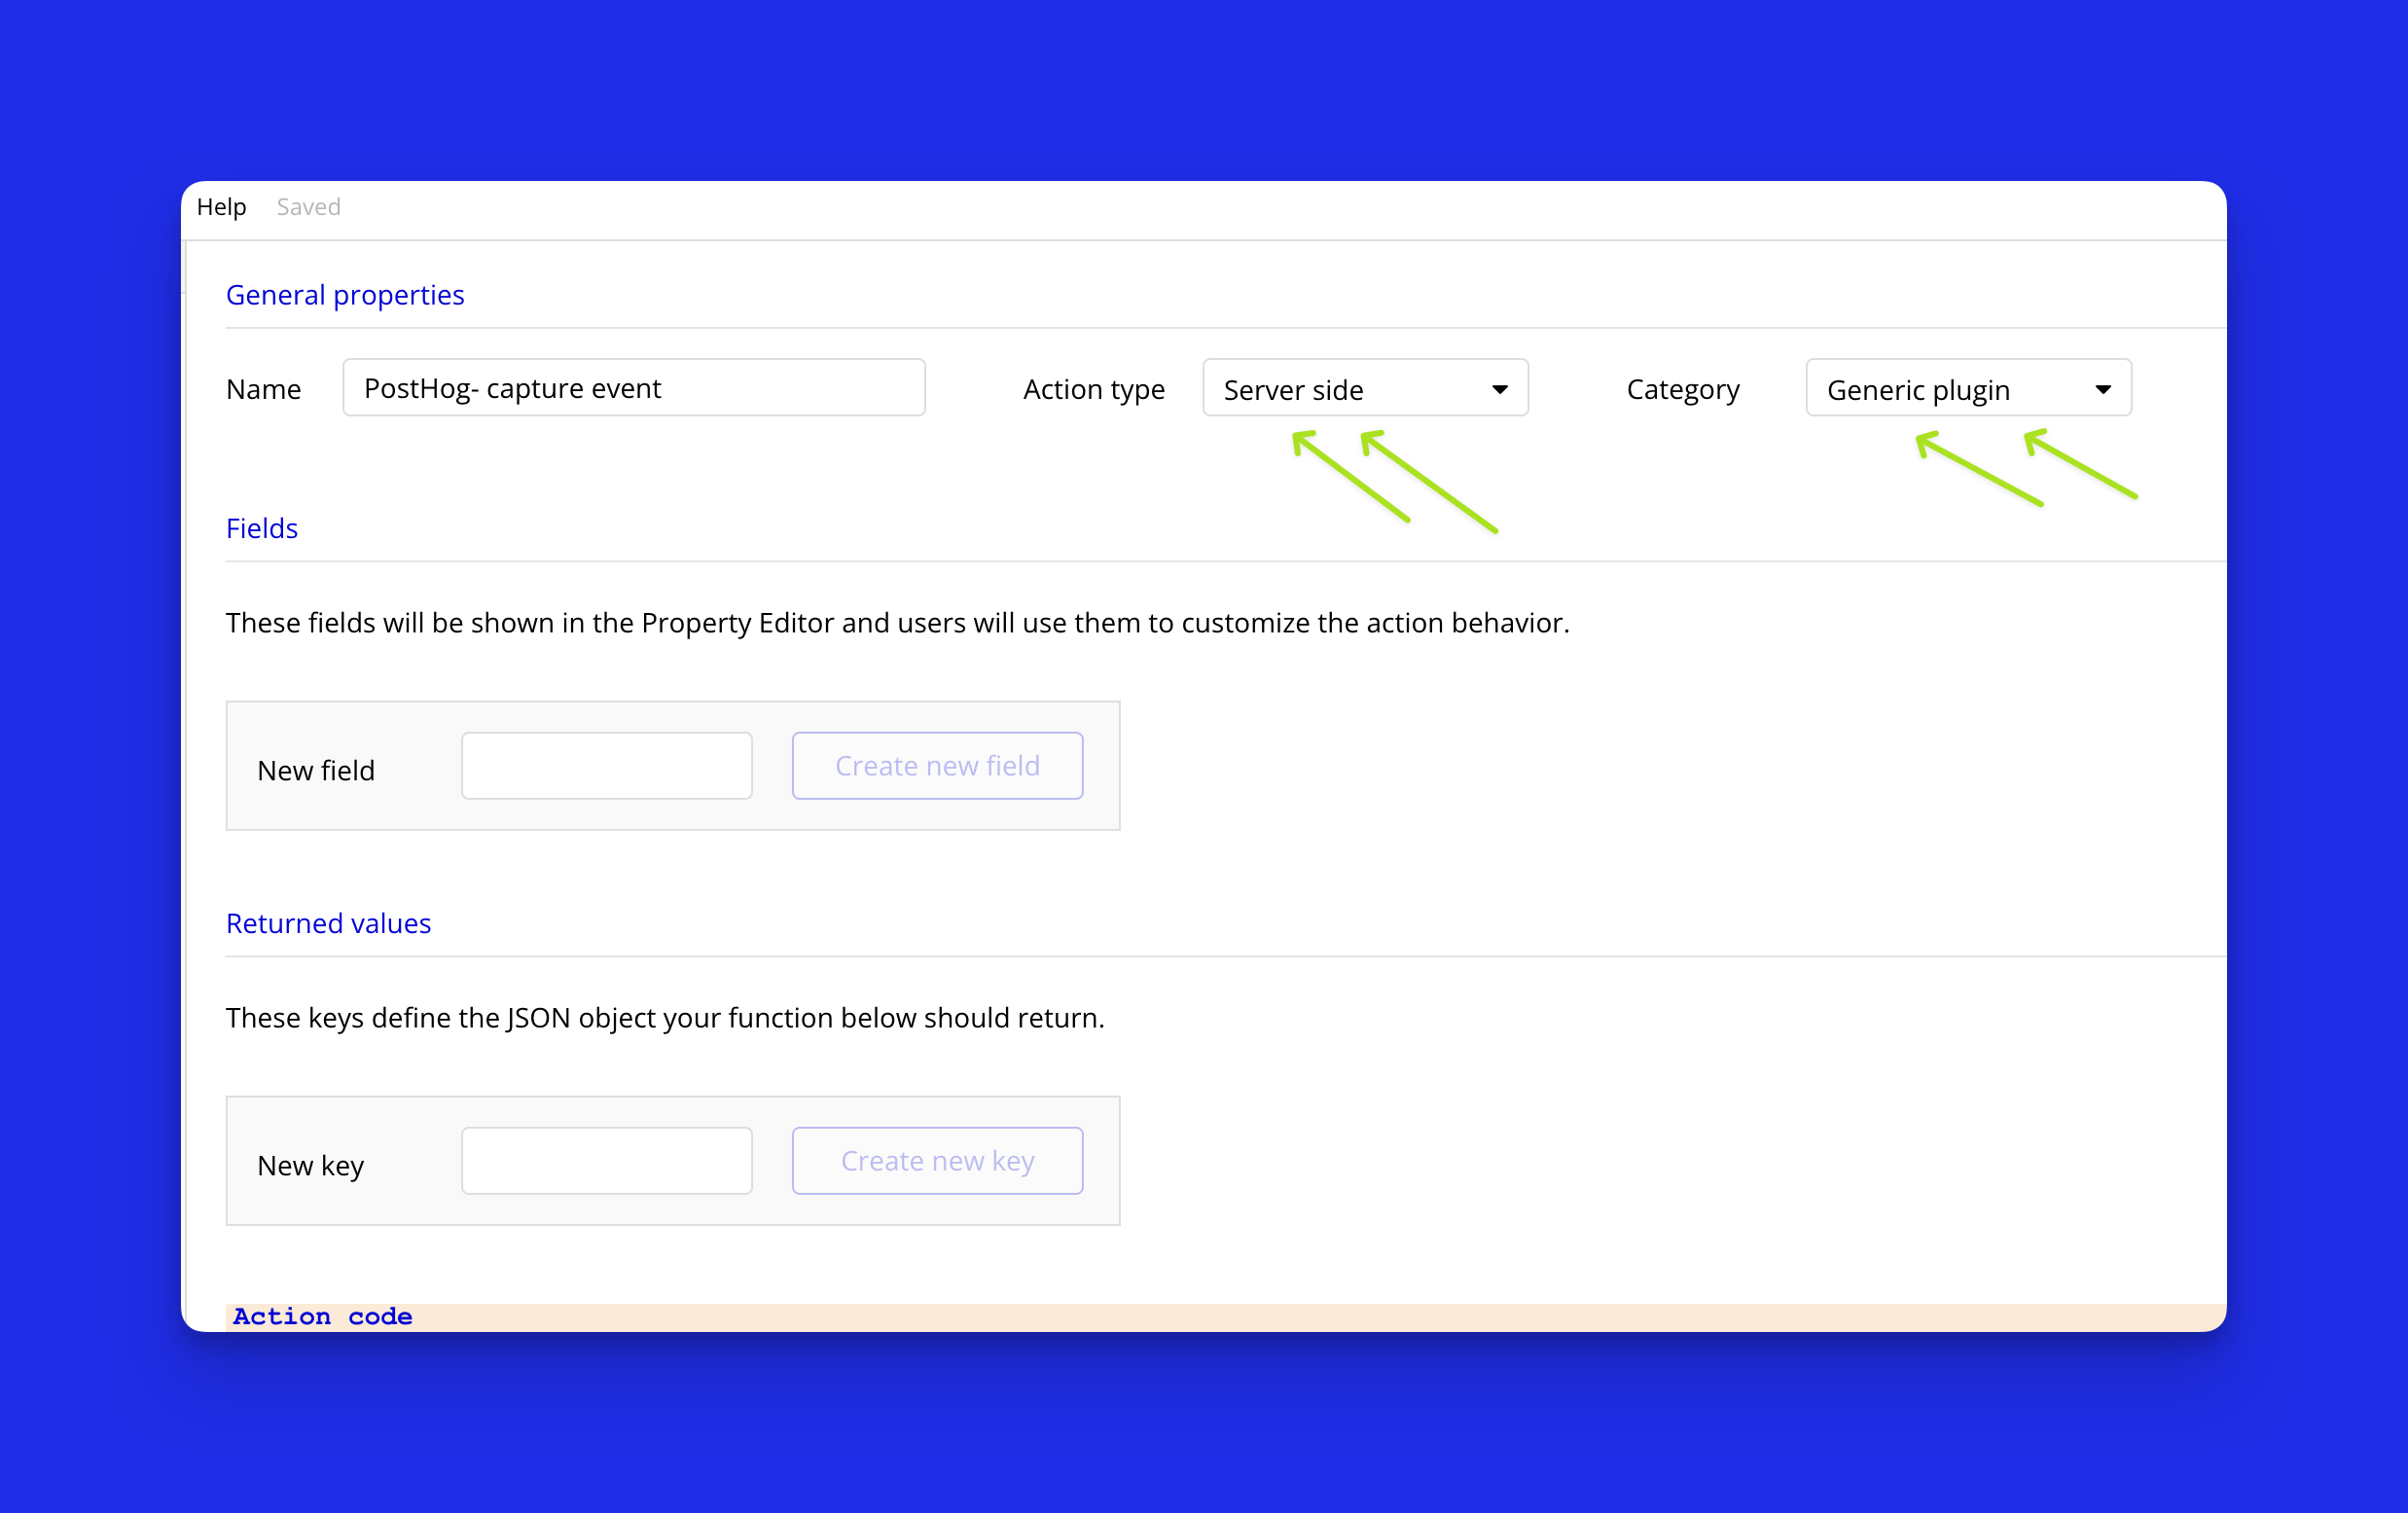
We’ll start by creating a new action, actions are available in the
workflows within our Bubble app. Navigate to the Actions tab and click "Add a New Action.” Name this action "PostHog- capture event"

Next set the Action type to "Server-side” since we’ll be using the node.js SDK and we’ll keep the category as a generic plugin.
Now it's time to define our input fields. Add the following text fields:
distinctId: Serves as the unique ID for the user.
event: Specify the name of the event you'll capture.
featureFlagKey: Taken from your experiment dashboard, this identifies which experiment variant the user is in.
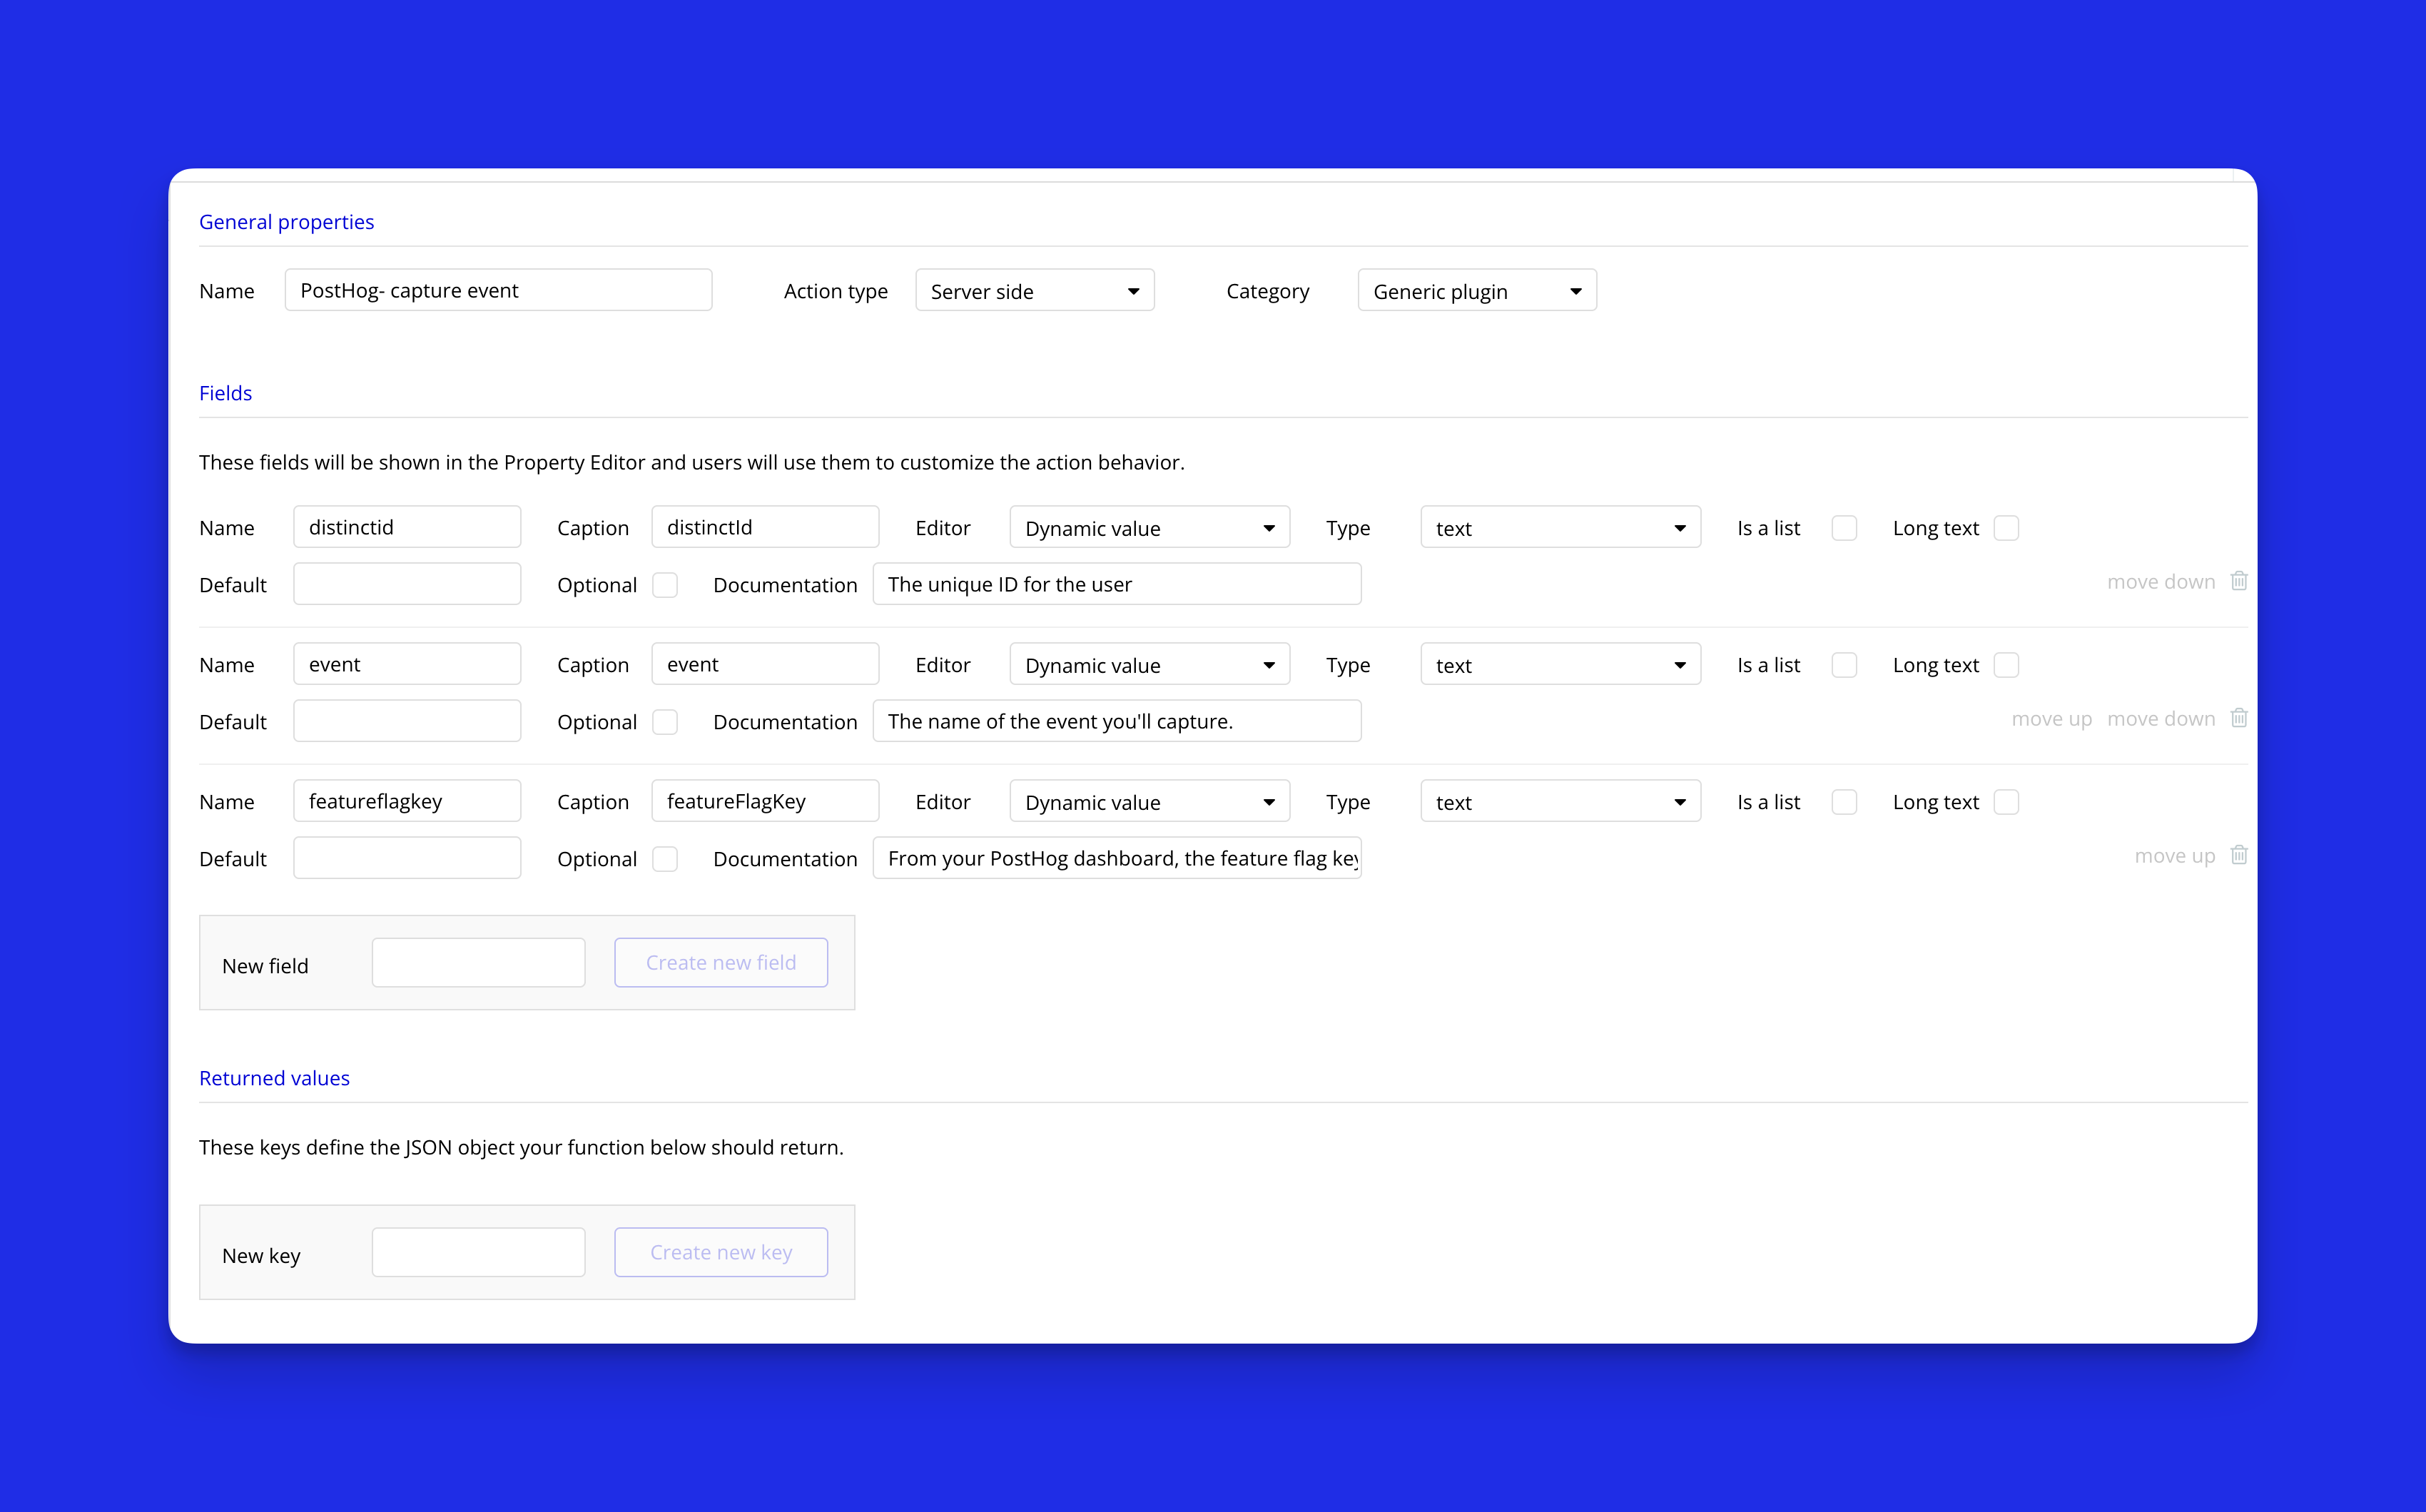
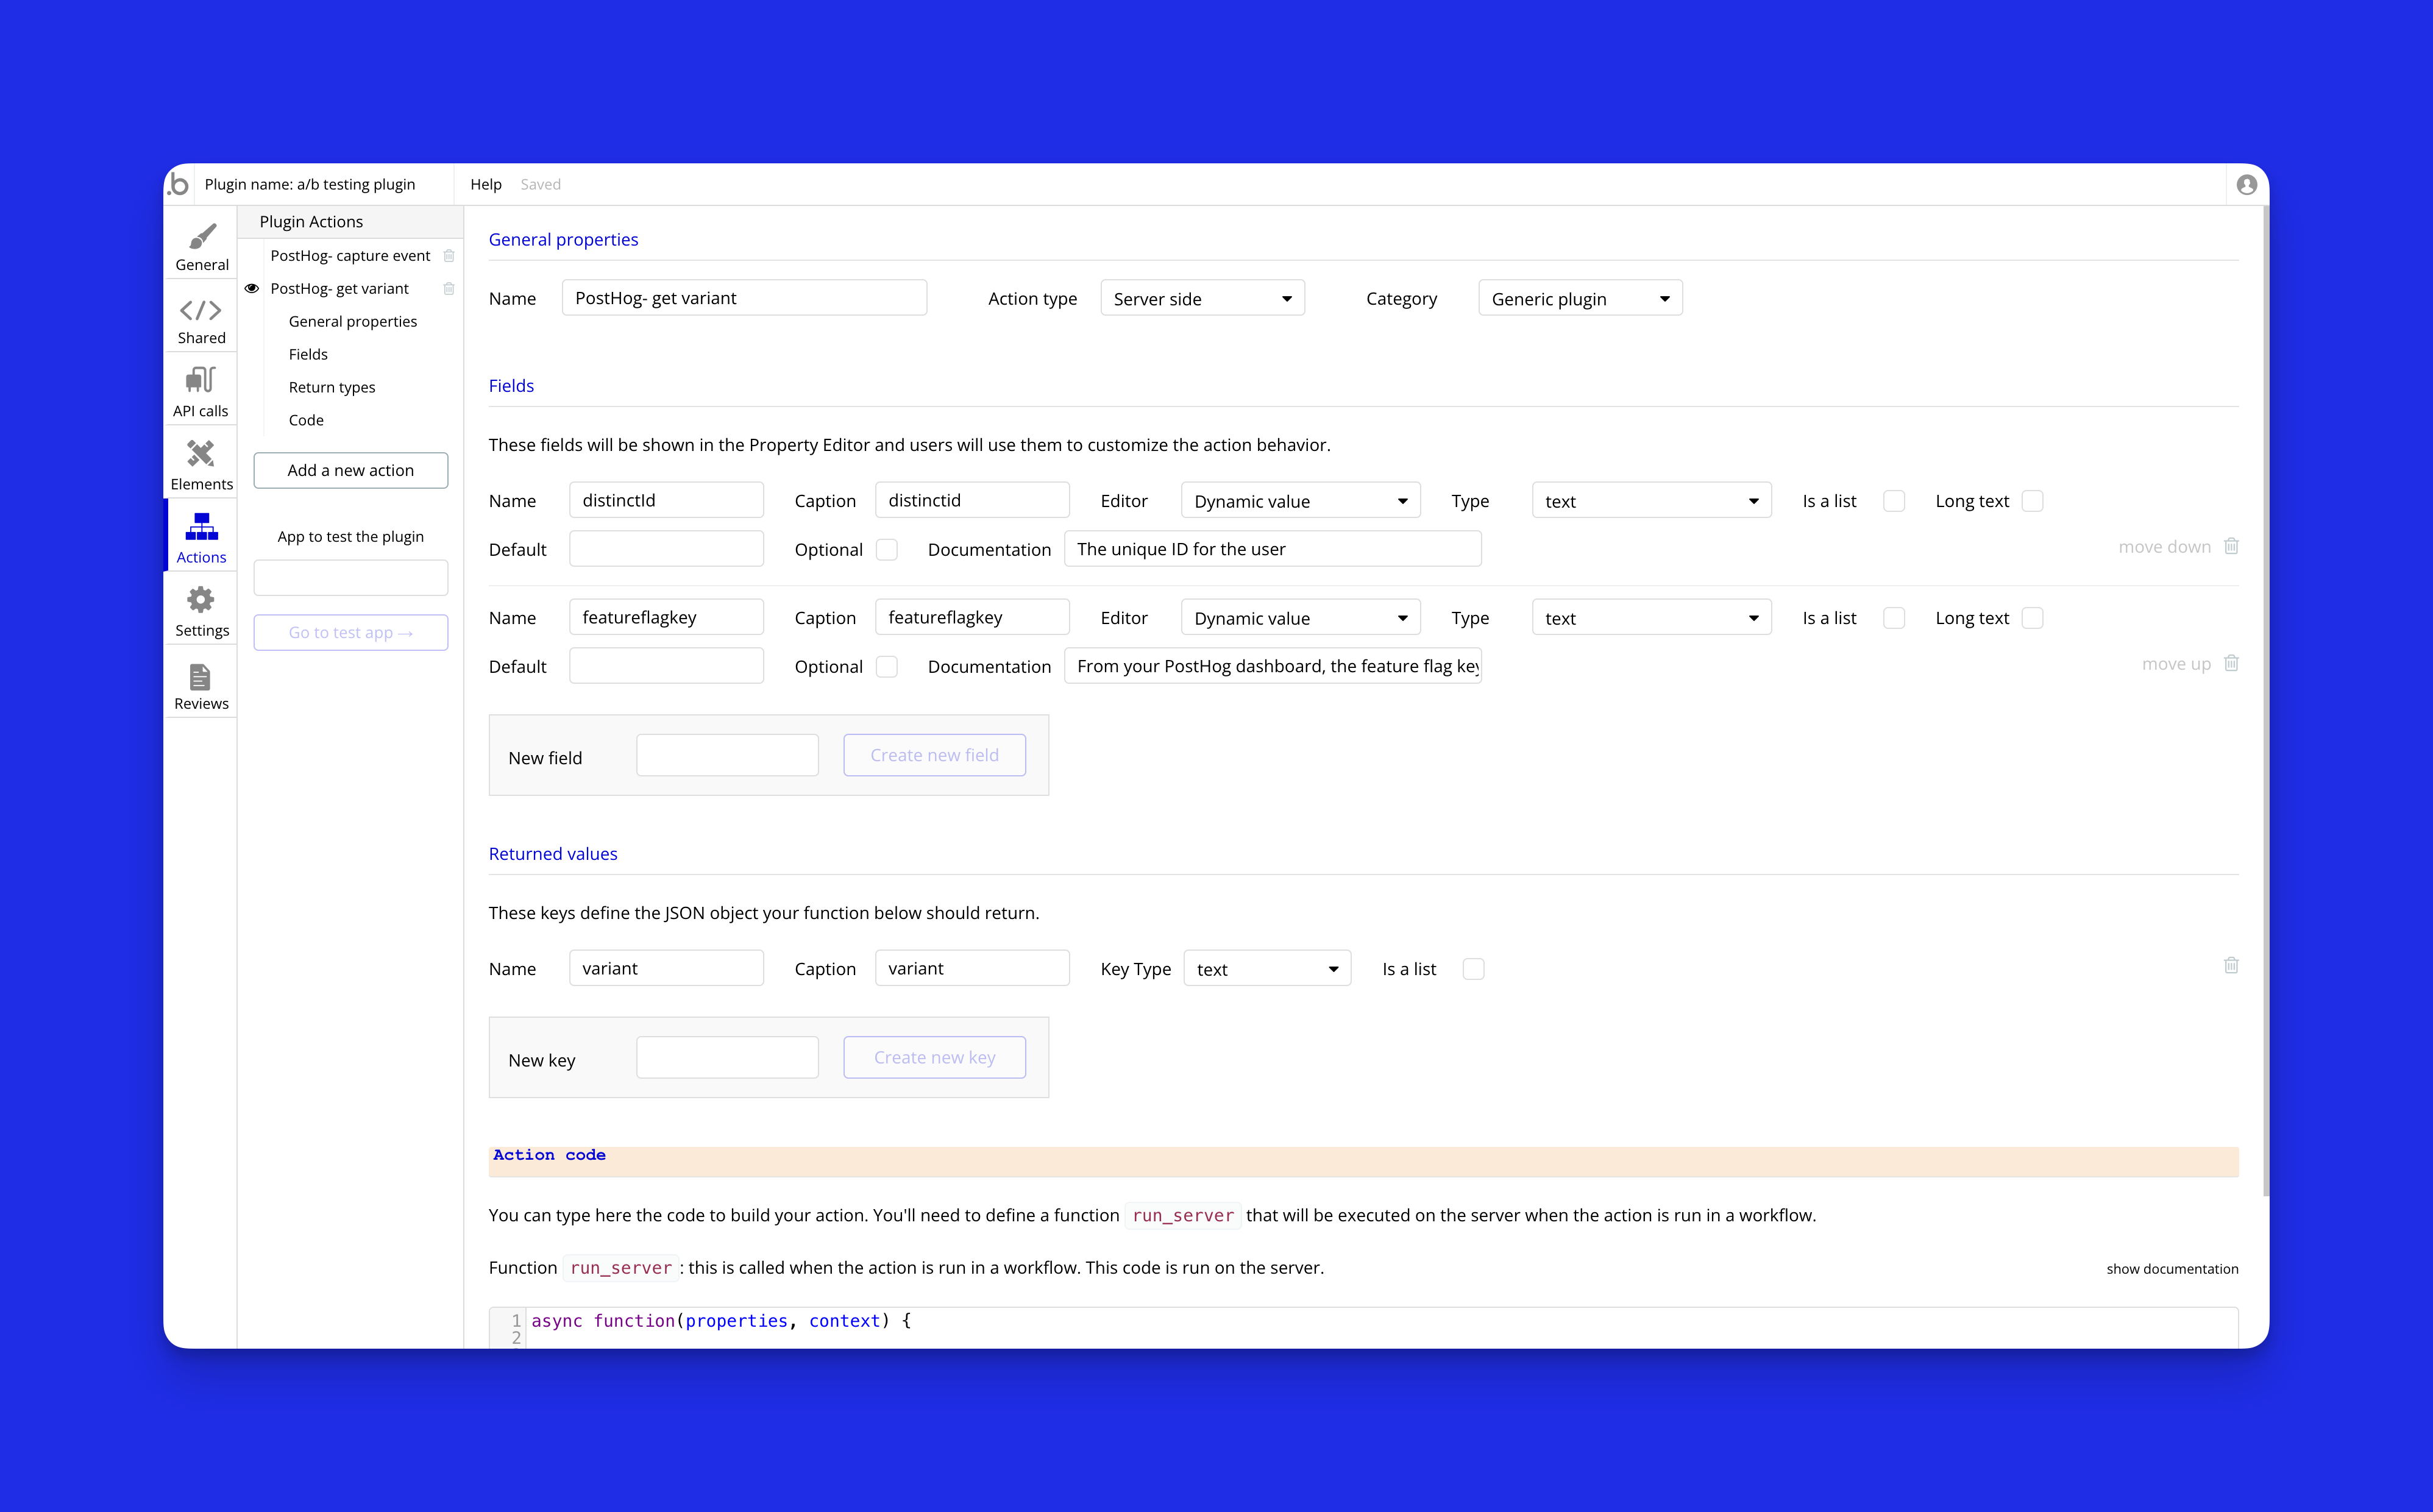
Finally, include a returned value:
variant: This will be returned by our action for use in other parts of your Bubble app.

Formatting the action and importing PostHog
Now we’ll dive into the action’s code, Bubble automatically provides a shell for an async function, which looks like this:
async function (properties, context){
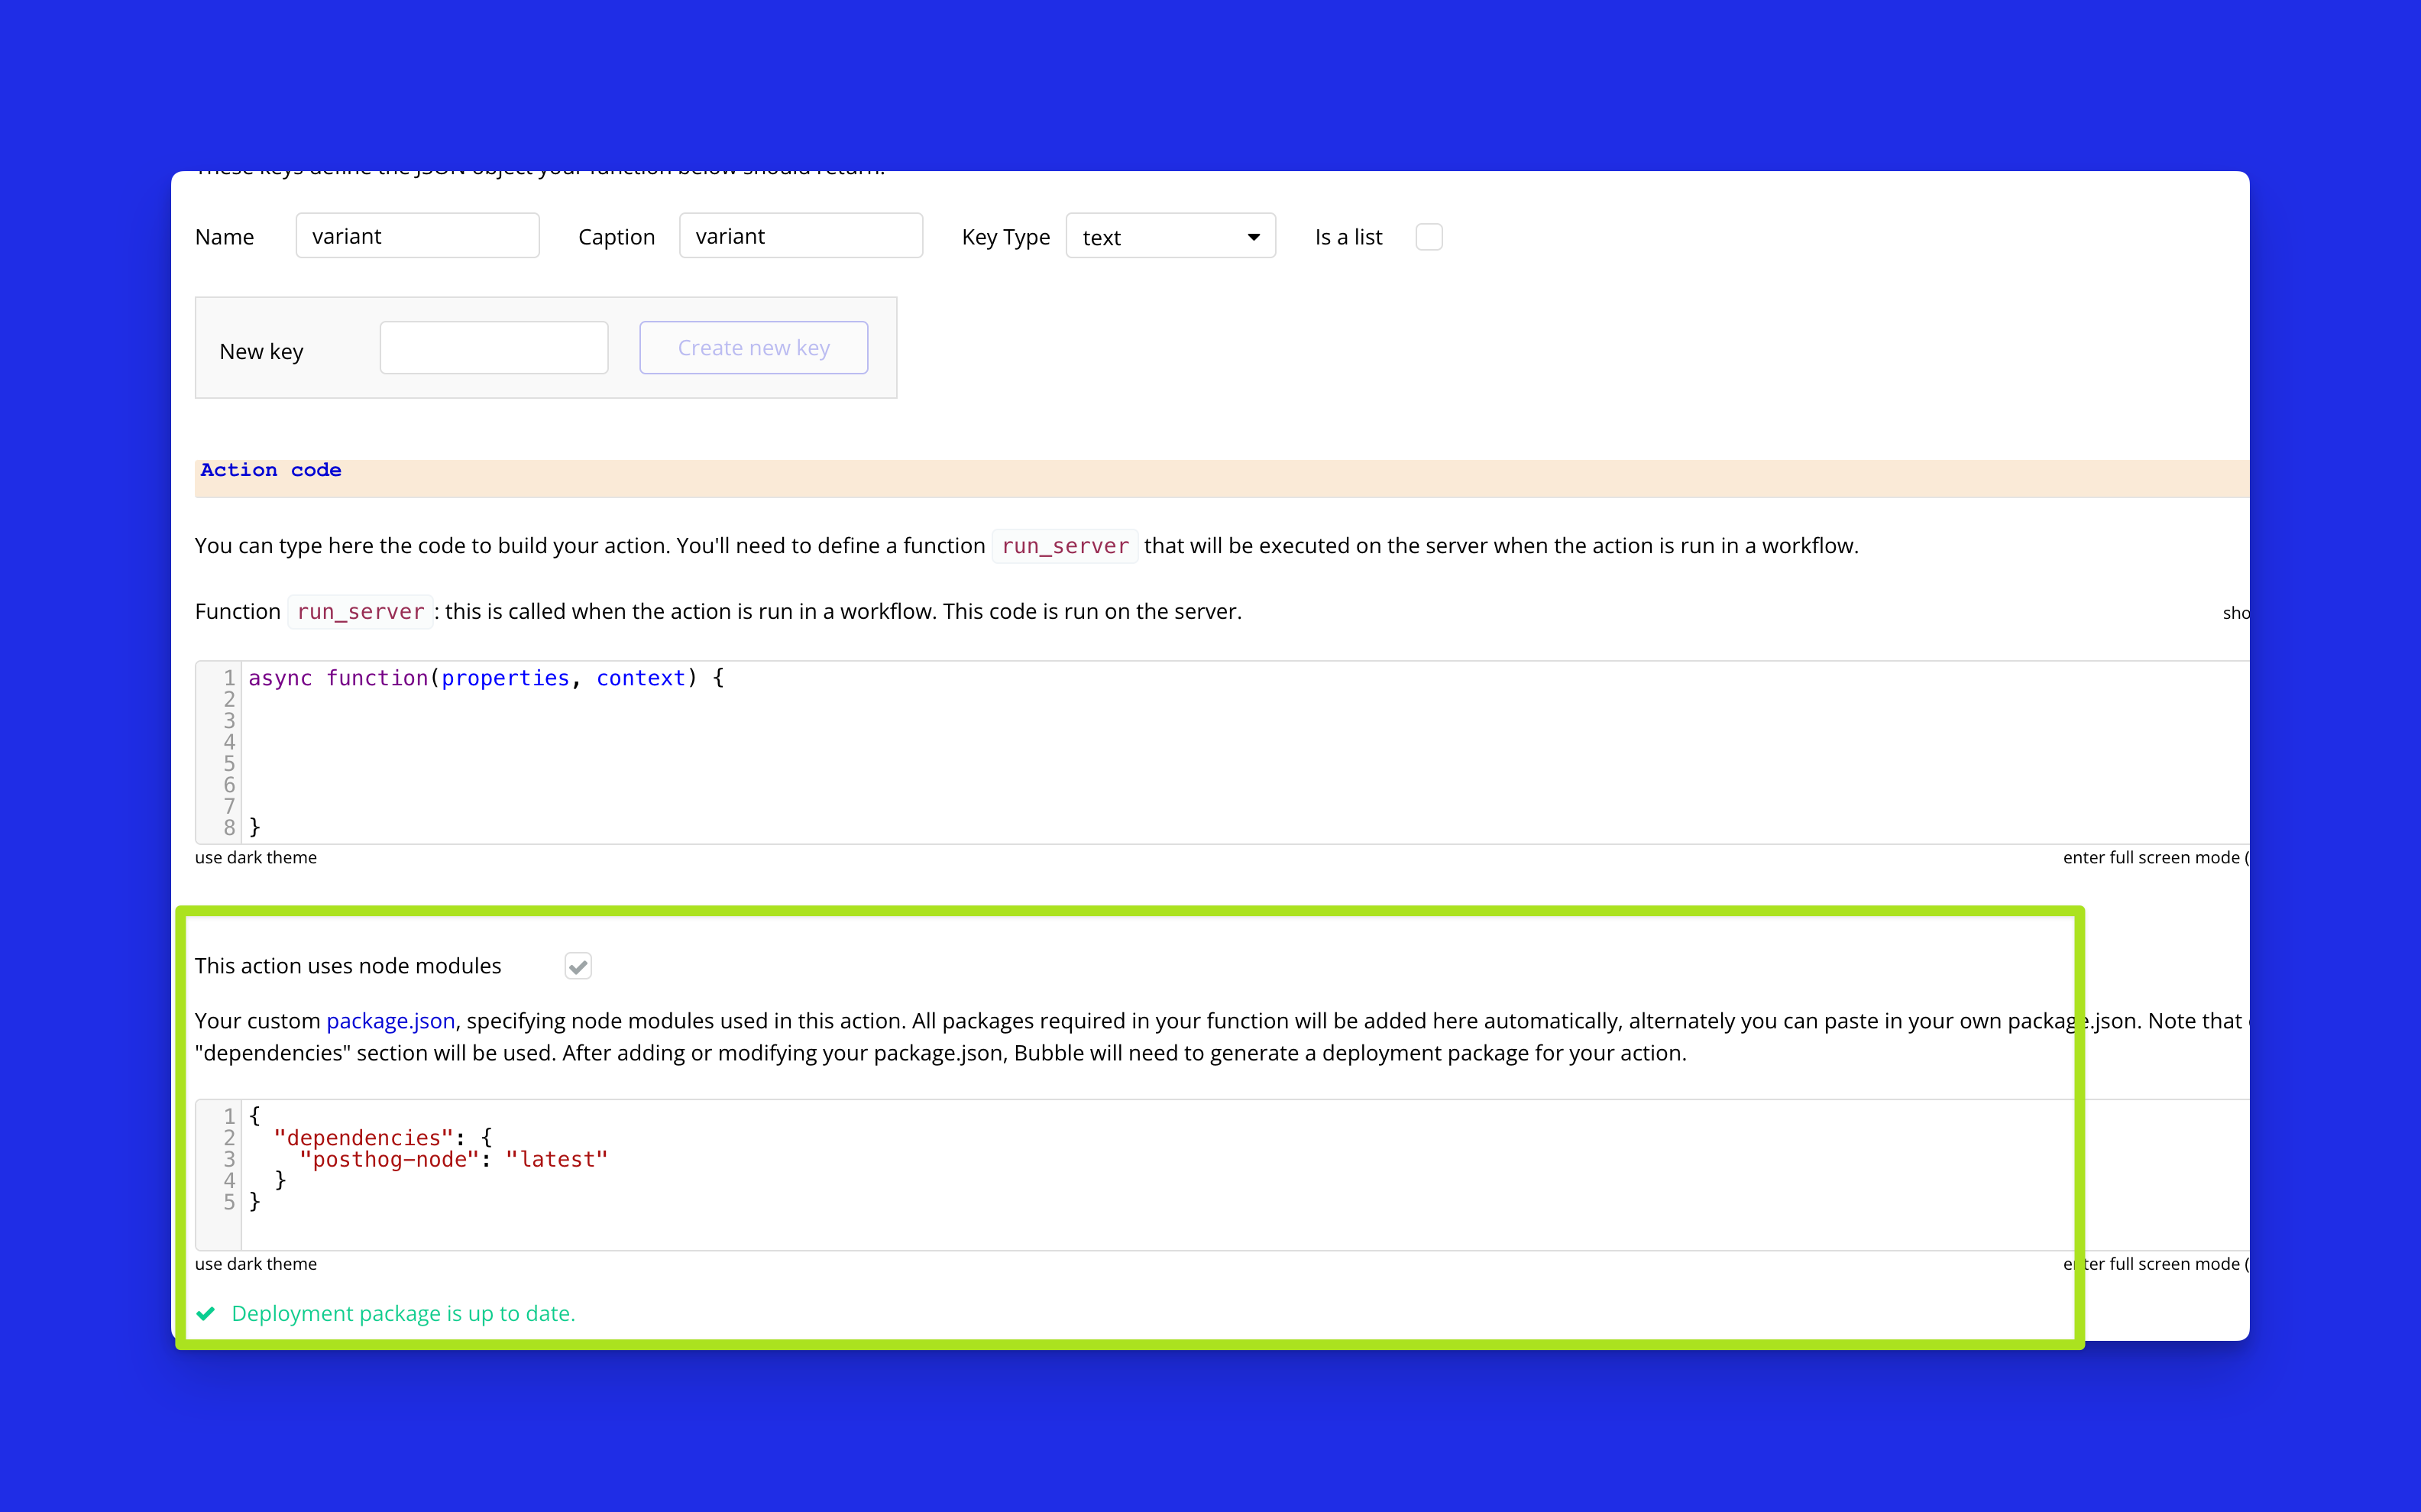
}Next, make sure to check the option that says "This action uses node modules."

and create a custom
package.json for our Node dependencies. Here's what it should contain:{
"dependencies": {
"posthog-node": "latest"
}
}Once you add the package.json be sure to build the packages so it’s available in the action

Now onto our action code. First, we’ll fetch our API keys from Bubble's context object. Any private keys that we’ve defined earlier in the project when setting up the shared keys are made accessible in the context object. Import PostHog using Node.js' require function. This is necessary because Bubble doesn't support ES6 import statements.
async function(properties, context) {
    // Initialize variables and import libraries
    const apiKey = context.keys["Project API key"];
    const { PostHog } = require('posthog-node');


}
💡 Pro Tip: If the Node module you’re using doesn’t support ESM syntax, you can find a workaround in this Bubble forum thread.
Adding the PostHog code
Now that our action is set up and we’ve imported our PostHog module, we can add the rest of the PostHog code. First, initialize our PostHog client using our project's API key like so:
async function(properties, context) {
    // Initialize variables and import libraries
    const apiKey = context.keys["Project API key"];
    const { PostHog } = require('posthog-node');

    // Create a new PostHog client
    const client = new PostHog(apiKey, { host: 'https://app.posthog.com' });

    // Remaining code
    ...
}
Next, you'll need to fetch the feature flag information. We’ll wrap this in a try-catch block. Bubble stores any input fields that we defined earlier in a properties object. Retrieve the values with:
async function(properties, context) {
 // Initialize variables and import libraries
    const apiKey = context.keys["Project API key"];
    const { PostHog } = require('posthog-node');

// Create a new PostHog client
    const client = new PostHog(apiKey, { host: 'https://app.posthog.com' });

//Get the variant for the user
    try {
        const variant = await client.getFeatureFlag(properties.featureFlagKey, properties.distinctId);

// Remaining code
...
Lastly, it's time to send the event to PostHog. You'll be using the distinctId, the event name, and the feature flag variant you fetched earlier the full code snippet should look like so:
async function(properties, context) {
    const apiKey = context.keys["Project API key"];
    const { PostHog } = require('posthog-node');

    const client = new PostHog(apiKey, { host: 'https://app.posthog.com' });

    try {
        const variant = await client.getFeatureFlag(properties.featureFlagKey, properties.distinctId);

        const eventCapture = await client.capture({
            distinctId: properties.distinctId,
            event: properties.event,
            properties: {
                [`$feature/${properties.featureFlagKey}`]: variant
            }
        });

        // Format and return the result
        return {
            variant: variant,
            eventCapture: eventCapture
        };

    } catch (error) {
        console.error('Error:', error);
    }
}
Creating an action for retrieving the variant
Sometimes you may want to simply grab the variant without sending any events to PostHog. This can be useful for modifying elements or deciding what UI to display, so we’ll create an action for that specifically.
Start by creating a new server-side action. It will look quite similar to our previous action; however, you won't need an 'event' field this time.
Go ahead and check the box for using Node modules, add our dependencies, and make sure you build the package so our deployment package is up to date.
The code snippet for this action is almost identical to the one you used earlier; you'll just skip the event capture step.
async function(properties, context) {
    const apiKey = context.keys["Project API key"];
    const { PostHog } = require('posthog-node');

    const client = new PostHog(apiKey, { host: 'https://app.posthog.com' });

    try {
        const variant = await client.getFeatureFlag(properties.featureFlagKey, properties.distinctId);


        // Format and return the result
        return {
            variant: variant
        };

    } catch (error) {
        console.error('Error:', error);
    }
}Trying the plugin in Bubble
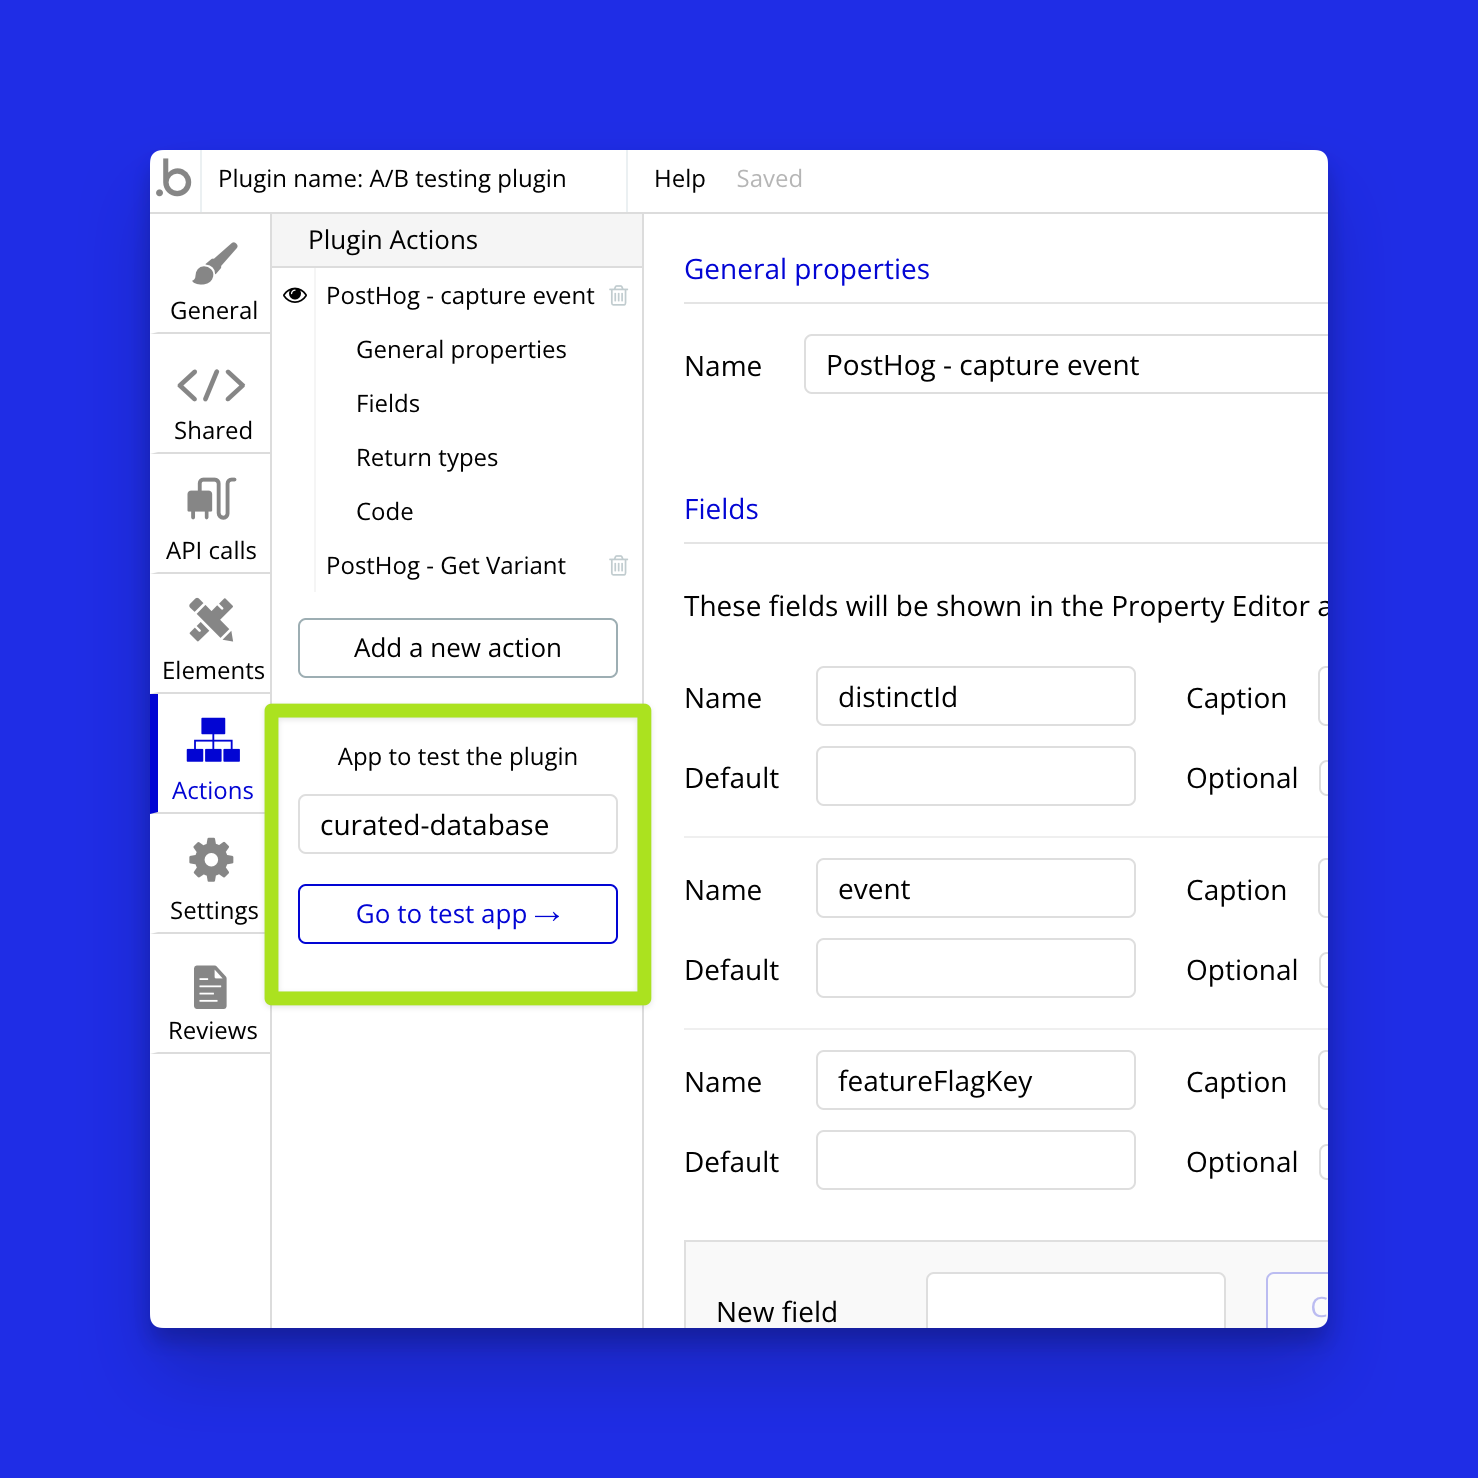
Congratulations, you've built the plugin! Now let's see it in action. I'm using the test version of Integrations Directory for this demo. For whatever app you choose you’ll want to put your Bubble ID in “app to test the plugin”
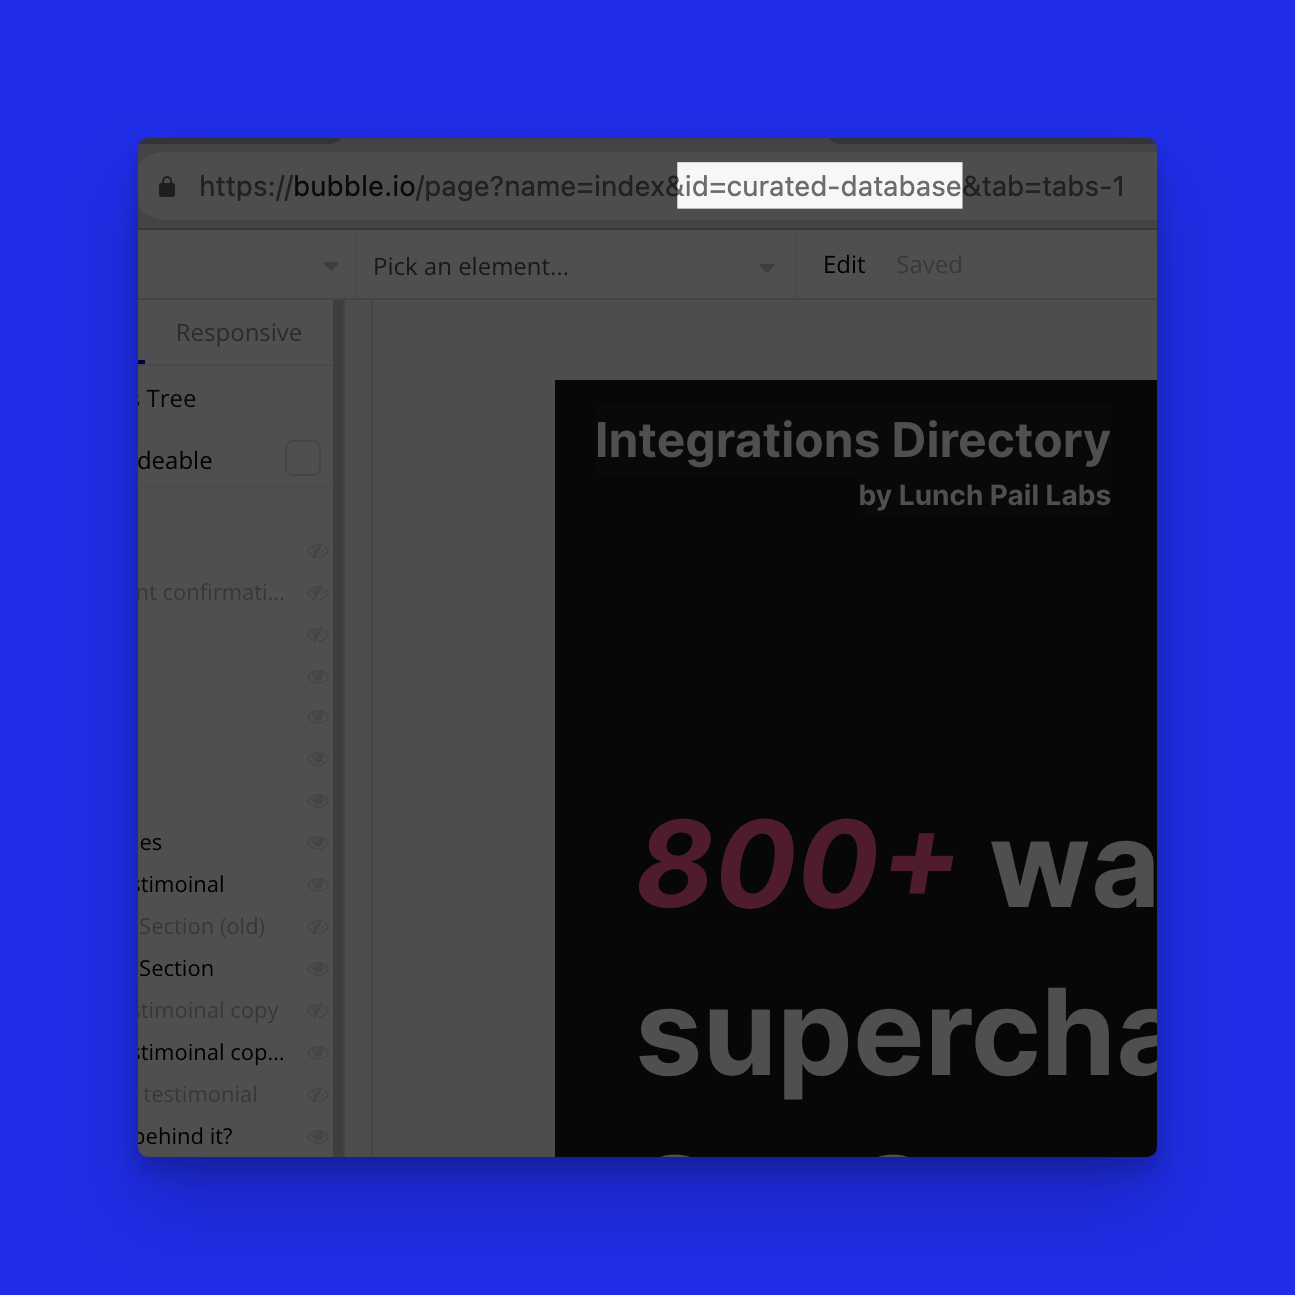
You can find the bubble id within your editor url
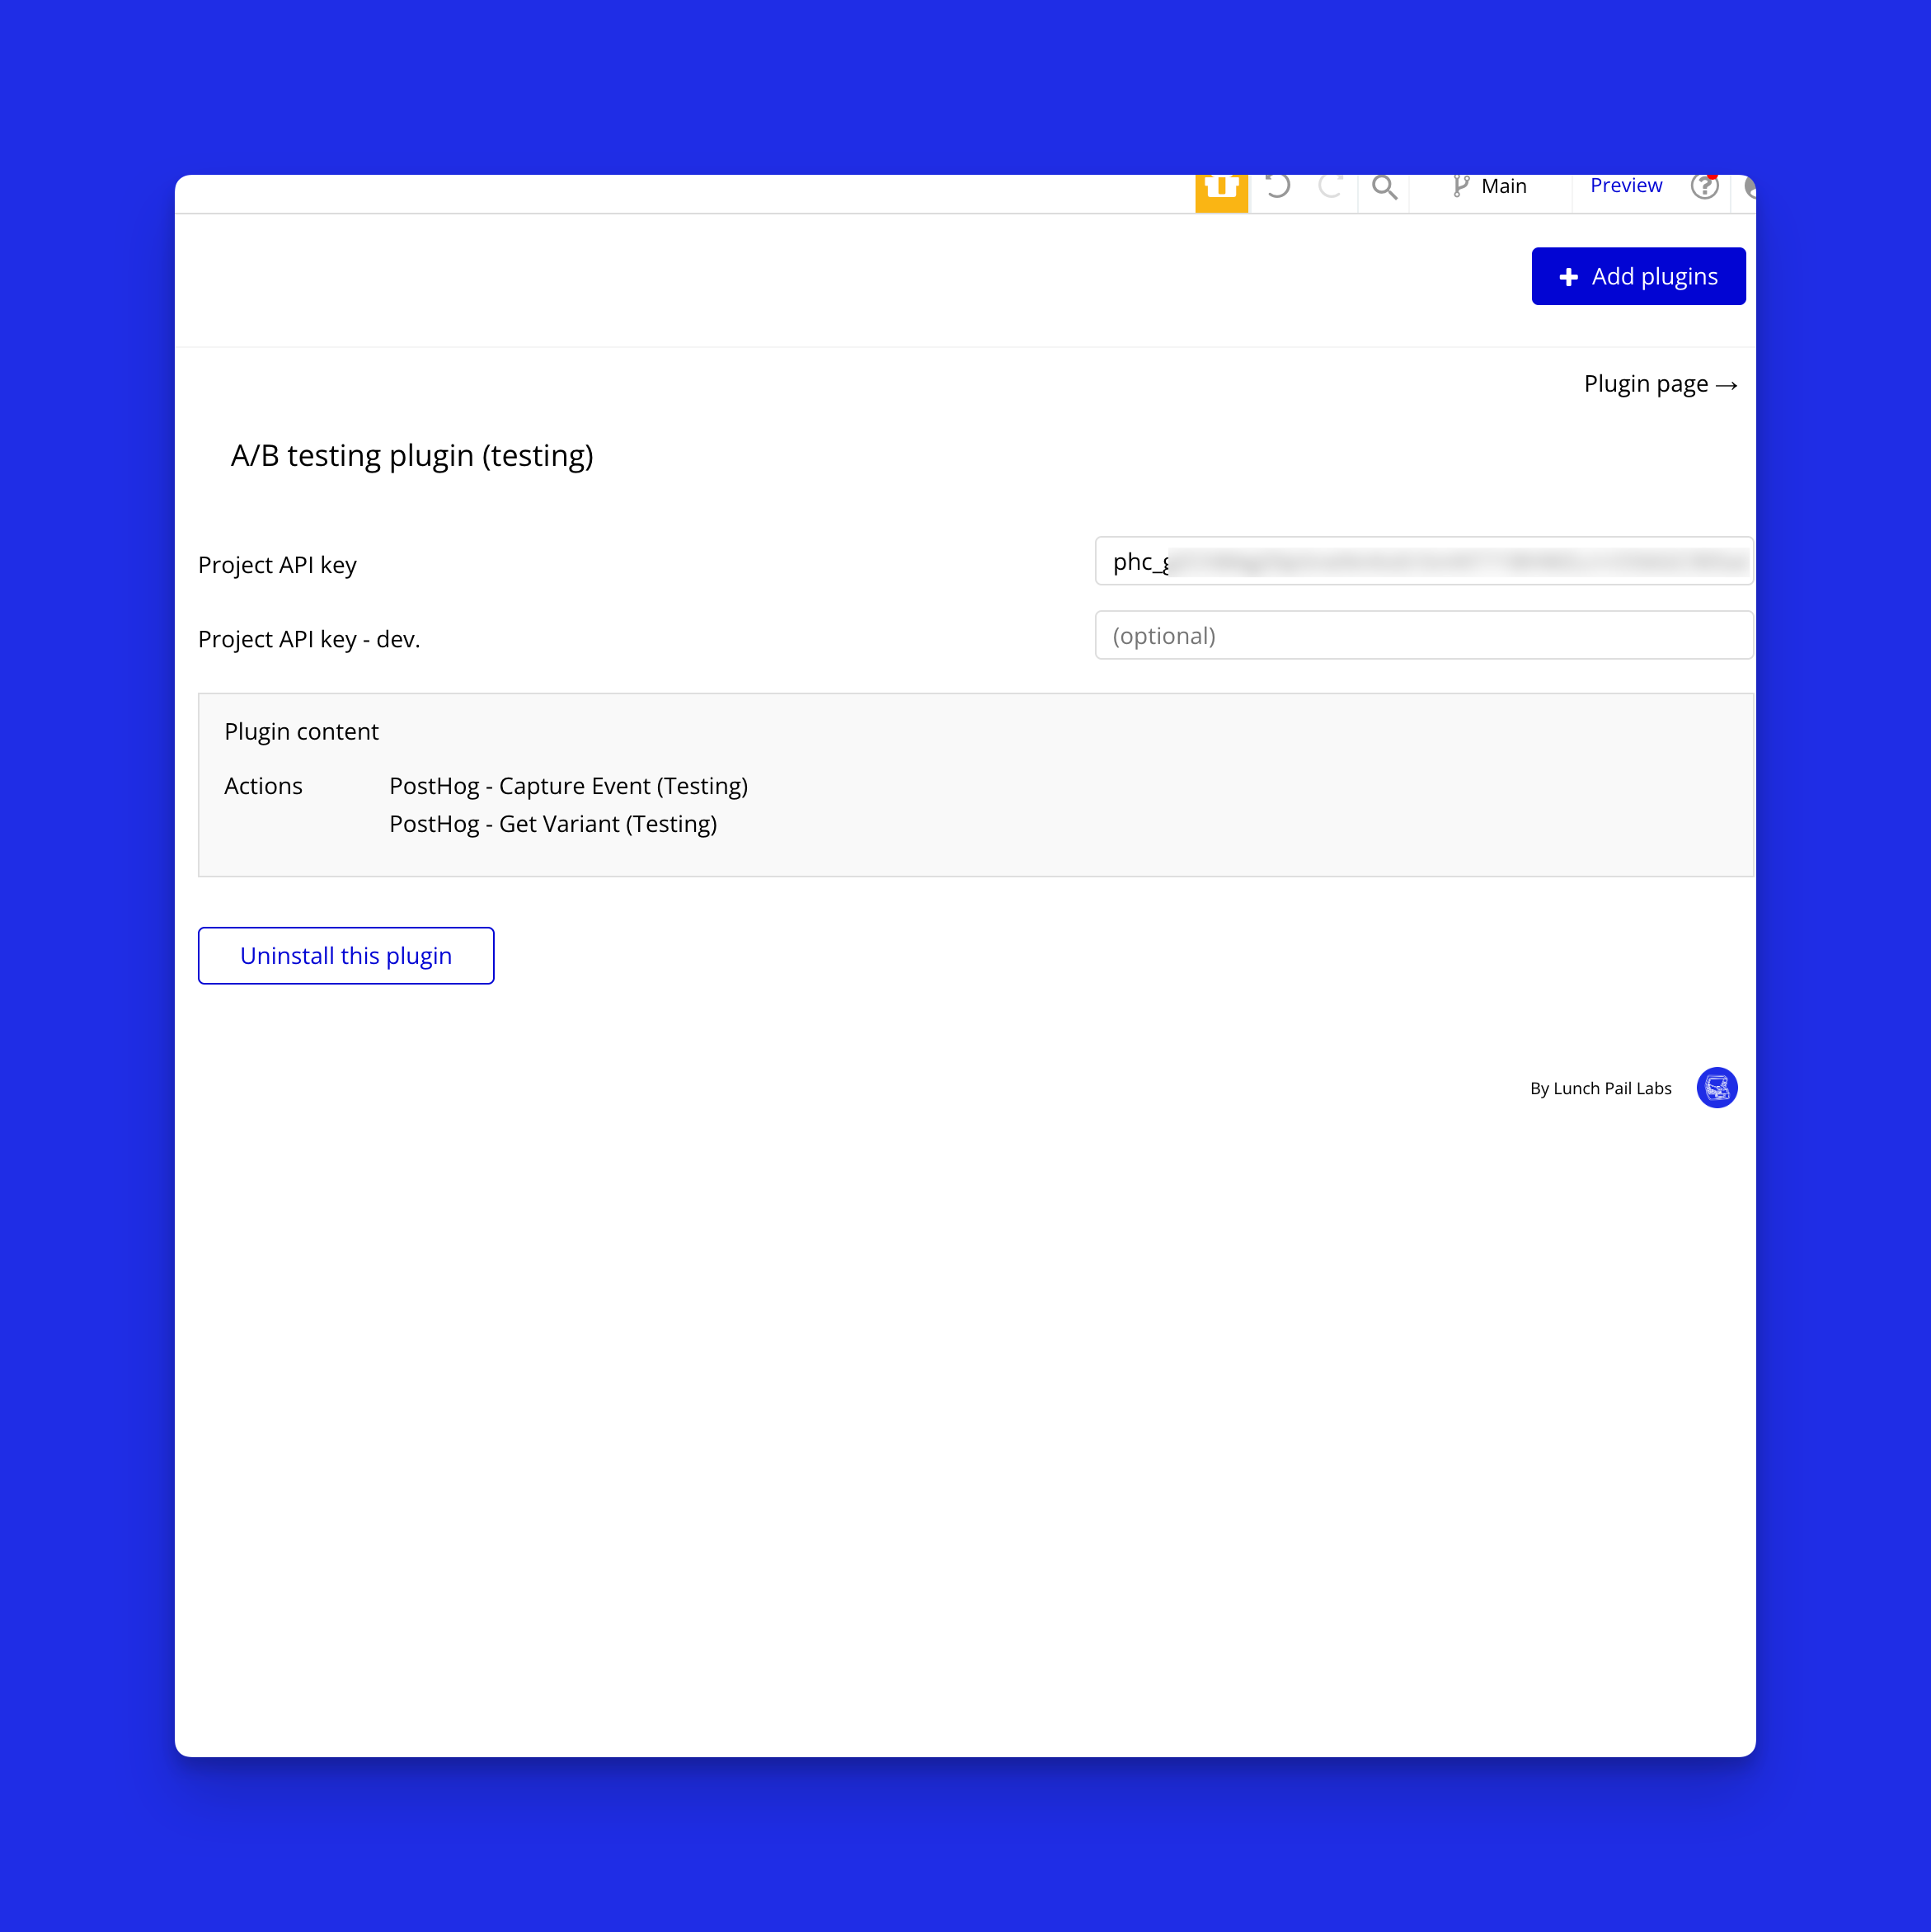
Then in the plugins tab, you can install the plugin and add your project API key which can be found in your PostHog settings under `Project Variables`
In my test, I insert the action into my workflows, triggered on page load to fetch the variant if I don’t have it for the user already.
I also a 'variant' field to the user data type in Bubble. This streamlines the process, removing the constant need to retrieve the variant.
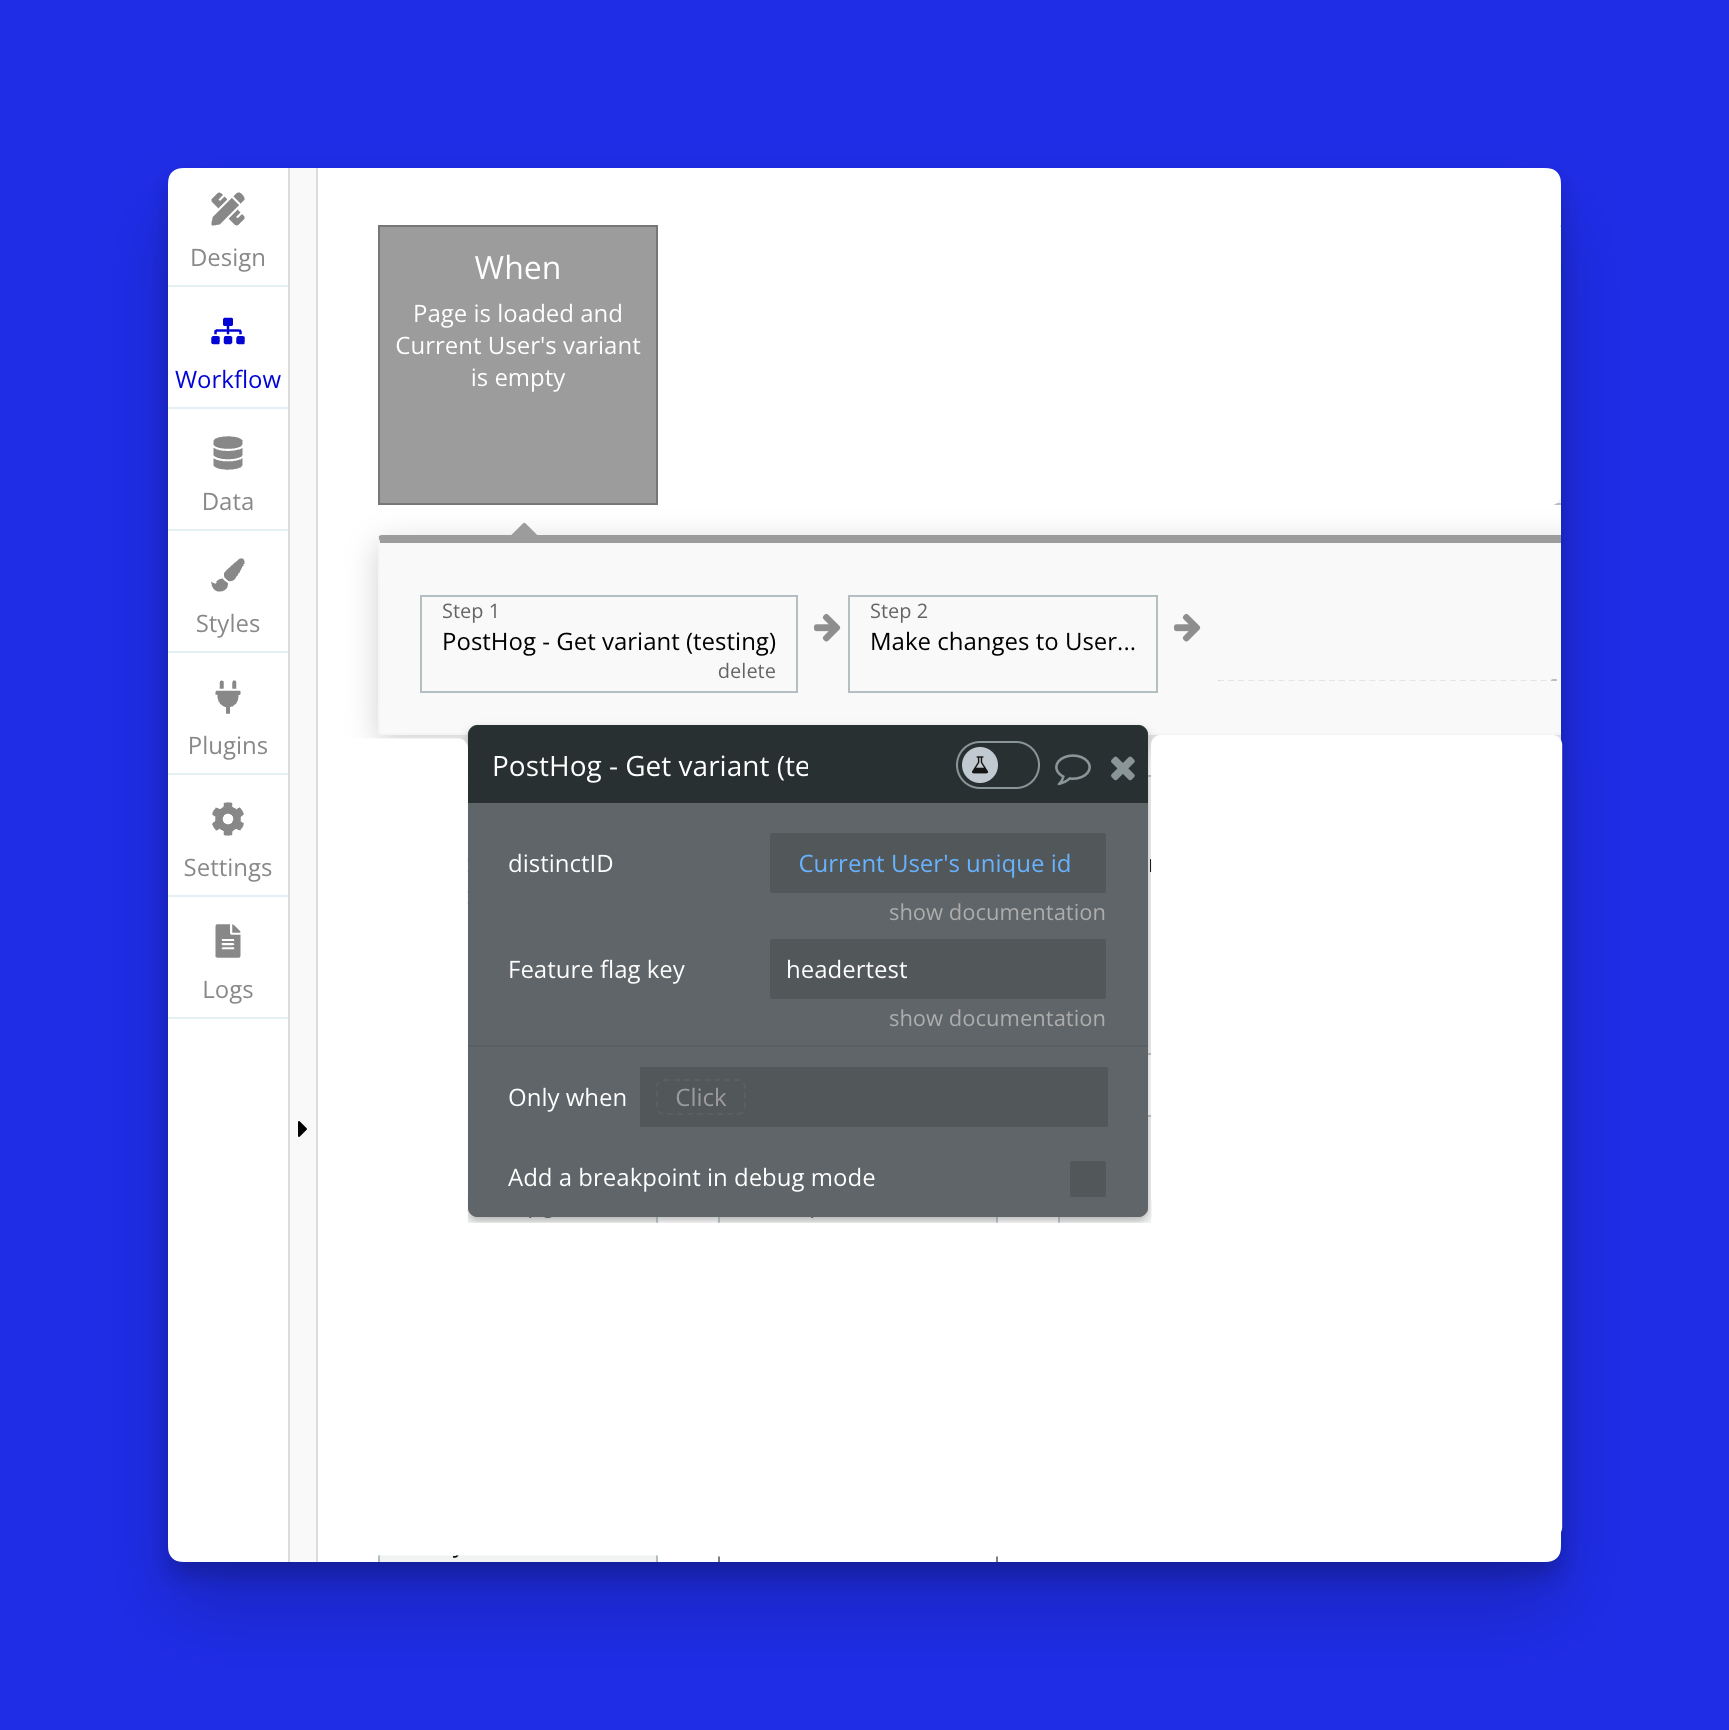
I adjusted my header by adding a condition to switch its display logic based on the fetched variant. In my case when it is the “test” group I change my header.

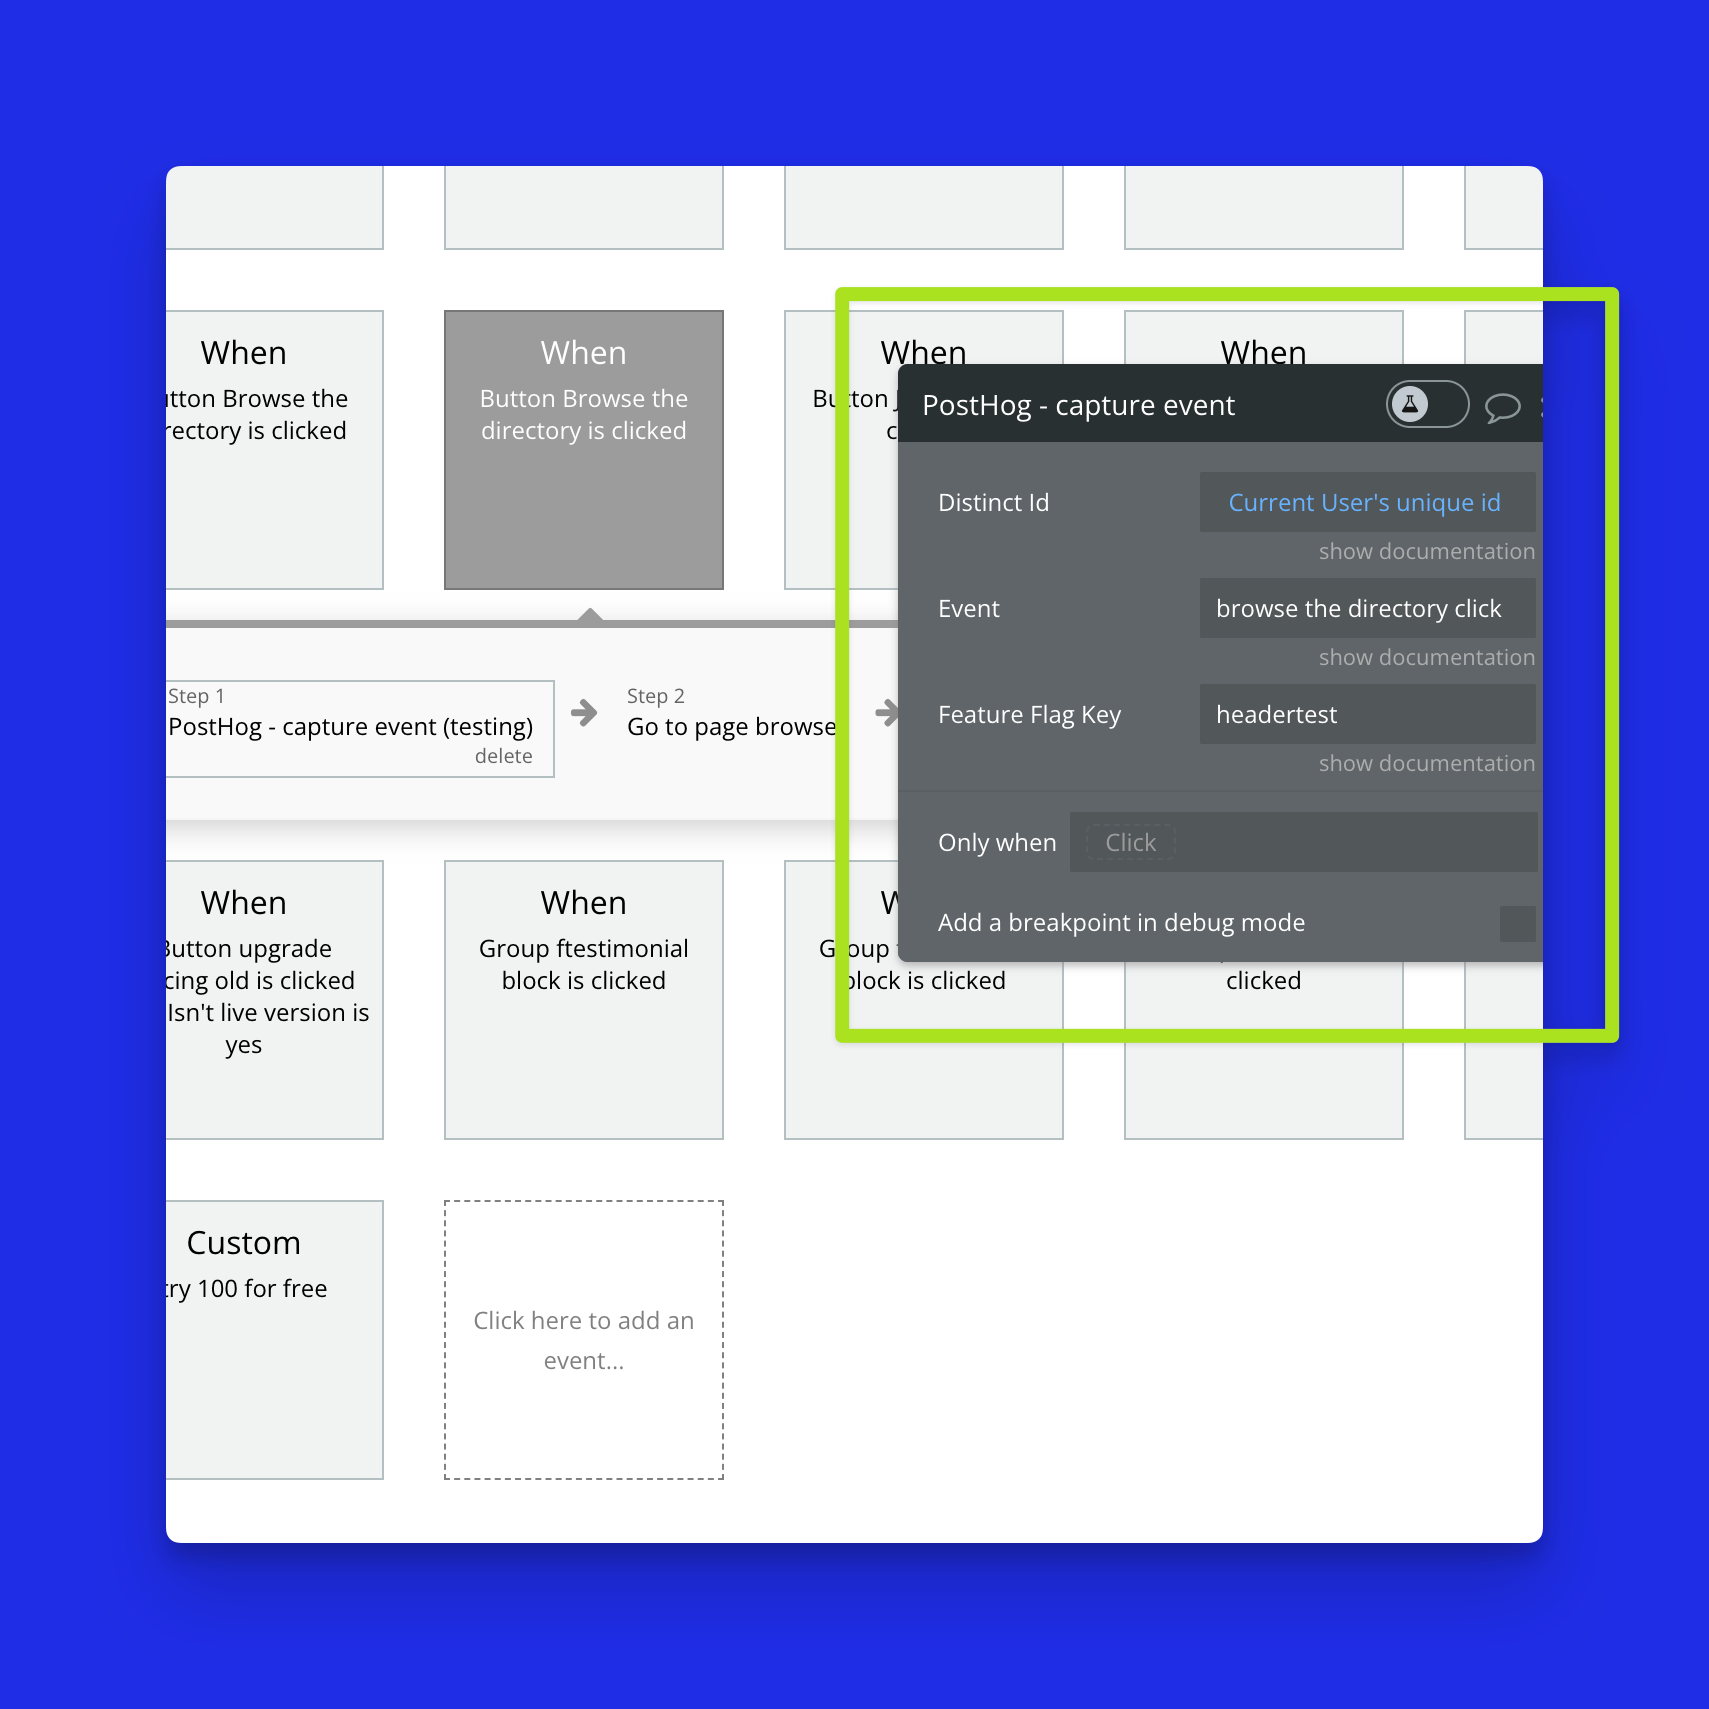
And then I’ll add a second workflow to track which performs better on button clicks, I’ll call the event “browse the directory click”
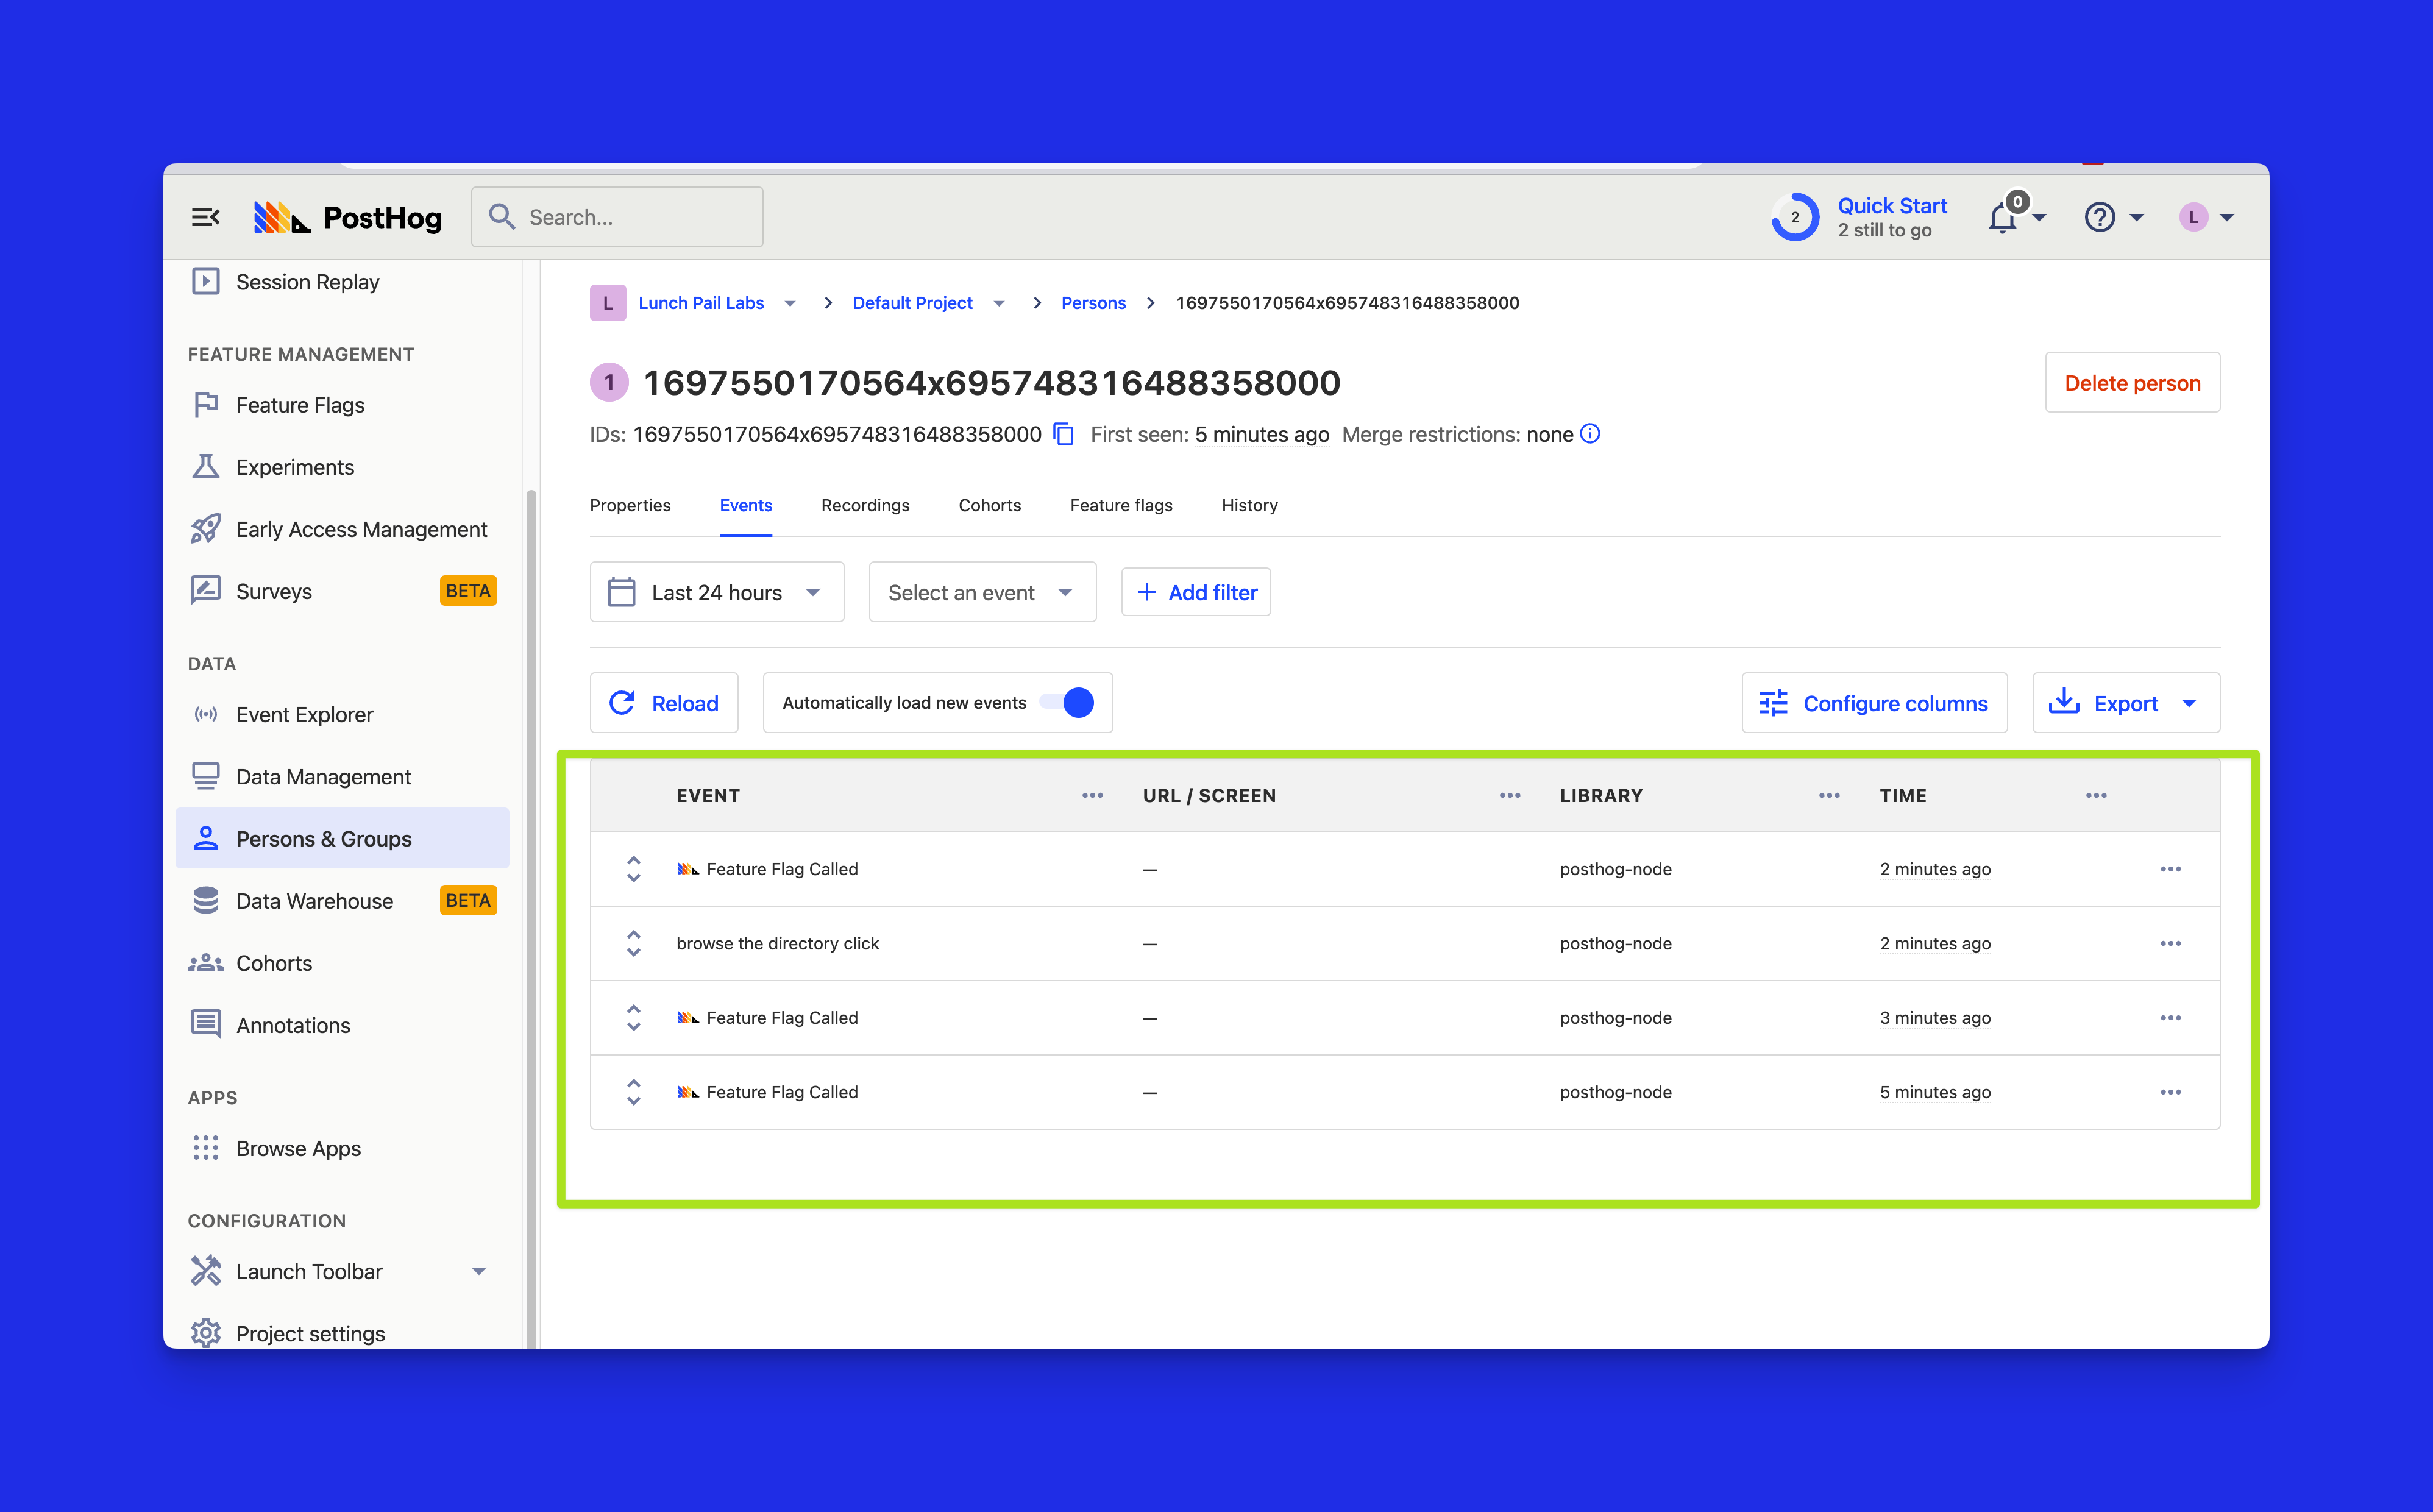
Then you can start clicking and head to your PostHog user analytics to confirm that events are sending, over time you’ll see the results in the experiments tab
Conclusion
That wraps up this introductory tutorial on integrating PostHog’s A/B testing with Bubble through a custom plugin. If you want to extend this plugin you could add funnel analytics or more A/B testing features including advanced analytics, PostHog's new survey features, session replay, and more.
.png?table=block&id=9ba33ac6-8e12-48f6-b980-4333b612ec56&cache=v2)
.png?table=block&id=13616626-adc1-4b27-8a59-b9b354bf860e&cache=v2)


