.png?table=block&id=d3cc914a-2c82-4faa-9285-acd1c6d94edb&cache=v2)
Do not index
In data integrations, matching data types between the source and the destination tool is crucial. Proper setup in Bubble is essential for correctly interpreting data, particularly when dealing with unpredictable data structures, like those from a relational database like we explore in the SmartSuite plugin tutorial.
Eli introduced a concept of 'virtual data types' a few years ago (find out more here). This approach involves giving Bubble a sample format to properly handle incoming data. Users can create this format either within your plugin or externally. After setting it up, their next step is to upload it into Bubble. The rest of this guide will detail methods for generating these formats and explain how users can implement them.
Why not rely solely on the API Connector?
You might be wondering why there's a need for these steps and why the Bubble's API connector isn't sufficient.
The API connector is effective when the data format is consistent every time. However, in cases where we’re pulling information from a data source where users may have various combinations of columns and types, the format becomes unpredictable.
In such scenarios, the API connector isn't suitable for a generalized format approach.
1. Generating “virtual data types”
Generating virtual data types with external tools
There are various methods to generate the formats needed for Bubble plugins, and it's not always necessary to create an element or action within Bubble itself; this is more about adding convenience. Users can alternatively utilize external tools like Postman or Hoppscotch.
Additionally, if the tool you're integrating with provides a sample format, you can direct your users to use this as part of their setup. This approach is exemplified by the Xano Bubble connector. As Xano allows users to test API calls directly from Xano documentation, they can conveniently acquire the sample format needed from there.
Using the plugin to generate the virtual data type
You can also generate formats directly within the plugin. This method involves initiating a call to the service and then using all or part of the response as an example format. We use this approach in the How to build a SmartSuite plugin tutorial.
Handling the virtual data type from a Plugin
Handling the format once it's returned can vary. If using Bubble elements, a 'copy to clipboard' action can be integrated. For server-side actions, the format is returned as a value, necessitating user configuration on their Bubble page for access.
In our How to Build a SmartSuite Plugin tutorial, we showcase a server-side action that returns the format, which users then set up on a Bubble page. Here's an overview of this process:
First, users need to add the “API Connector” plugin for importing our table format.

Next, they create an internal page to capture the format:
- Add a new page.
- Place a text element on the page.
- Set up a custom state called “format” for this text element, with a type of “text”.
- Assign “Text A's format” as the text element's value.
For a step-by-step visual, see the screen share below.
In the workflows section, they should:
- Add the 'SmartSuite - Fetch Table Format' action.
- Specify the 'TableId.'
- Include a second action to update the state of the text element to 'Result of Step 1's Table Format.'
Refer to the video below for a visual guide.
Finally, they can run the app and copy the format.

2. Making actions work with virtual data types
Regardless of whether users generate the virtual data type through an external tool or your plugin facilitates the process, it's important to ensure that any objects your plugin subsequently returns are formatted in a way that that is compatible with those virtual data types. Bubble has specific ways of handling data types:
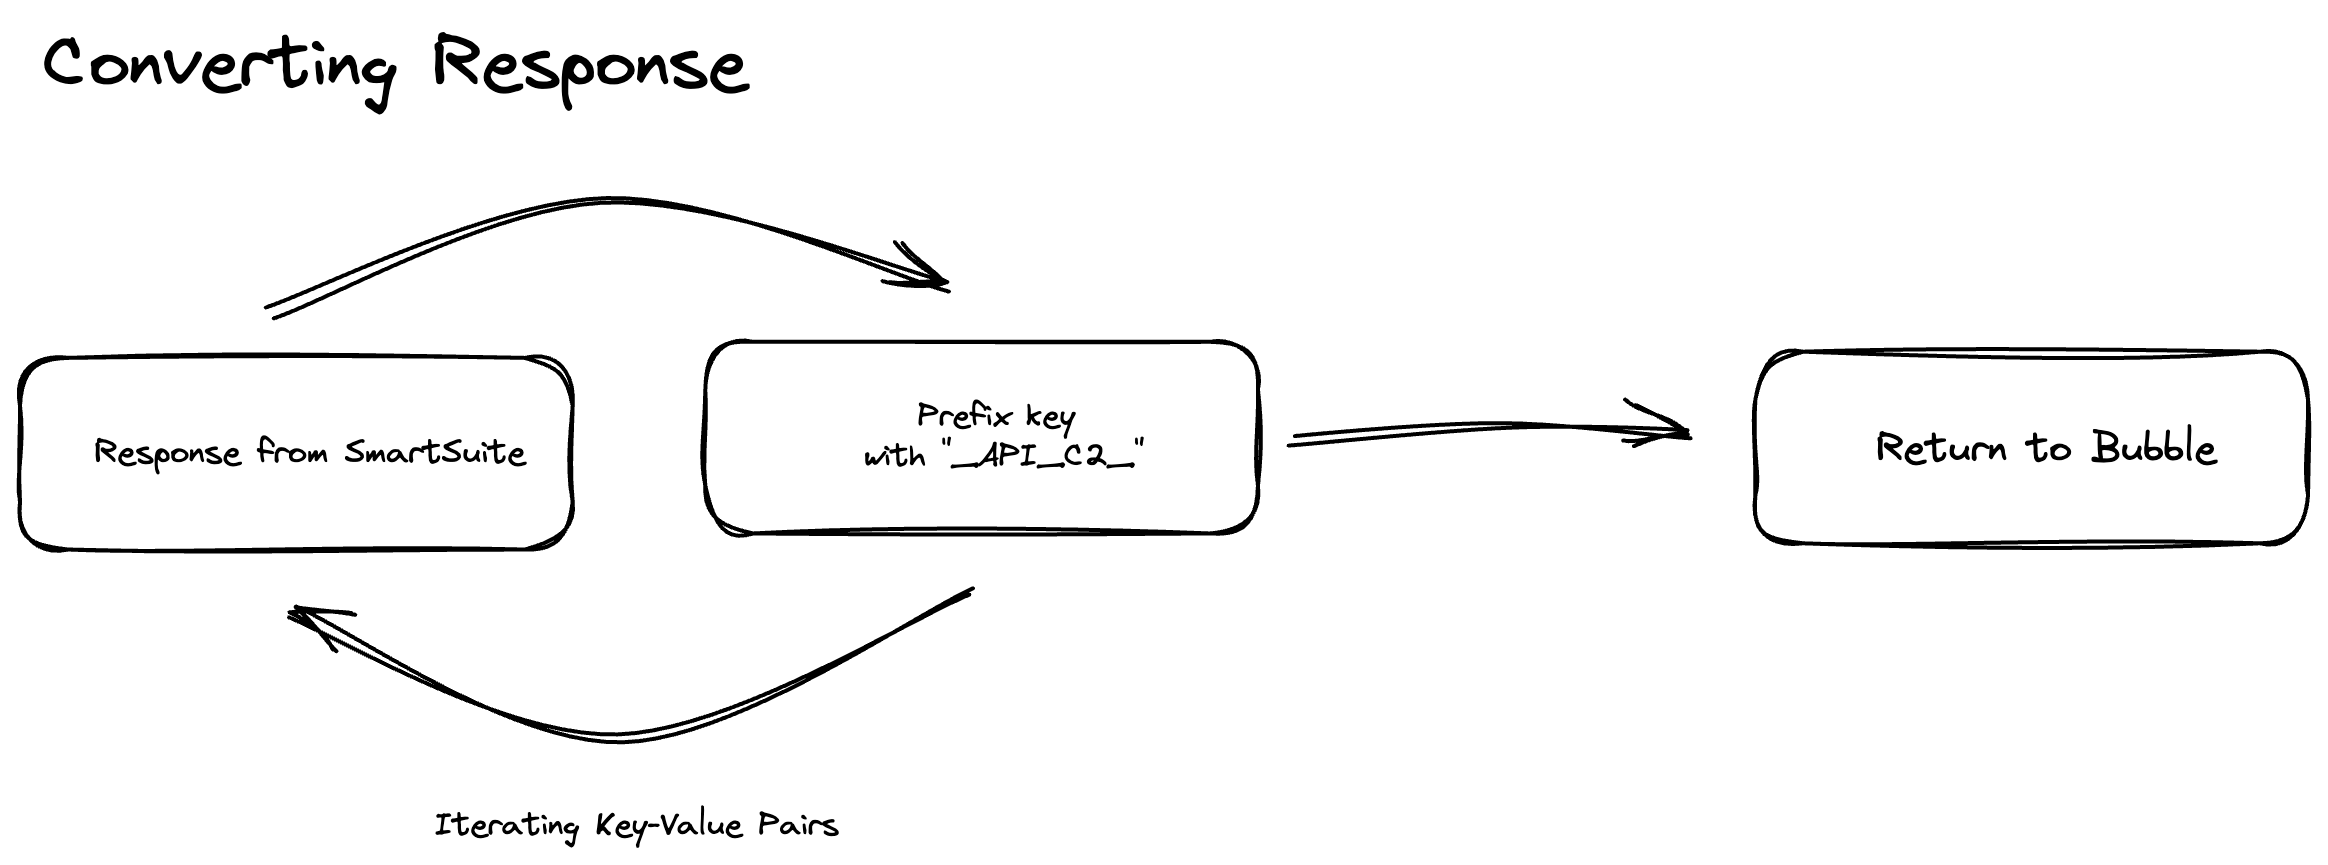
- For data types imported from the plugin, Bubble adds a prefix '_p_' to each key.
- For data imported through the API Connector (a common method when the data type isn't predetermined), Bubble uses the prefix '_api_c2_'.
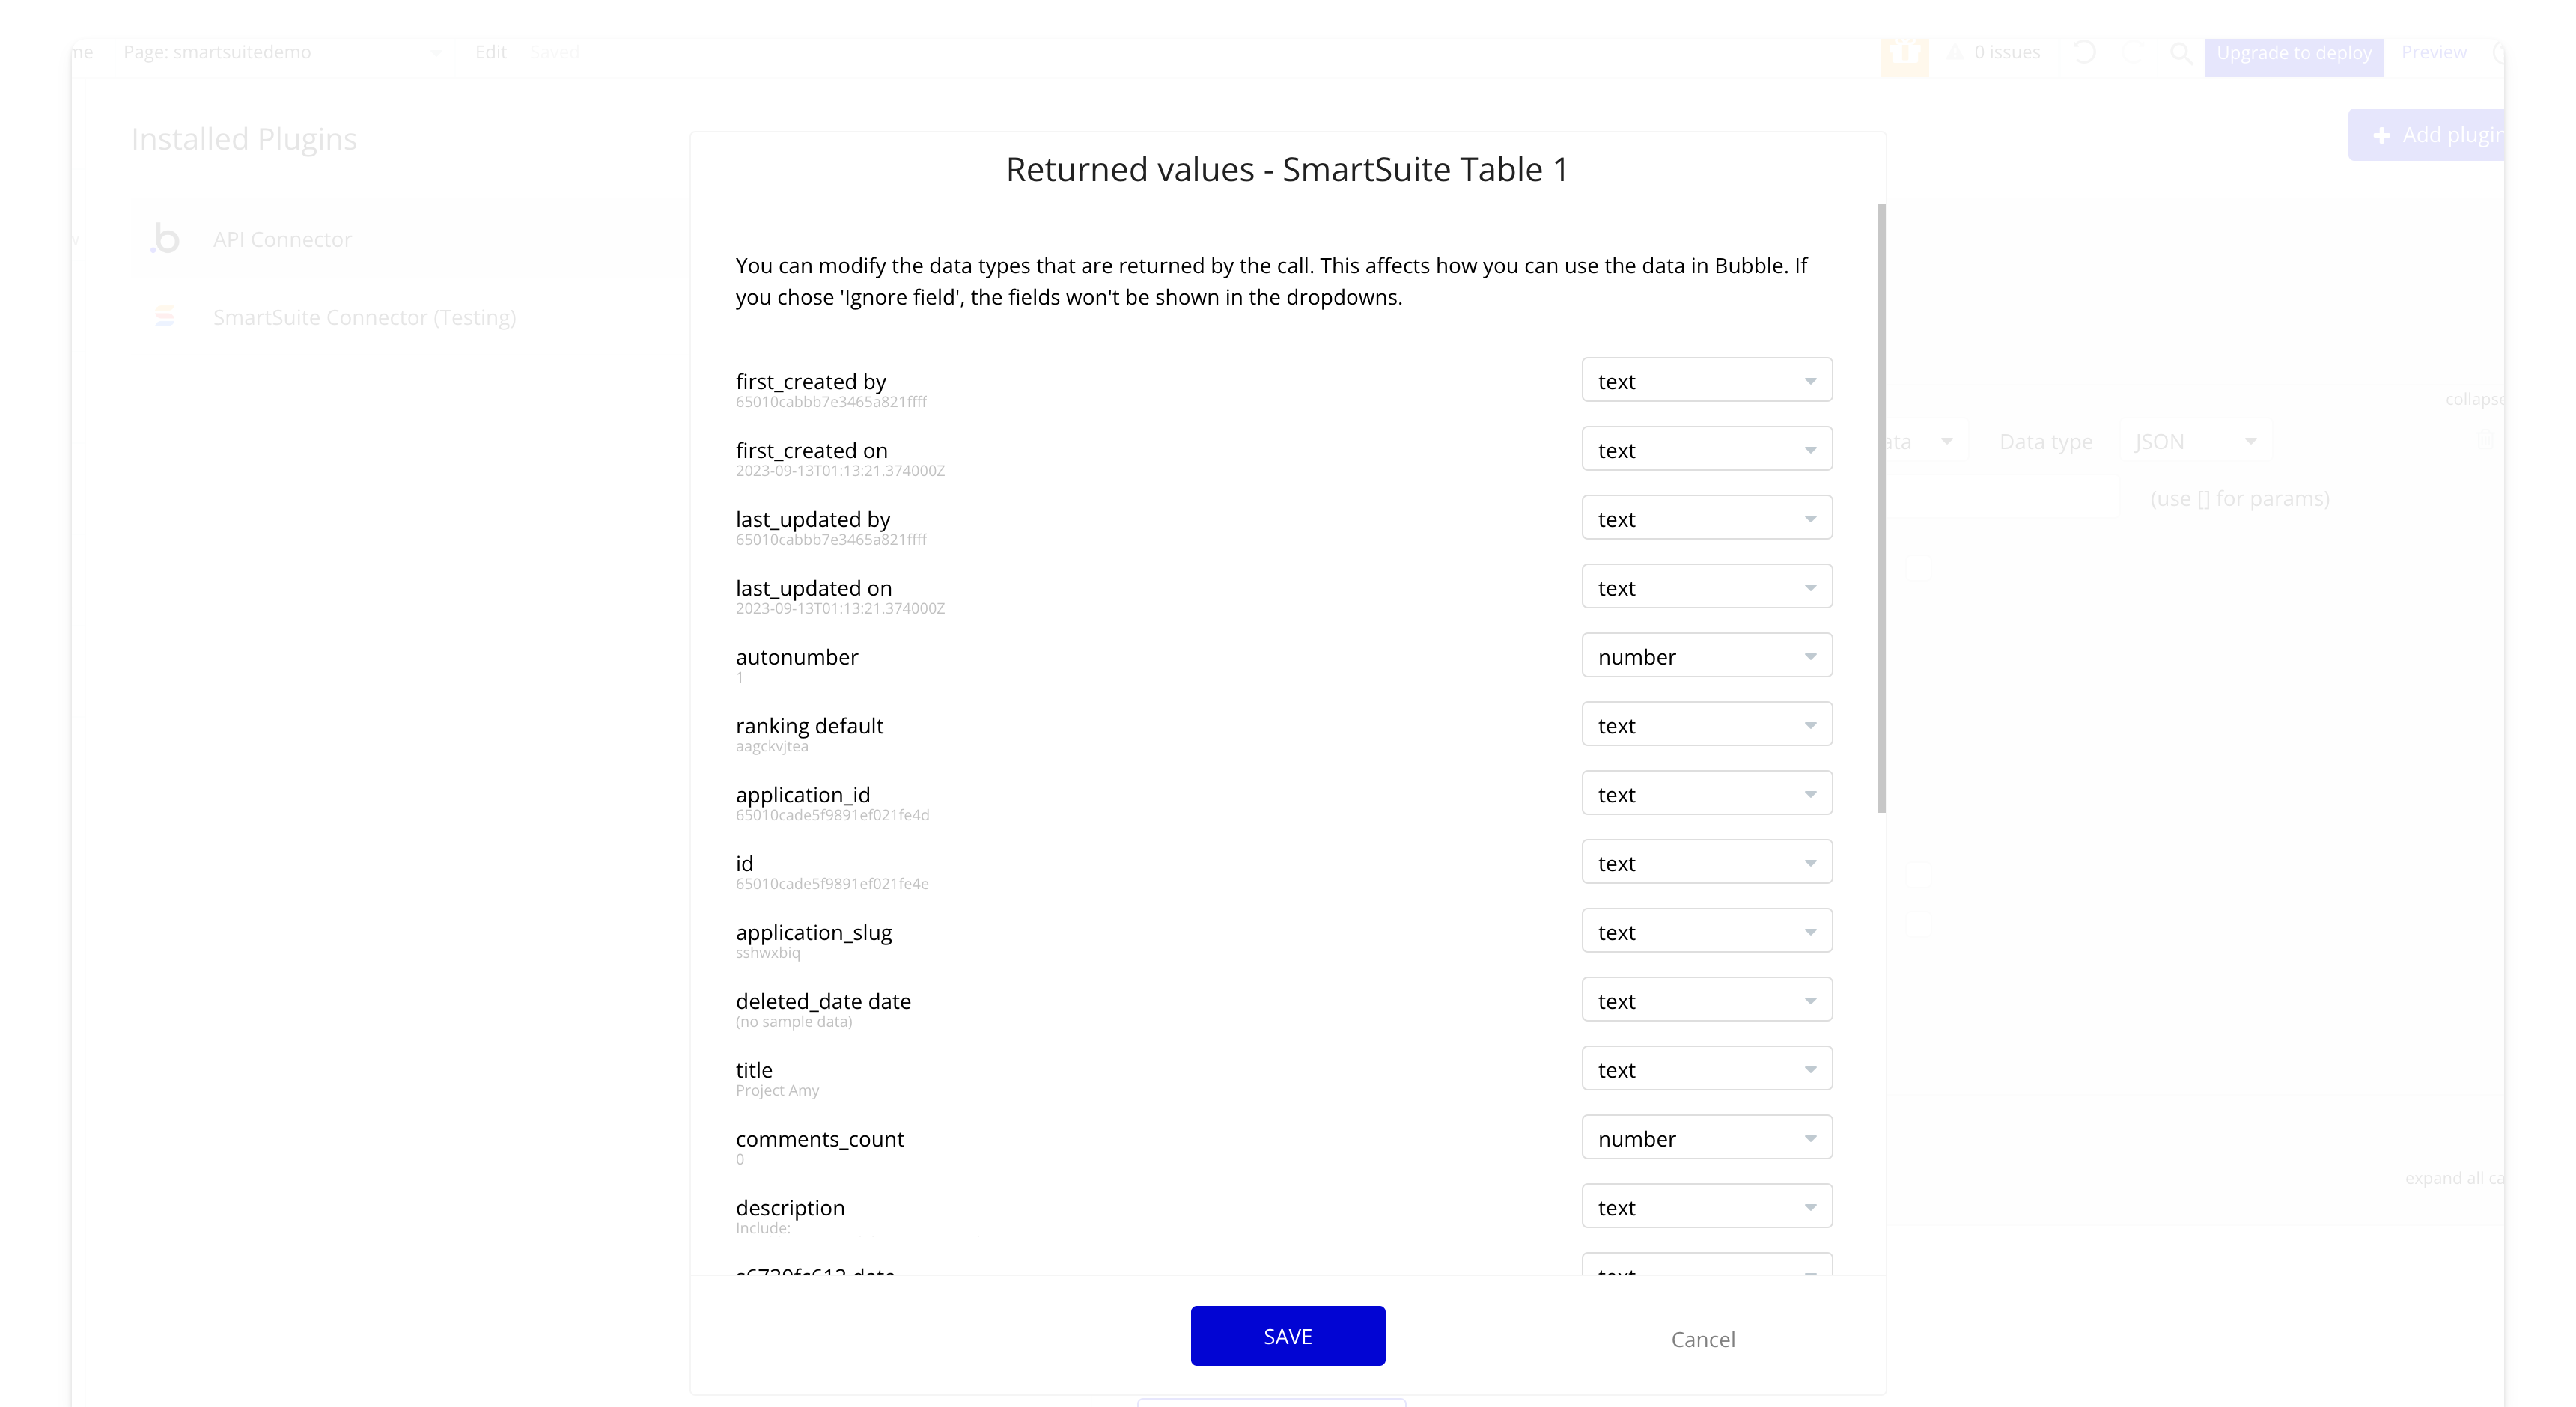
You can see an example of this here. For a more detailed explanation, check out this Bubble forum thread (link).
3. User configuration in Bubble
No matter how users generate the “virtual data type”, they need to upload it into the API Connector for Bubble to recognize the expected format from your plugin.
In the Bubble editor, go to the 'Plugins' tab and open the 'API Connector'. Choose 'Add another API' and name it. If the 'API Connector' isn't already in the project, users can add it by selecting 'Add plugins', searching for 'API Connector', and then clicking 'Install'

Rename the 'API Call' to something more descriptive. This name will be used as the data source type for tables, repeating groups, and other elements in Bubble

Users should then enter the example format into the designated field and click 'Save'. This action will save the data type in the Bubble editor.

And that covers it! Users will need to go through exercise anytime they change the field types or add new fields that they’d like displayed in Bubble.
And that's it, we've covered the essentials of handling virtual data types. I'm curious to hear about your approach – how do you tackle virtual data types in your projects? Drop me a line at hey@lunchpaillabs.com and let's discuss.
.png?table=block&id=9ba33ac6-8e12-48f6-b980-4333b612ec56&cache=v2)
.png?table=block&id=212977e8-a999-4315-ac12-fee59313593e&cache=v2)