.png?table=block&id=212977e8-a999-4315-ac12-fee59313593e&cache=v2)
Do not index
In this guide, we're diving into how to create a SmartSuite plugin for Bubble. SmartSuite is a collaborative work management platform designed for teams to plan, track, and manage their workflows. It combines the simplicity of a task manager with the power of a database. Bubble, on the other hand, provides a no-code environment for building web applications, offering complete freedom in design.
Integrating SmartSuite's user-friendly database with Bubble's no-code versatility opens up possibilities for various internal business applications, including custom portals, task management tools, and recruitment platforms.
While this tutorial will guide you through building the plugin from scratch, if you'd like to get up and running quickly, I've also published a paid version of this plugin. Feel free to check out the docs and demo app if you have any questions
What we’ll build
There are a variety of ways to build data integrations for Bubble. In this tutorial, we’ll focus on a server-side plugin action that fetches new records from SmartSuite on request.
The plugin will include two server-side actions; one for grabbing the data type of our records for Bubble and one for fetching data from SmartSuite. The plugin will have the following features:
- Users can set up the integration and get the table structure for importing into Bubble.
- Users can fetch records from their SmartSuite tables.
- Users can import data from SmartSuite to display in Bubble, but they can't store or modify records within Bubble.
Prerequisites
Before we dive into the tutorial, make sure you have these essentials:
- Bubble account and a Bubble app that you’d like to use to test with the plugin
- Some familiarity with Bubble plugins is helpful. If you're new to this, check out this guide.
- a SmartSuite API Key and Workspace ID
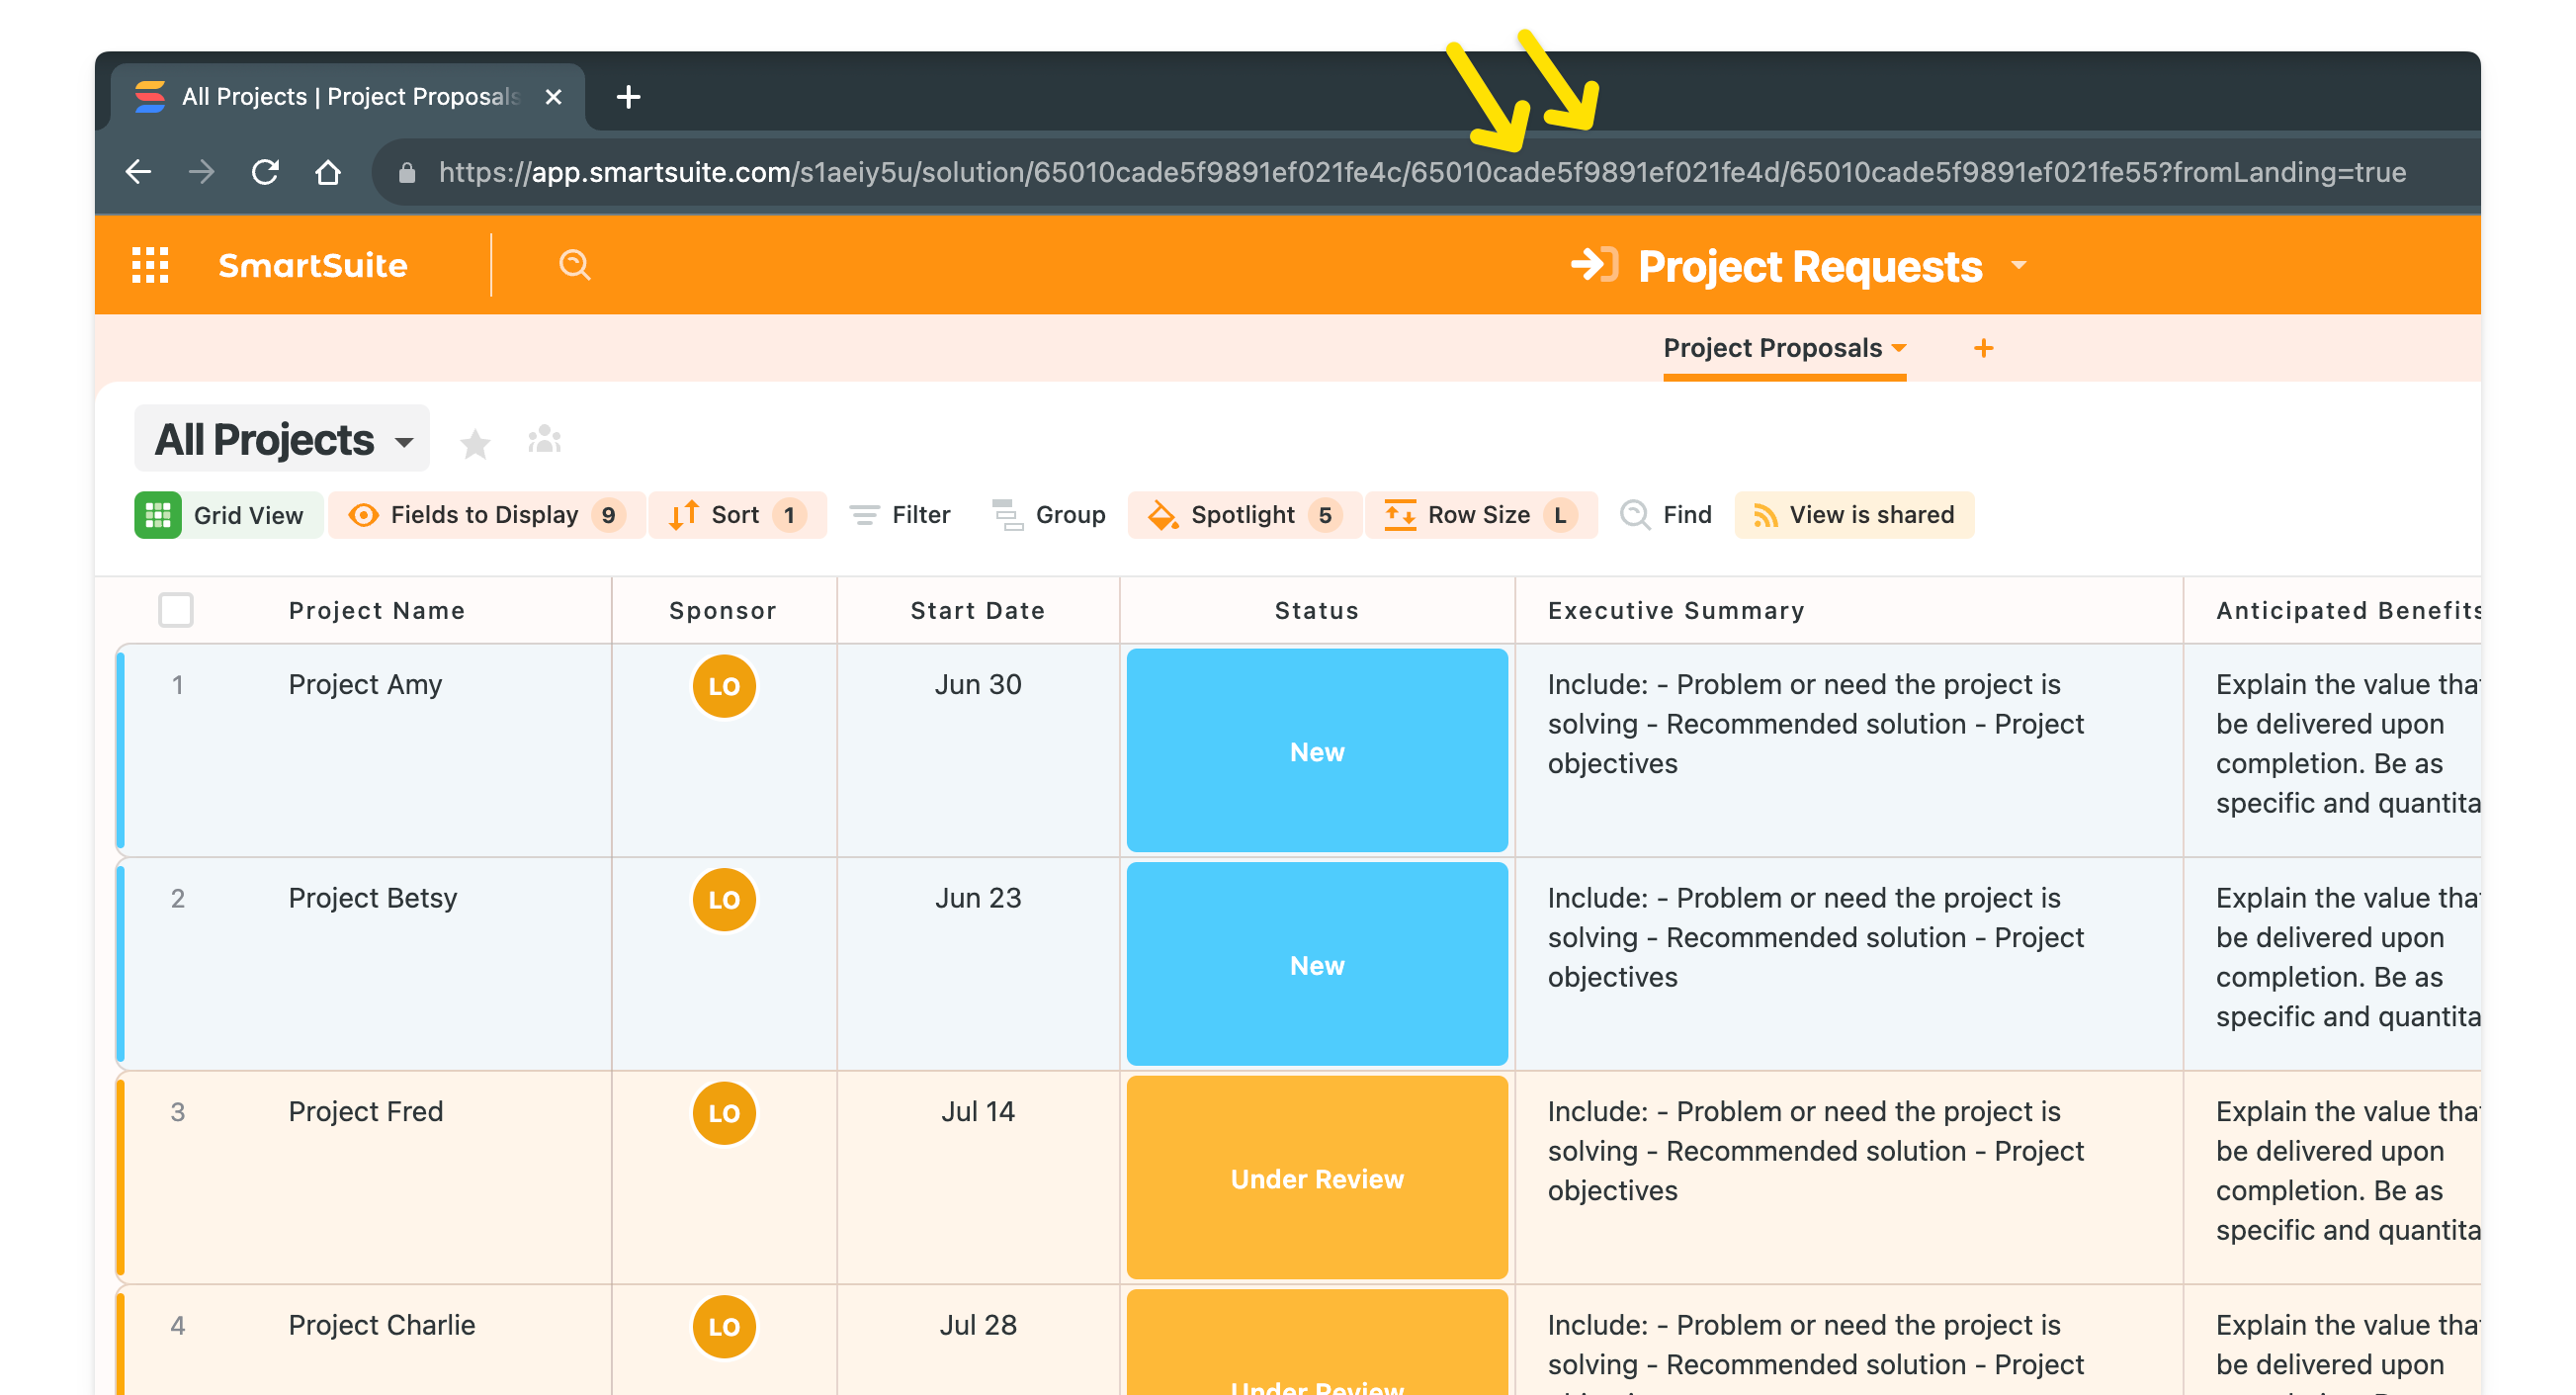
- Find the Table ID for SmartSuite by looking at the second ID in the URL of the table you want to use.
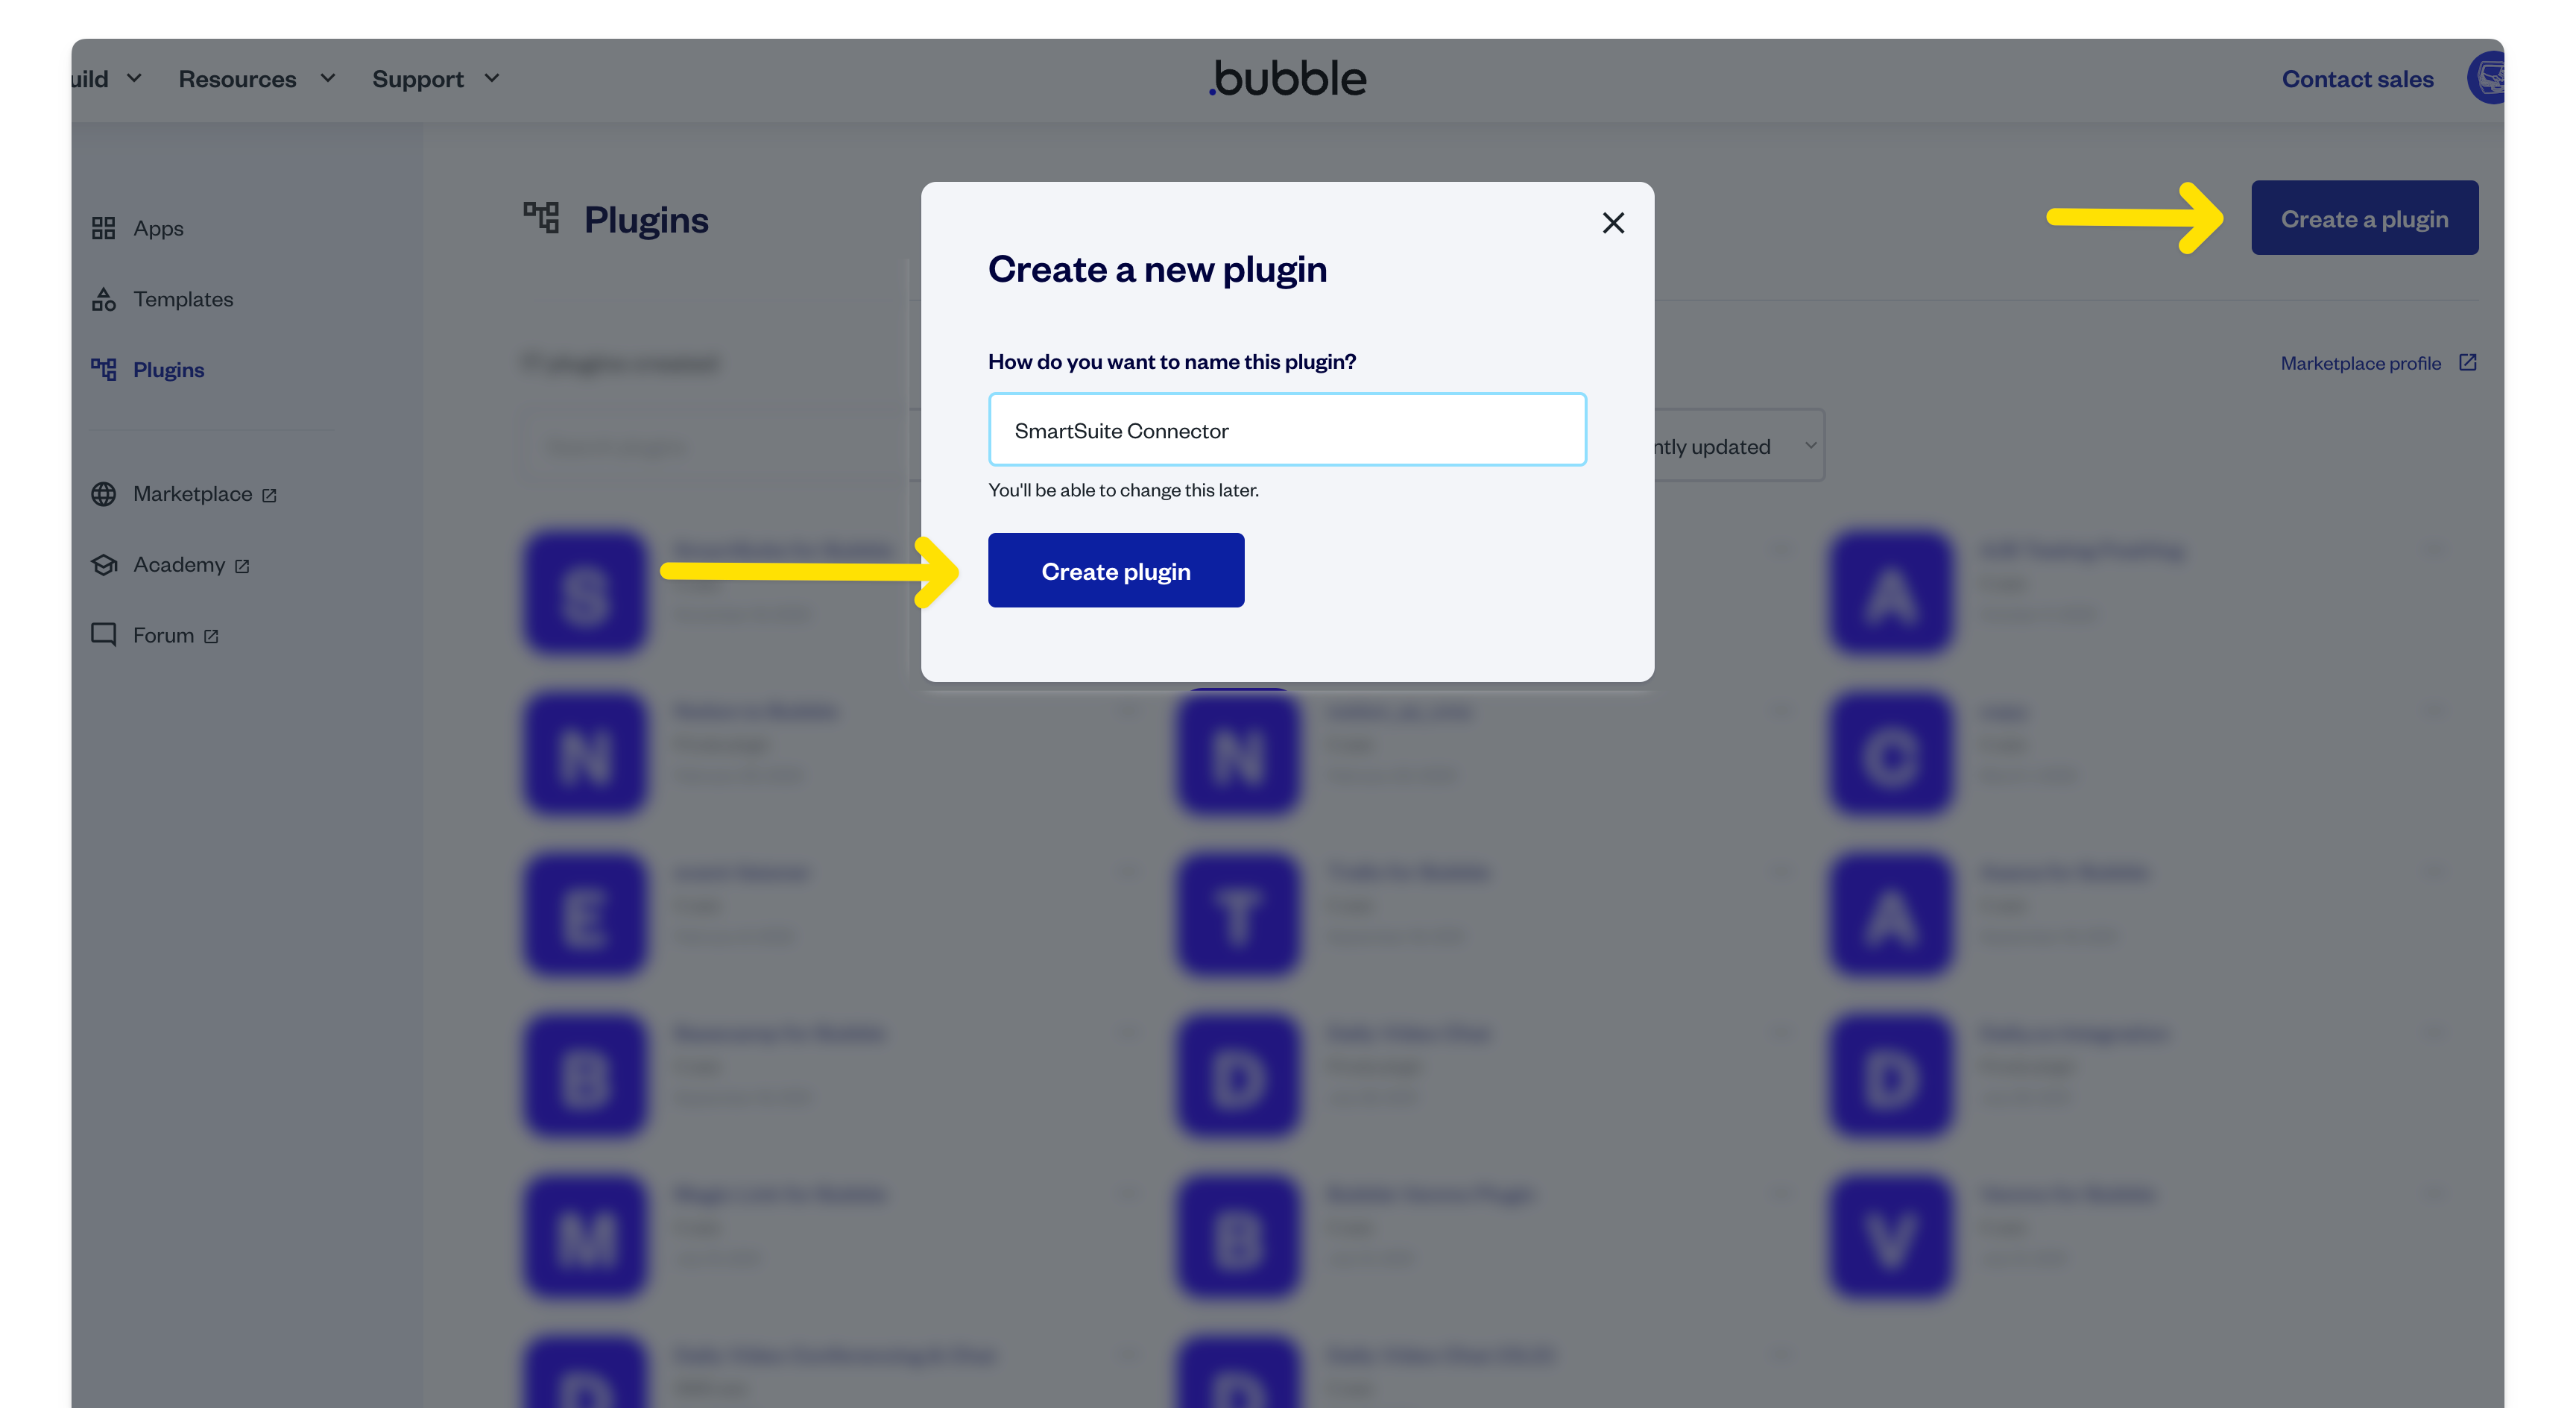
1. Set up the plugin
Once logged in, head to Bubble’s ”Plugins” tab, choose “Create a plugin”, give it a name, and then click “Create plugin”.
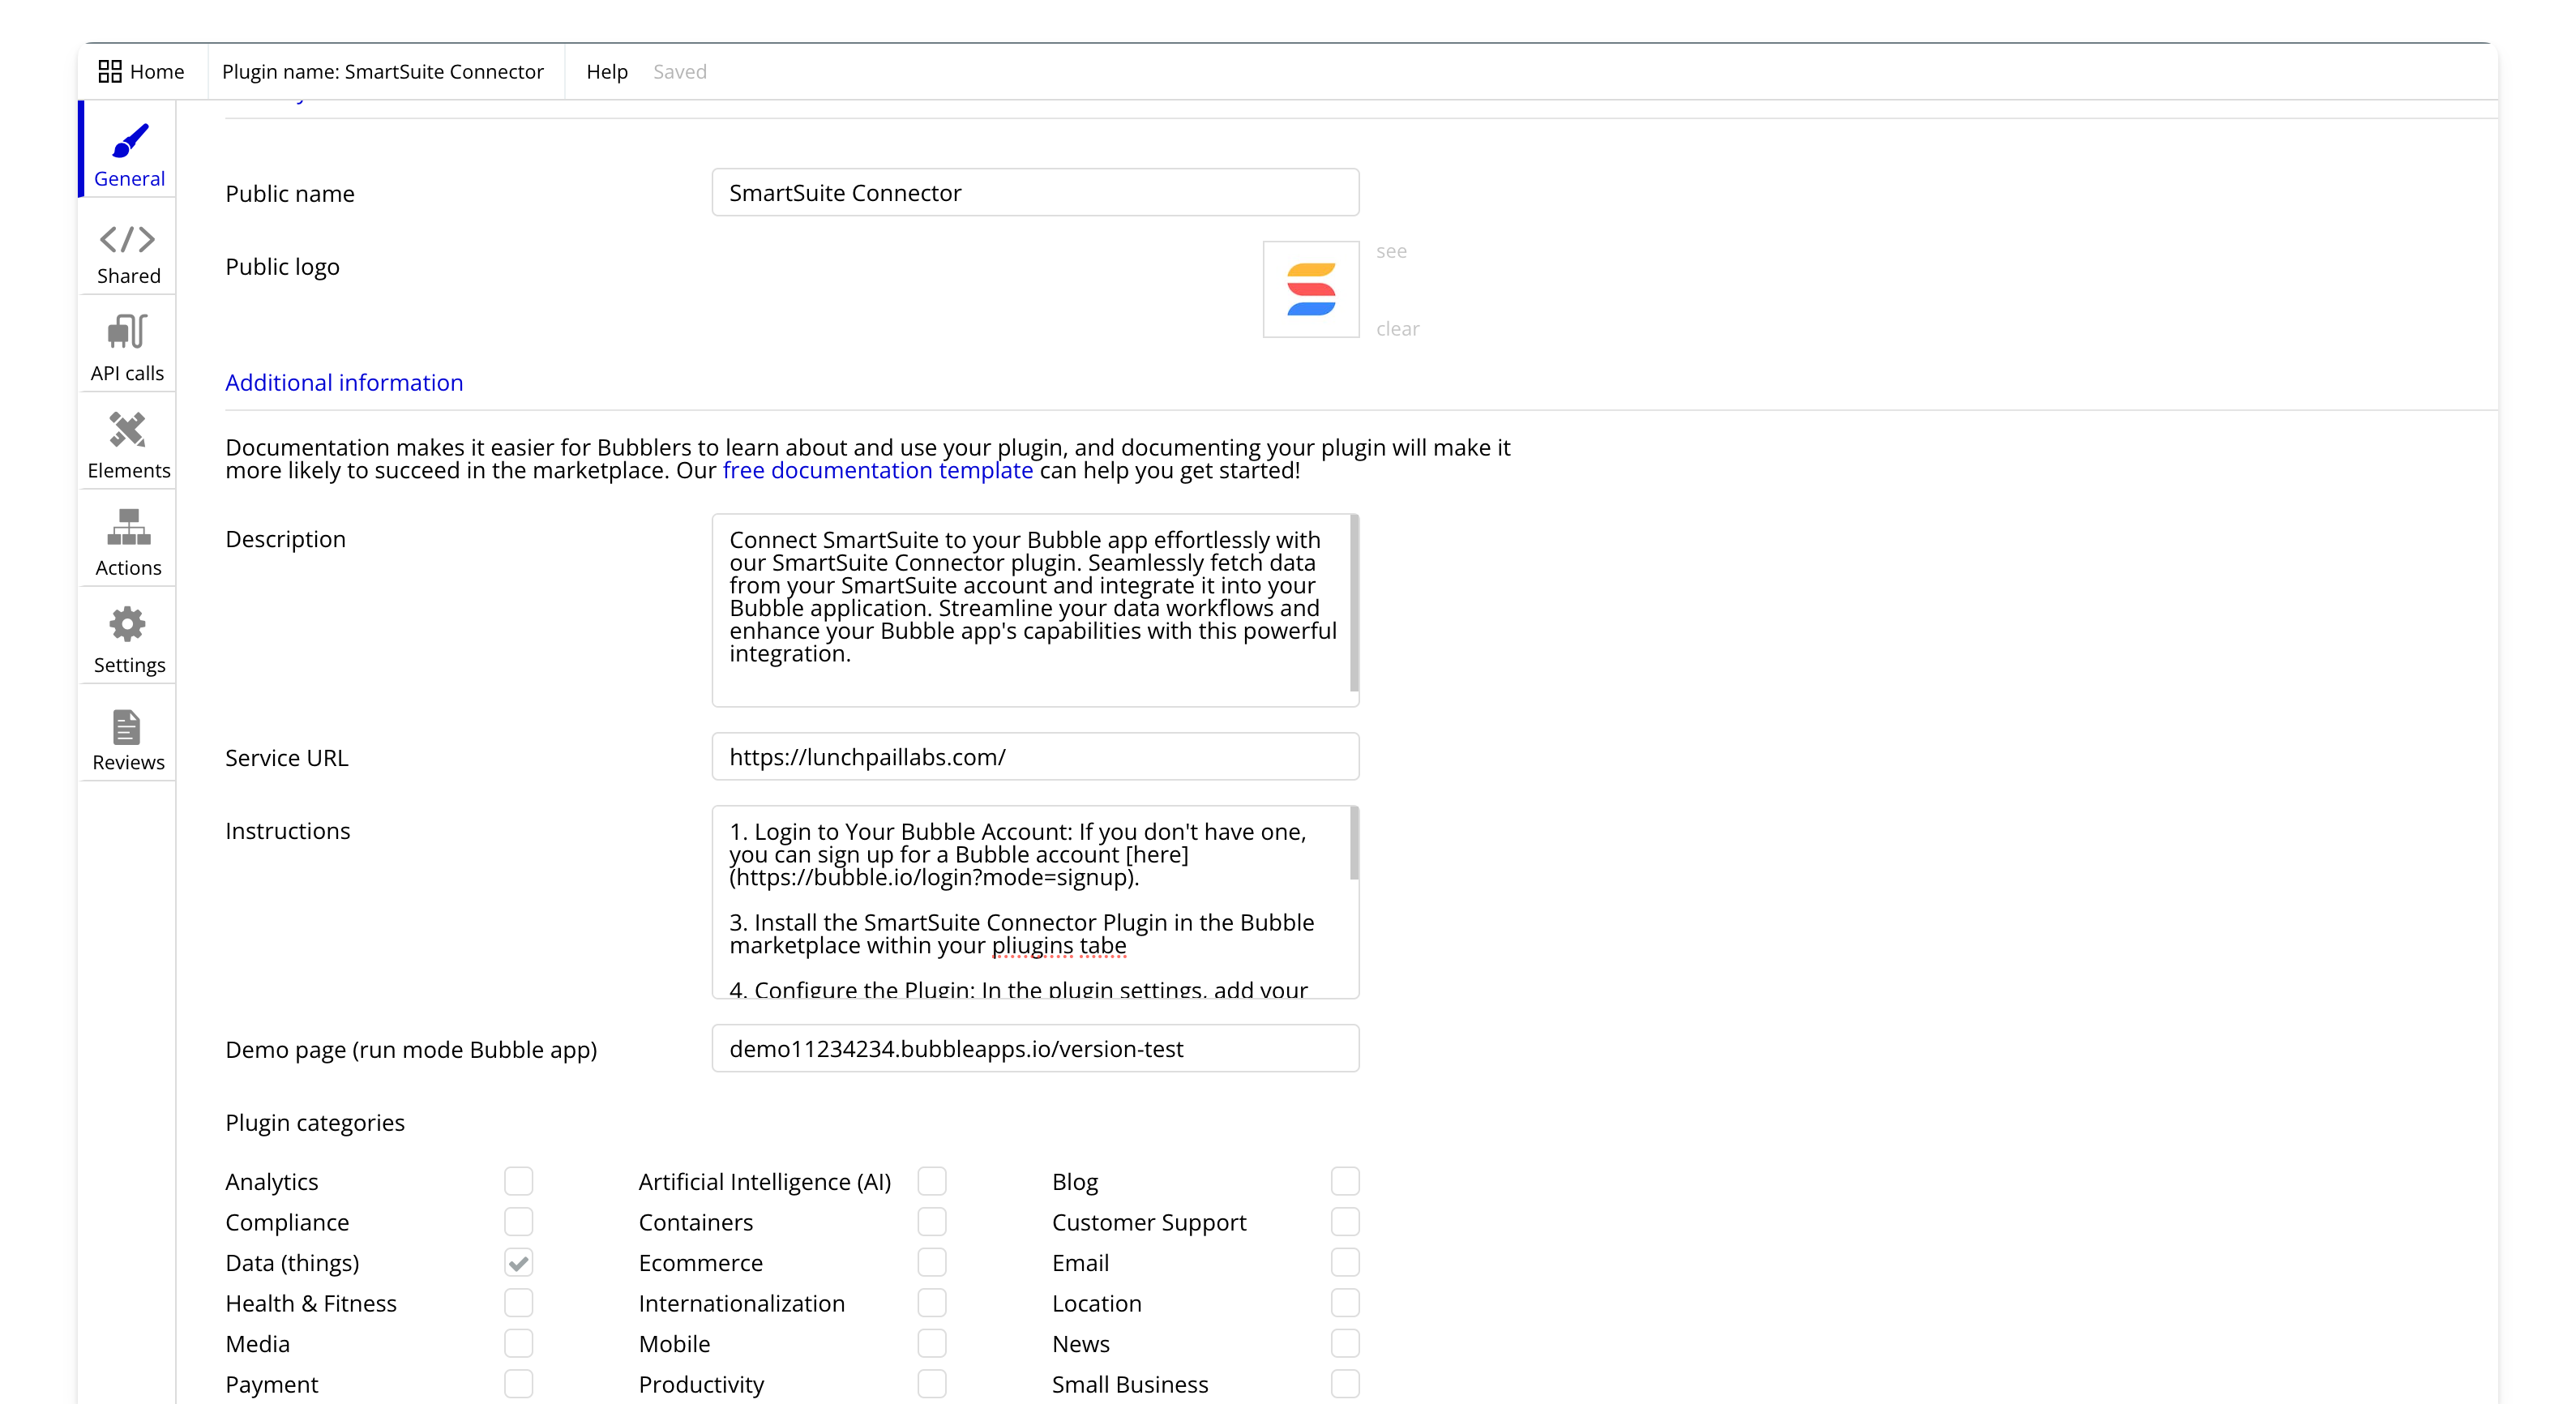
In the “General” tab, provide the necessary information about the plugin. Check the “Data (things)” box in the “Plugin Categories” section. This information is what the Bubble community would see if you were to list this plugin publicly.
In the “Shared” tab, add two additional keys: “API Key'” and “Workspace Id”. These fields will allow users to input their own SmartSuite credentials. Make sure to mark these keys as “private”.

Private keys are exclusively on Bubble's server, preventing their use in client-side code, HTML headers, or elements. This ensures the security of our plugin users' credentials.
2. Build the action to fetch the expected data structure
To enable Bubble to read and display our data, we need to inform Bubble about the expected data type and fields. However, as the plugin author, we can't preconfigure this due to the various tables and field combinations our users might connect to. Currently, the data type import process is manual on the user's end, and it needs to be done for each new table they want to connect. This is one limitation of this particular integration method for Bubble.
This action provides the first table record as an example for users to import.
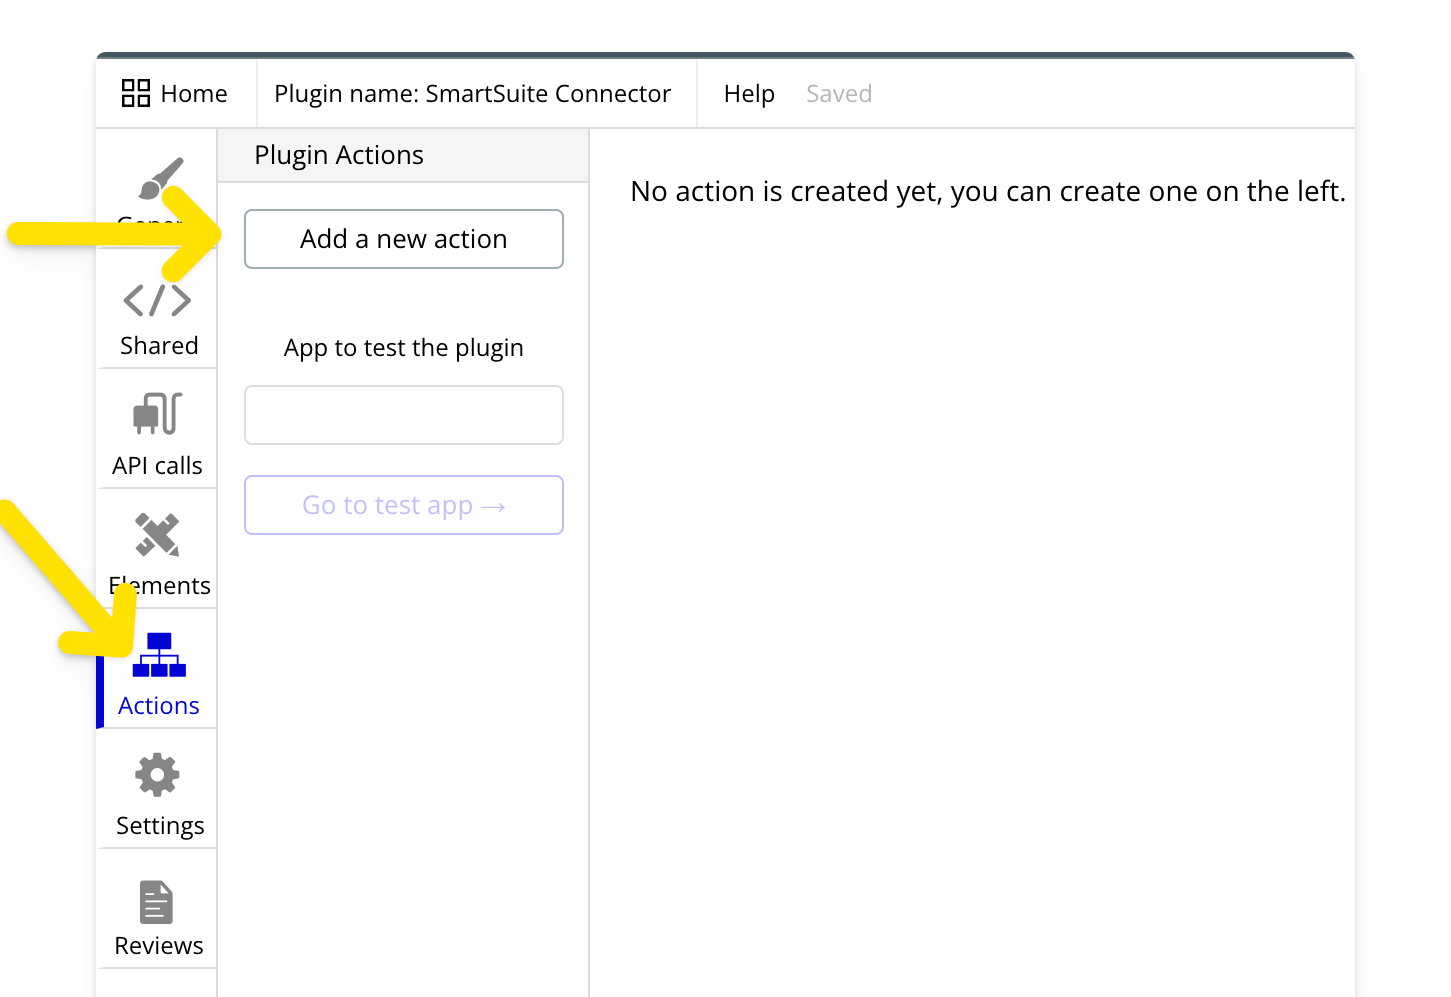
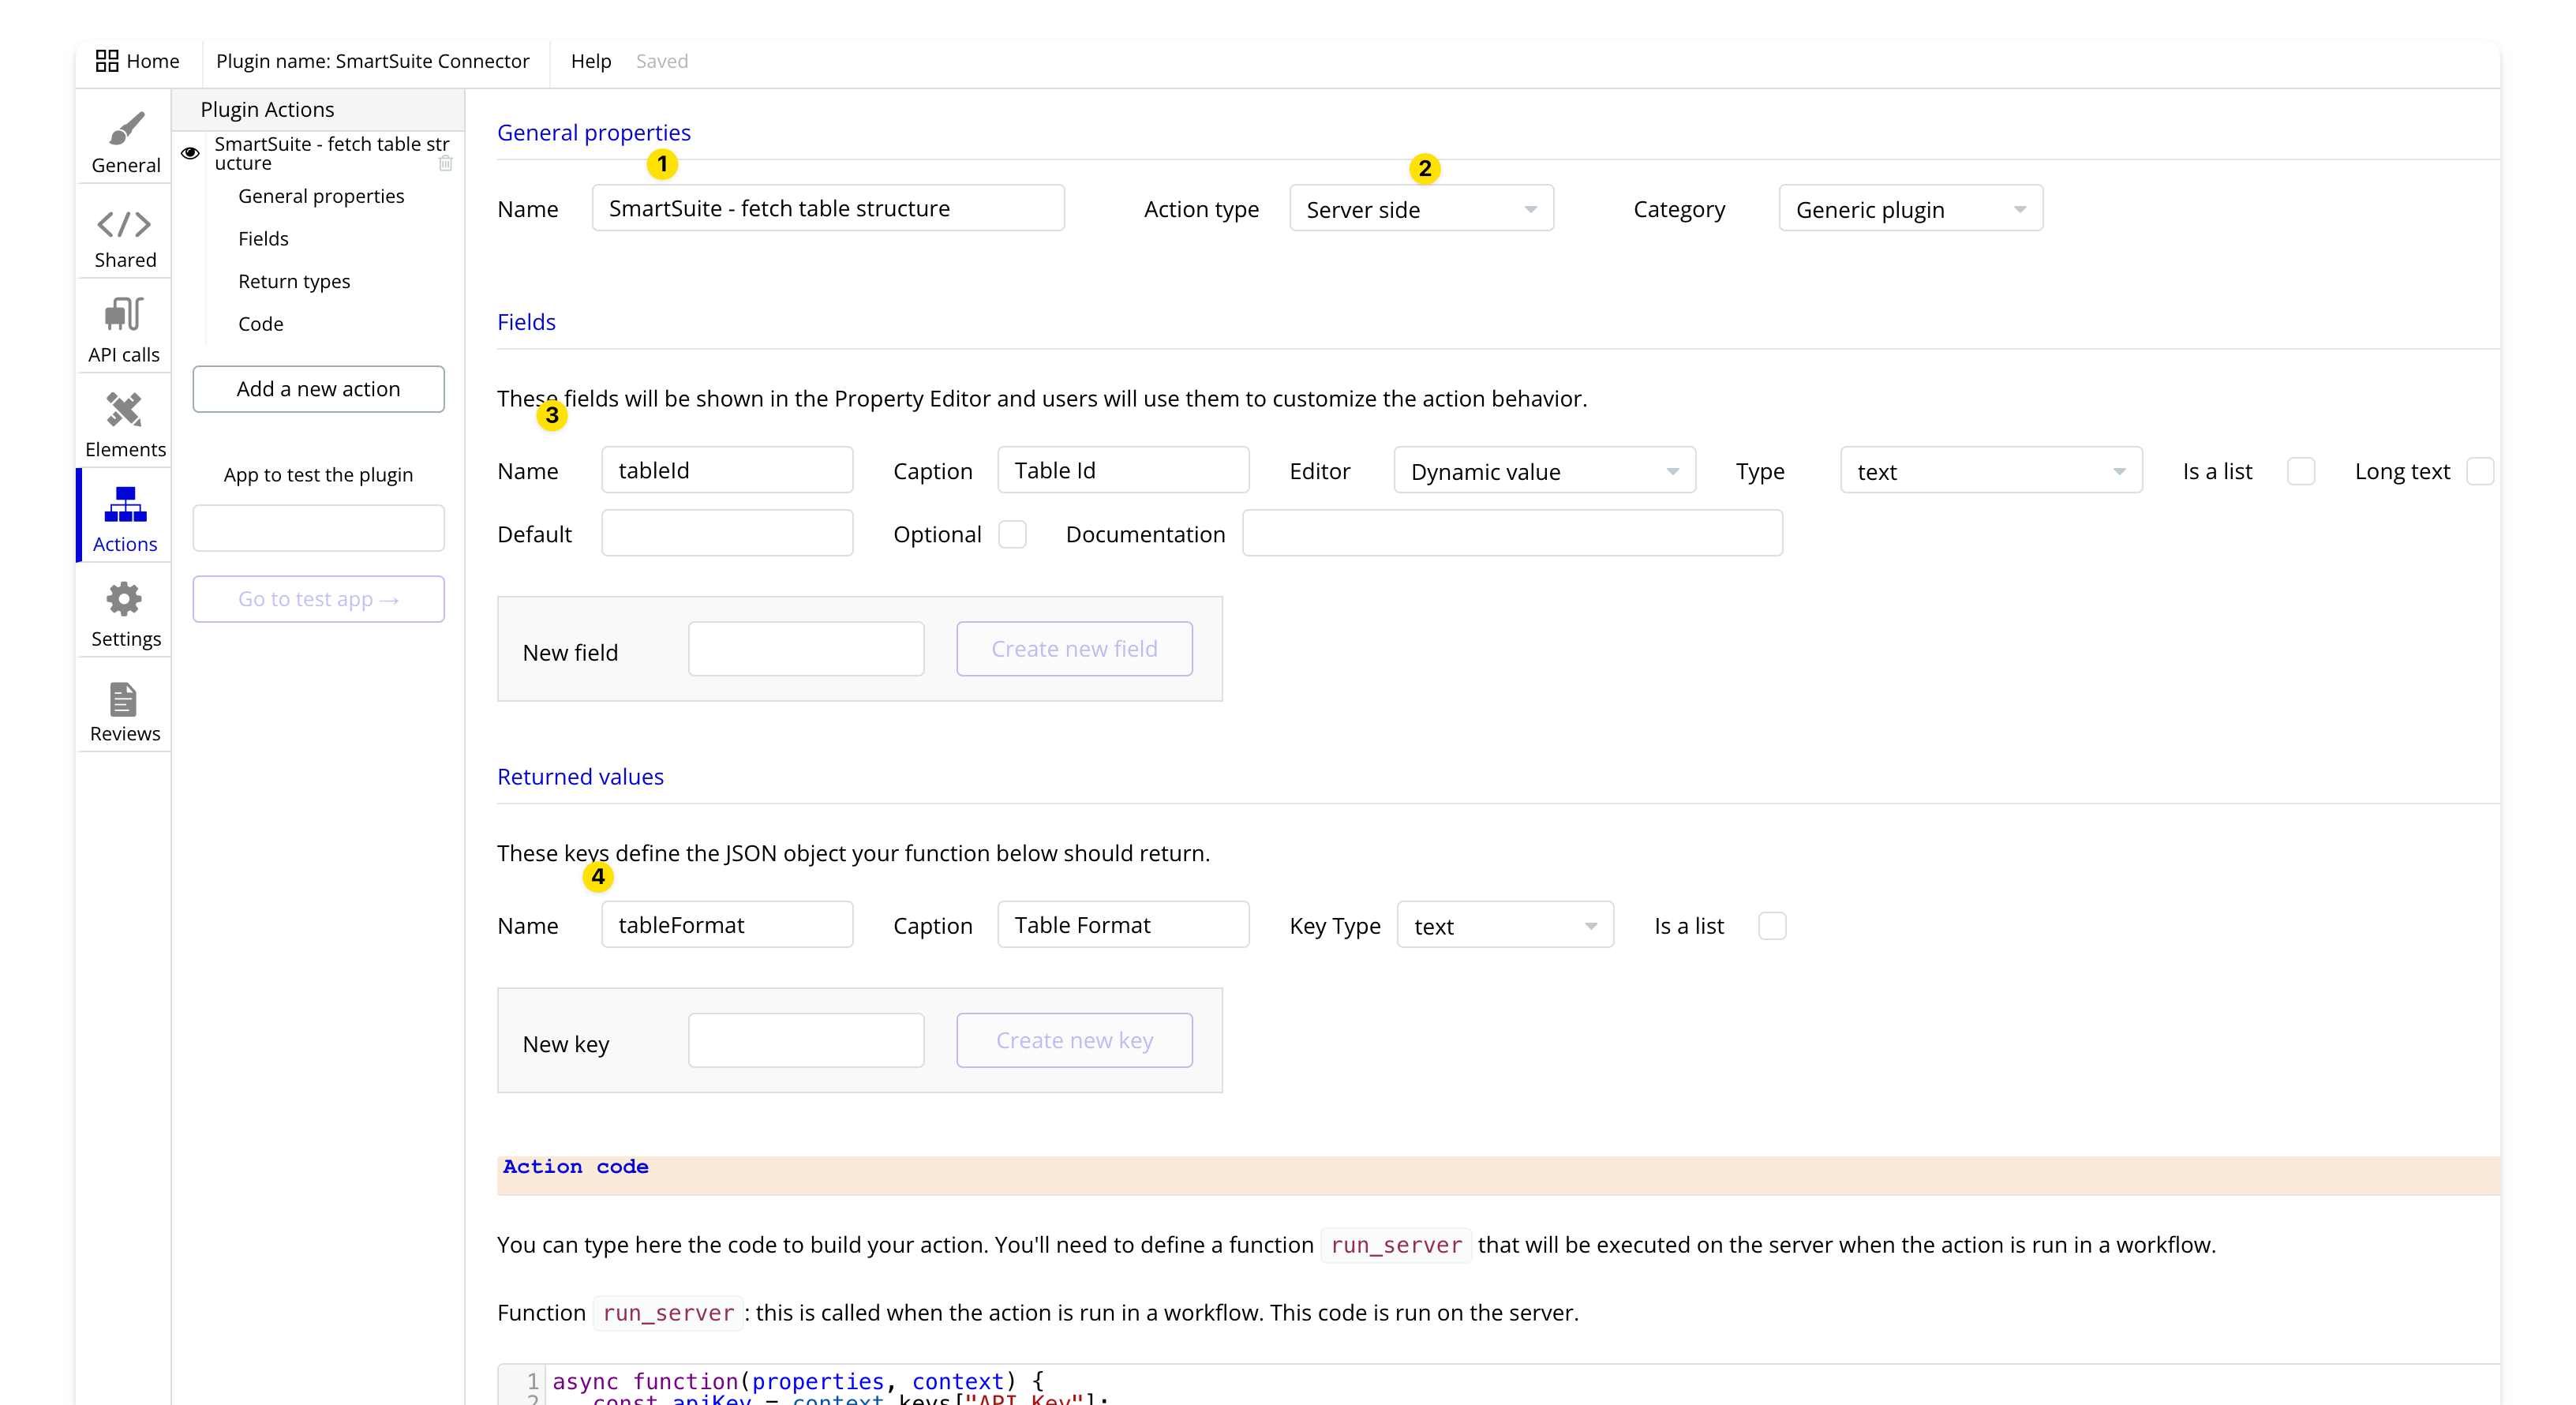
First, “add a new action” from the “actions” tab
In the action editor, configure the following settings:
- Name: “SmartSuite - Fetch Table Structure” (You can use any name. It’s for identification within Bubble workflows, so make it descriptive).
- Action Type: Server Side
- Fields: "TableId" with a type of "dynamic value" and "text" data type.
- Returned Value: "TableFormat" with a type of "text.
In the action code, start by extracting the 'API Key' and 'Workspace Id' from the context object like this:
async function(properties, context) {
   const apiKey = context.keys["API Key"];
   const workspaceId = context.keys["Workspace Id"];
   // Rest of your code here
}
Next, format the API call to SmartSuite by appending the “tableId” to the API URL and configuring the required headers for authentication
async function(properties, context) {
   const apiKey = context.keys["API Key"];
   const workspaceId = context.keys["Workspace Id"];

   const url = `https://app.smartsuite.com/api/v1/applications/${properties.tableId}/records/list/`;
   const options = {
       method: 'POST',
       headers: {
           'Authorization': `Token ${apiKey}`,
           'ACCOUNT-ID': workspaceId,
           'Content-Type': 'application/json'
       },
       body: JSON.stringify({
           "sort": [],
           "filter": {}
       })
   };
}
Fetch records from SmartSuite, filter for the first record. The first record will be the example format that the user will provide to Bubble. This format helps Bubble understand what data to expect. Below is the full code for this task.
async function(properties, context) {
   const apiKey = context.keys["API Key"];
   const workspaceId = context.keys["Workspace Id"];

   const url = `https://app.smartsuite.com/api/v1/applications/${properties.tableId}/records/list/`;
   const options = {
       method: 'POST',
       headers: {
           'Authorization': `Token ${apiKey}`,
           'ACCOUNT-ID': workspaceId,
           'Content-Type': 'application/json'
       },
       body: JSON.stringify({
           "sort": [],
           "filter": {}
       })
   };

   try {
       const response = await fetch(url, options);
       if (!response.ok){
           throw new Error(`HTTP error! status: ${response.status}`);
       }

       const responseBody = await response.json();
       const firstItem = responseBody.items && responseBody.items[0] ? JSON.stringify(responseBody.items[0]) : null;

       return {
           tableFormat: firstItem,
       };
   } catch (err) {
       console.error('Error:', err);
       return {
           tableFormat: null,
       };
   }
}
3. Build the action to fetch records
Next, we’ll create the action for grabbing records from SmartSuite, in the actions tab add a new action

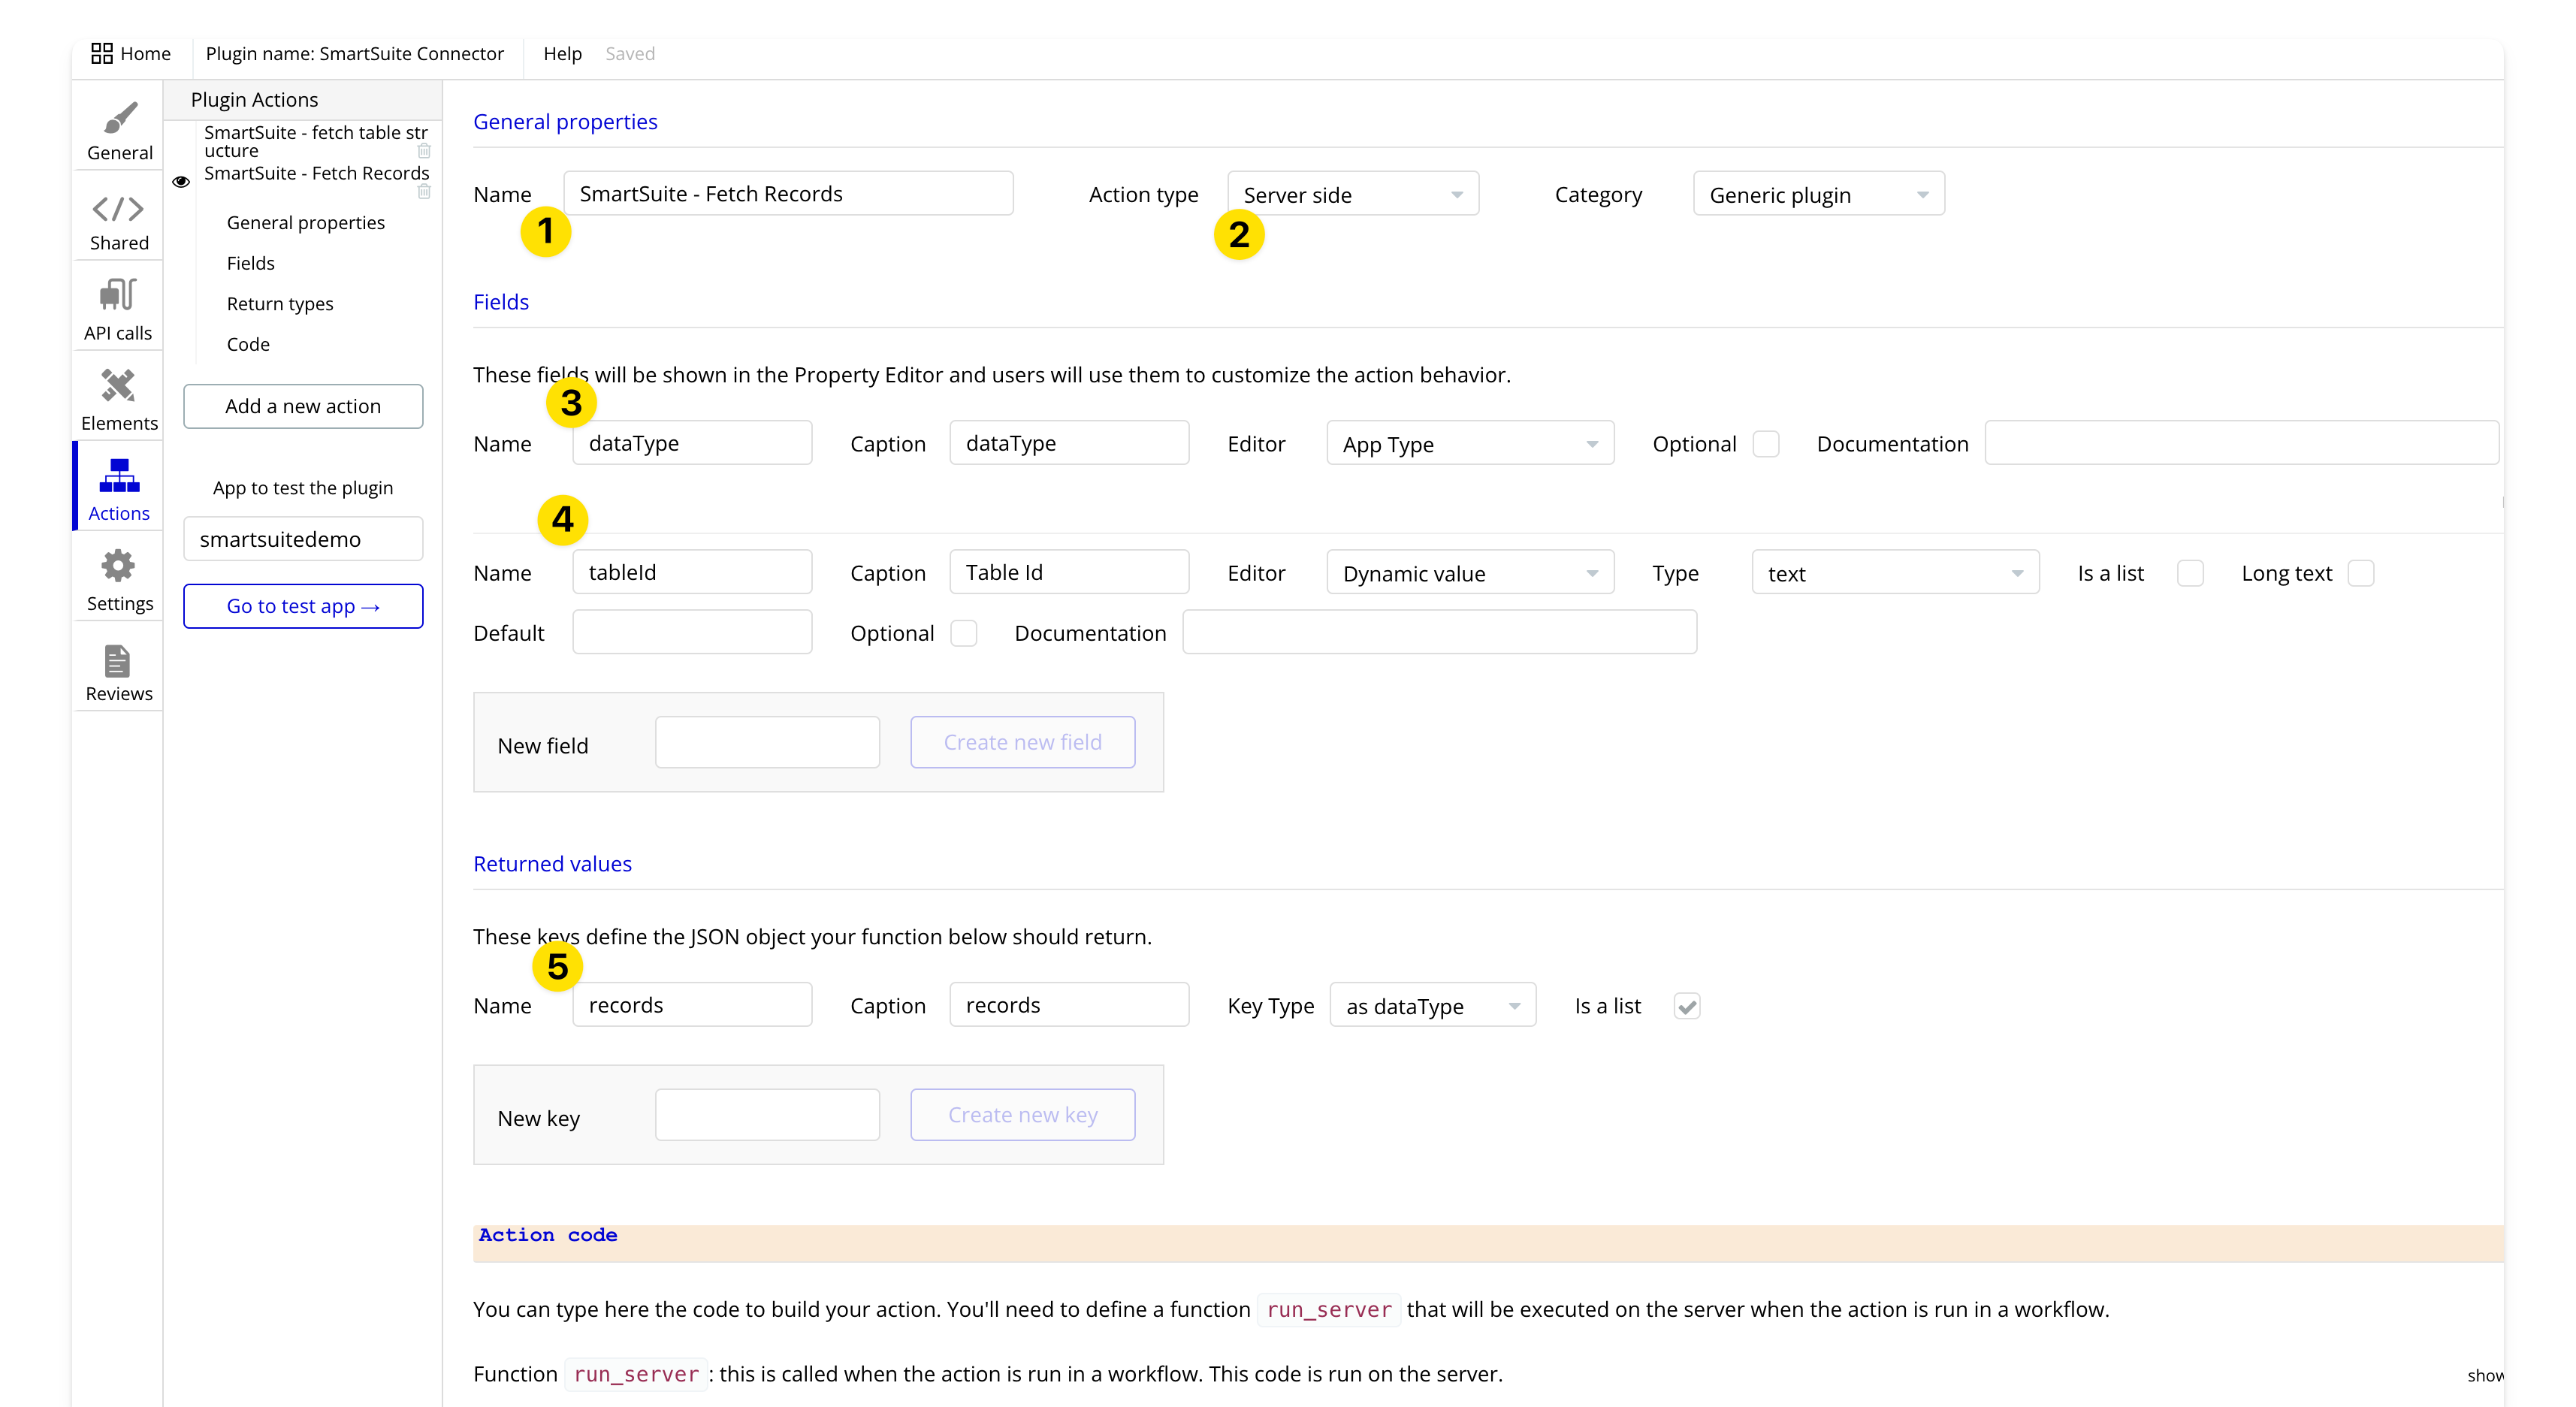
In the action editor, configure the following settings:
- Name: 'SmartSuite - Fetch Records.'
- Action Type: 'Server Side'
- Field 1: “dataType” of type “App type” Users will configure this based on the data type they've created in Bubble.
- Field 2: “tableId” with a “dynamic value” of type 'text’
- Returned Values: 'records' with a type of 'dataType' and mark it as a list. This step helps Bubble understand the type of object this data represents.
The action code resembles the previous action we made to fetch the table format we’ll start by grabbing our API key and Workspace Id from the context object. start by extracting the 'API Key' and 'Workspace Id' from the context and format the API call to SmartSuite by appending the “tableId” to the API URL and configuring the required headers for authentication
async function(properties, context) {
   const apiKey = context.keys["API Key"];
   const workspaceId = context.keys["Workspace Id"];

   const url = `https://app.smartsuite.com/api/v1/applications/${properties.tableId}/records/list/`;
   const options = {
       method: 'POST',
       headers: {
           'Authorization': `Token ${apiKey}`,
           'ACCOUNT-ID': workspaceId,
           'Content-Type': 'application/json'
       },
       body: JSON.stringify({
           "sort": [],
           "filter": {}
       })
   };
}

  let responseBody;

}
Next, we'll convert the response from SmartSuite APIs into a format that Bubble can interpret. Bubble uses special character prefixes for data from plugins. Specifically, data types from the API connector are prefixed with '_api_c2_', while data types from plugins are prefixed with '_p_'
Since our plugin necessitates importing data types into the API connector, we ensure that all keys within the response, including those within nested objects, are prefixed with '_api_c2_'
For a more detailed understanding of this process, you can refer to a helpful Bubble forum thread by Jared from Codeless Consultant.
Additionally, Sergey from Mintflow shared a helpful module for automatically converting objects. We use the code directly in the action code.
Full code snippet
view full code snippet
async function(properties, context) {
  const token = context.keys["API Key"];
  const accountSid = context.keys["Workspace Id"];
  const url = `https://app.smartsuite.com/api/v1/applications/${properties.tableId}/records/list/`;
  const options = {
    method: 'POST',
    headers: {
      'Authorization': `Token ${token}`,
      'ACCOUNT-ID': accountSid,
      'Content-Type': 'application/json'
    },
    body: JSON.stringify({
      "sort": [],
      "filter": {}
    })
  };

  let responseBody;

  try {
    const response = await fetch(url, options);
    if (!response.ok) {
      throw new Error(`HTTP error! status: ${response.status}`);
    }
    responseBody = await response.json();
  } catch (err) {
    console.error('Fetch Error:', err);
    return; // Make sure to exit if the fetch fails
  }

    let convertObject = (obj, param_prefix) => {

    if (typeof obj !== 'object' || (obj && Array.isArray(obj))) return {};

    if (typeof param_prefix !== 'string' || !param_prefix || (typeof param_prefix === 'string' && !['_p_', '_api_c2_'].includes(param_prefix))) param_prefix = '_api_c2_';

    const convert = (obj, key_parent, is_array) => {

        let result = {};

        Object.keys(obj).forEach(key => {

            let cell = obj[key], key_new = `${param_prefix}${key}`;

            if (key_parent && !is_array) key_new = `${key_parent}.${key}`;


            if ((!cell && cell !== 0 && cell !== false) || typeof cell === 'undefined') {


                result[key_new] = null

            } else if (typeof cell !== 'object' && !Array.isArray(cell)) {


                result[key_new] = cell

            } else if (typeof cell === 'object' && !Array.isArray(cell)) {


                result = Object.assign(result, convert(cell, key_new))

            } else if (Array.isArray(cell)) {

                if (typeof cell[0] === 'object') {

                    result[key_new] = [];

                    cell.forEach(value => {

                        result[key_new].push(convert(value, key_new, true))
                    })

                } else {

                    // It's not an object array, so treat
                    // it as an array of Bubble primitives.
                    //
                    result[key_new] = cell;
                }
            }
        });


        return result
    };

    return convert(obj)
};

  try {
    // Directly use responseBody, no need to parse as it's already an object
  if (Array.isArray(responseBody.items) && responseBody.items.length > 0) {
  const prefixedItems = responseBody.items.map(item => convertObject(item, '_api_c2_')); // Pass the object and prefix
  return {
    records: prefixedItems
  };
} else {
  console.error("Items array is empty or the response is not an array of objects");
}
  } catch (error) {
    console.error("Error handling response:", error.message);
  }
}
That's it! In the next section, we'll demonstrate this action.
4. Try the plugin
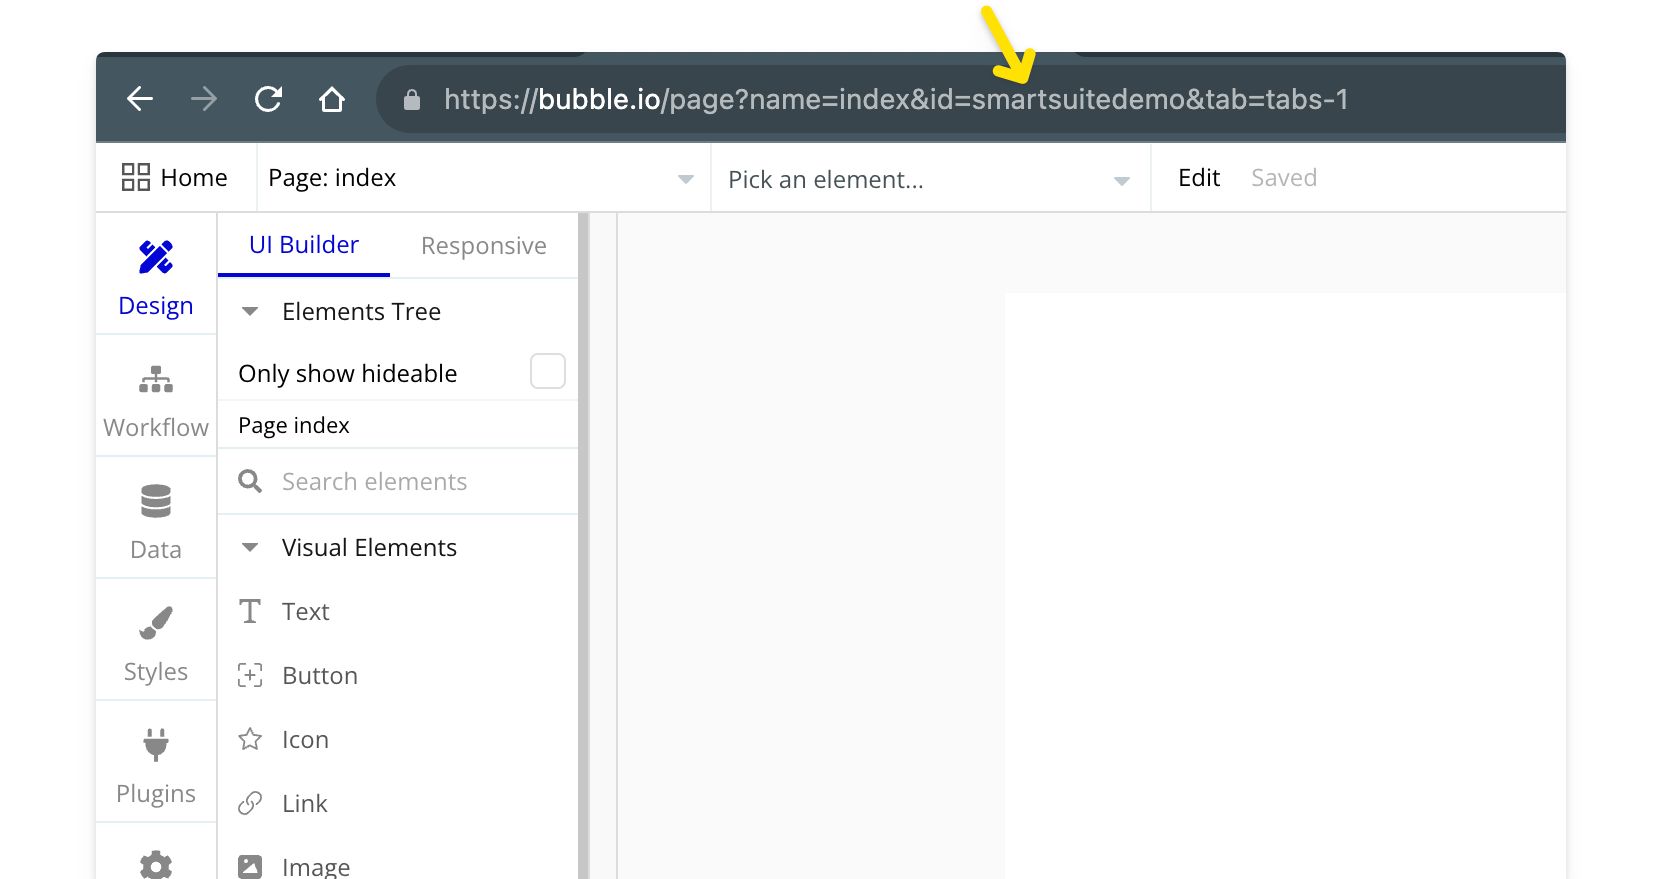
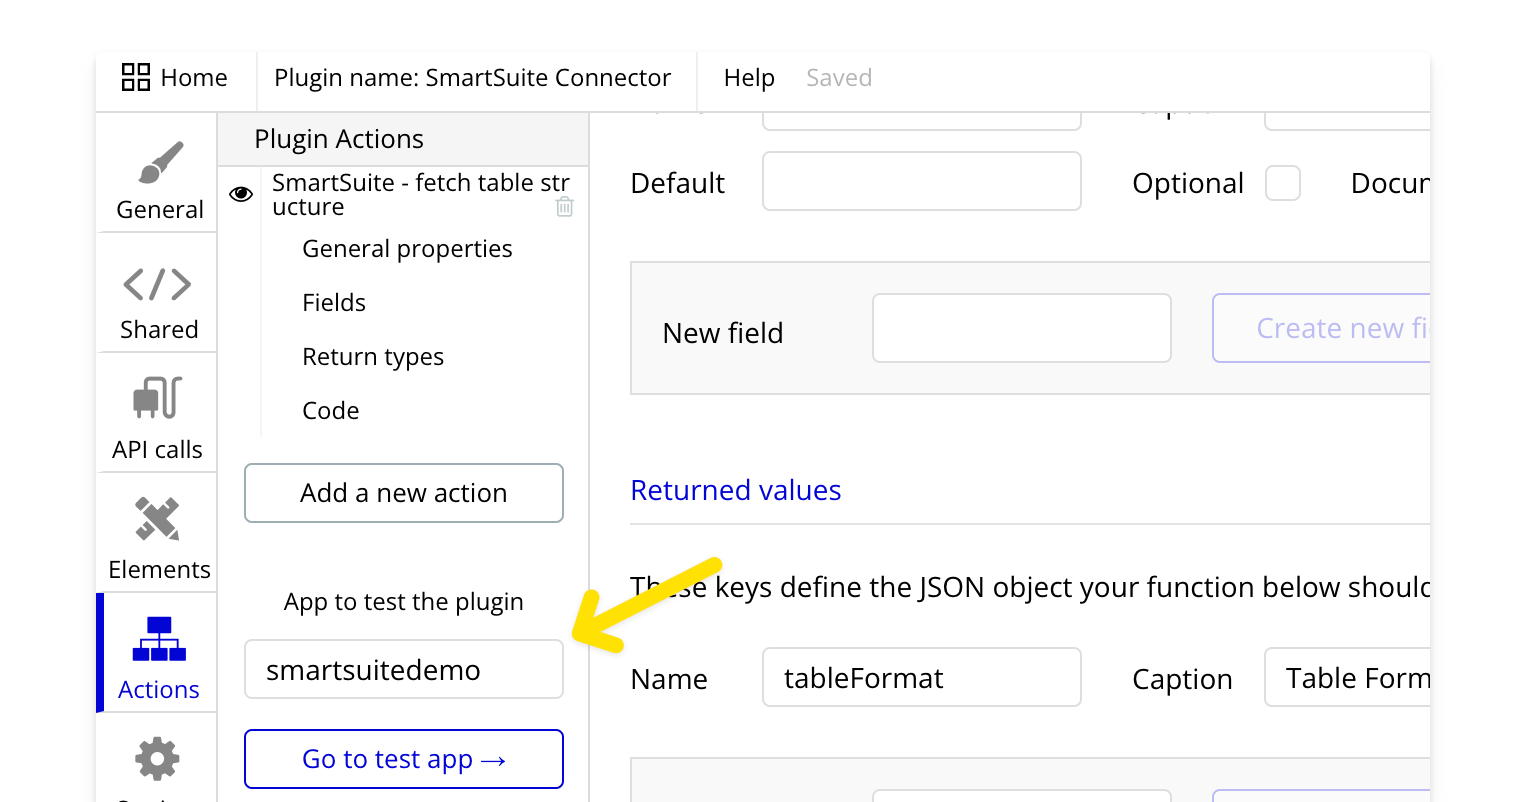
To test the plugin, we’ll require a Bubble app ID. Locate the app ID in the URL, then input it into the “App to test the plugin” field.
Click “Go to test app” and head to the Plugins tab

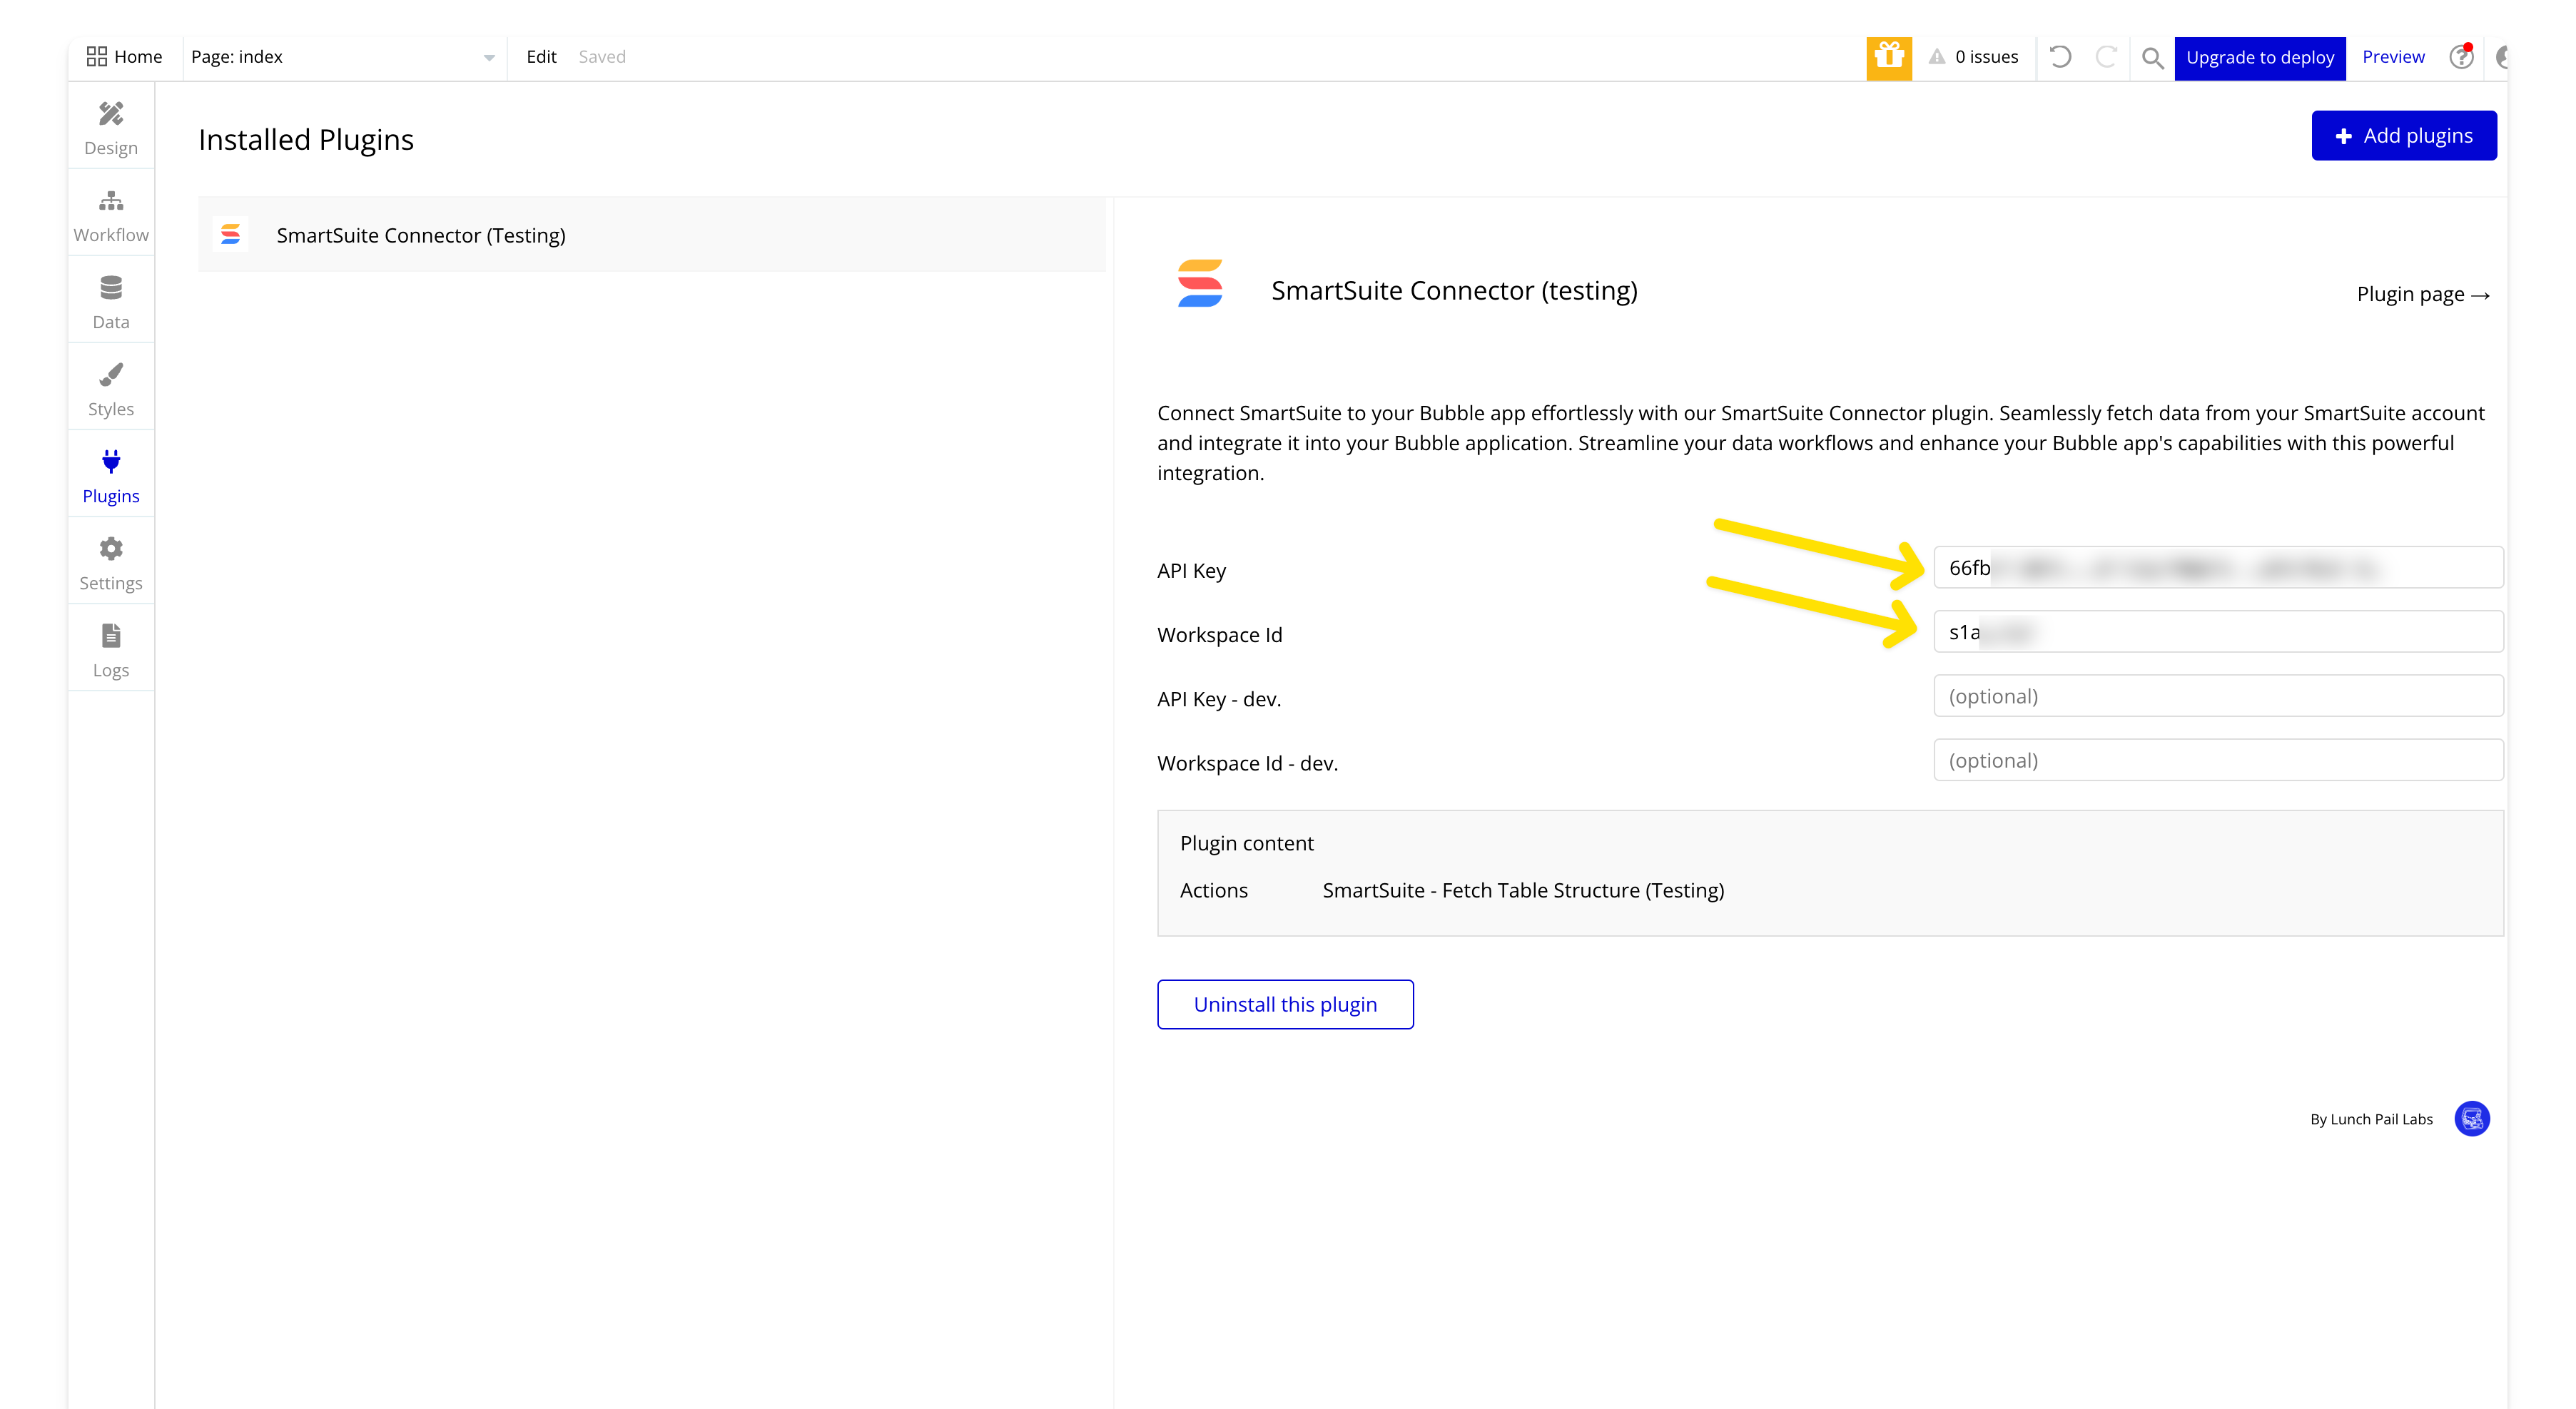
In our SmartSuite plugin, add the API key and Workspace Id from the prerequisites. You can leave the development values empty; they are only necessary if you have different values for development and production.
For setup, make sure you have your virtual data type ready (more on working with virtual data types here), which you can create using the fetched data action for convenience. Here's a summary of the steps:
Fetch the table format for import into Bubble
Create a page to display the data type, add a text element with a custom state named 'format,' and set the text element's content to 'Text A's format'. You can refer to the video demonstration for this step.
Create a workflow with two actions on page load: 'SmartSuite - fetch table' followed by 'set state of Text A' using the results of the first step as the state value. You can refer to the video demonstration for this.
Import the data format into Bubble by copying it and adding it to the API Connector.
Get SmartSuite records for display in Bubble
We’ll create a new page and add a repeating group
Set the data type to the data type we defined earlier and leave the data source empty
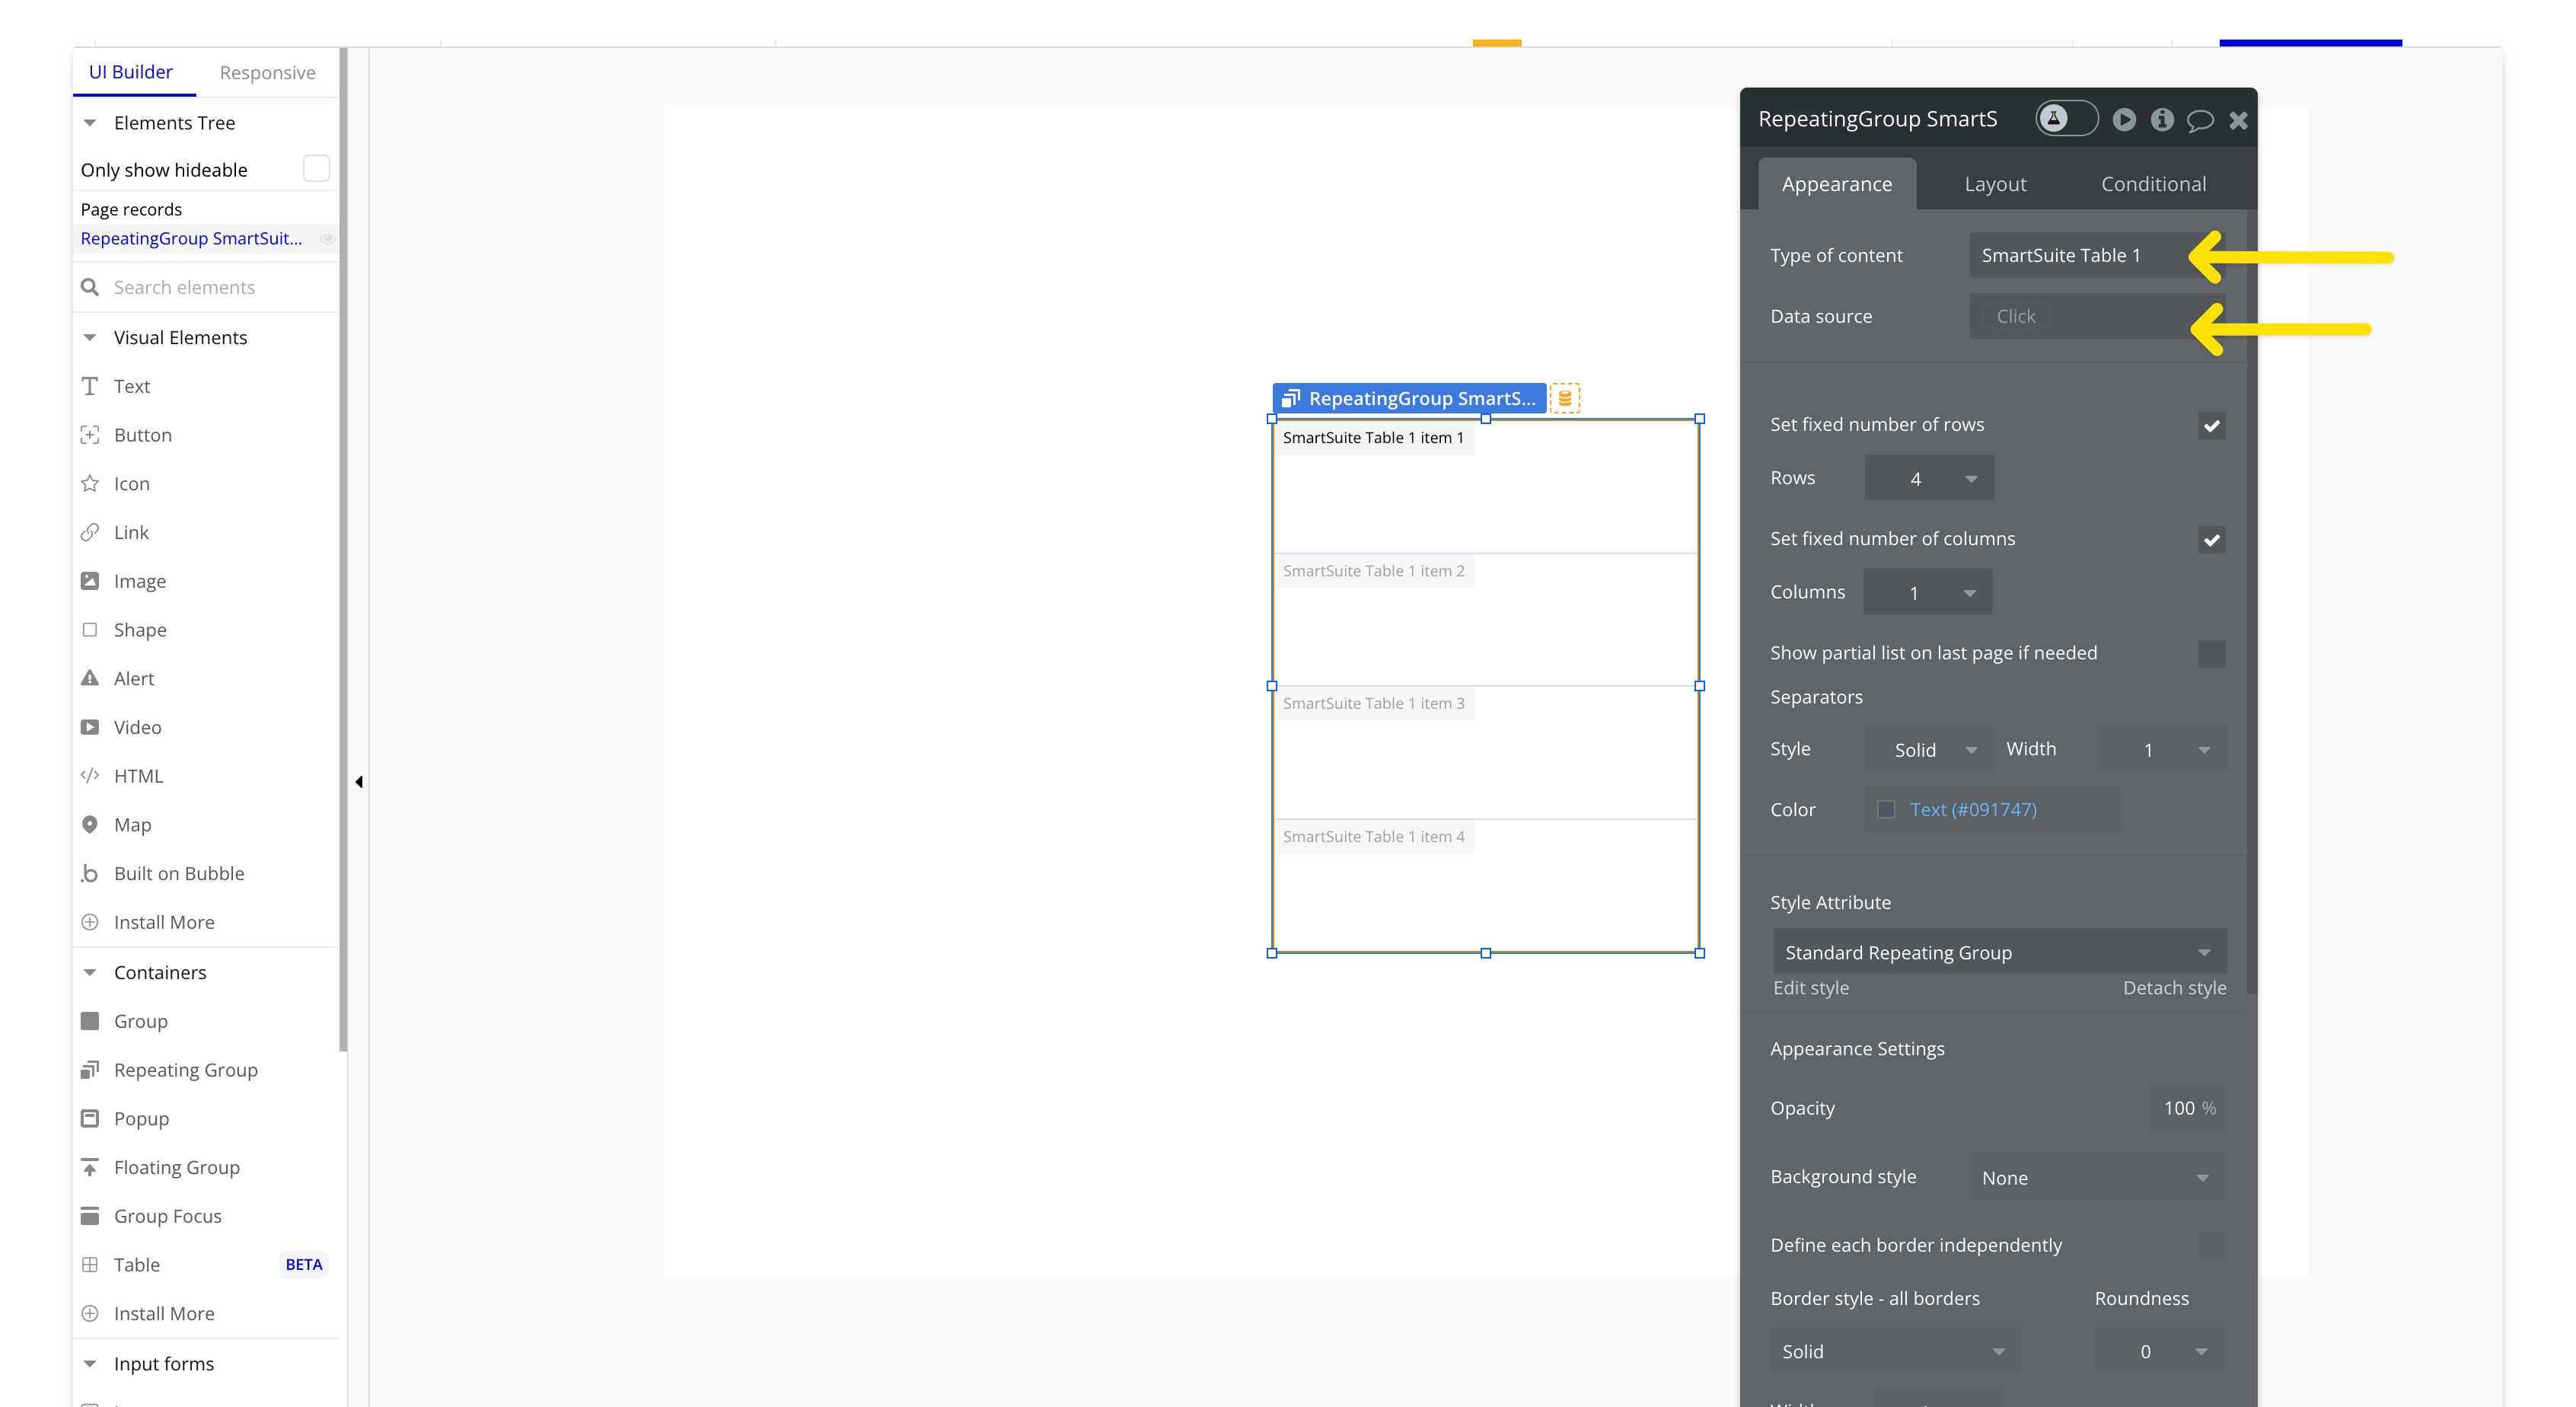
Then add a text element to the repeating group and set the content to the data type’s title. Video demonstration below
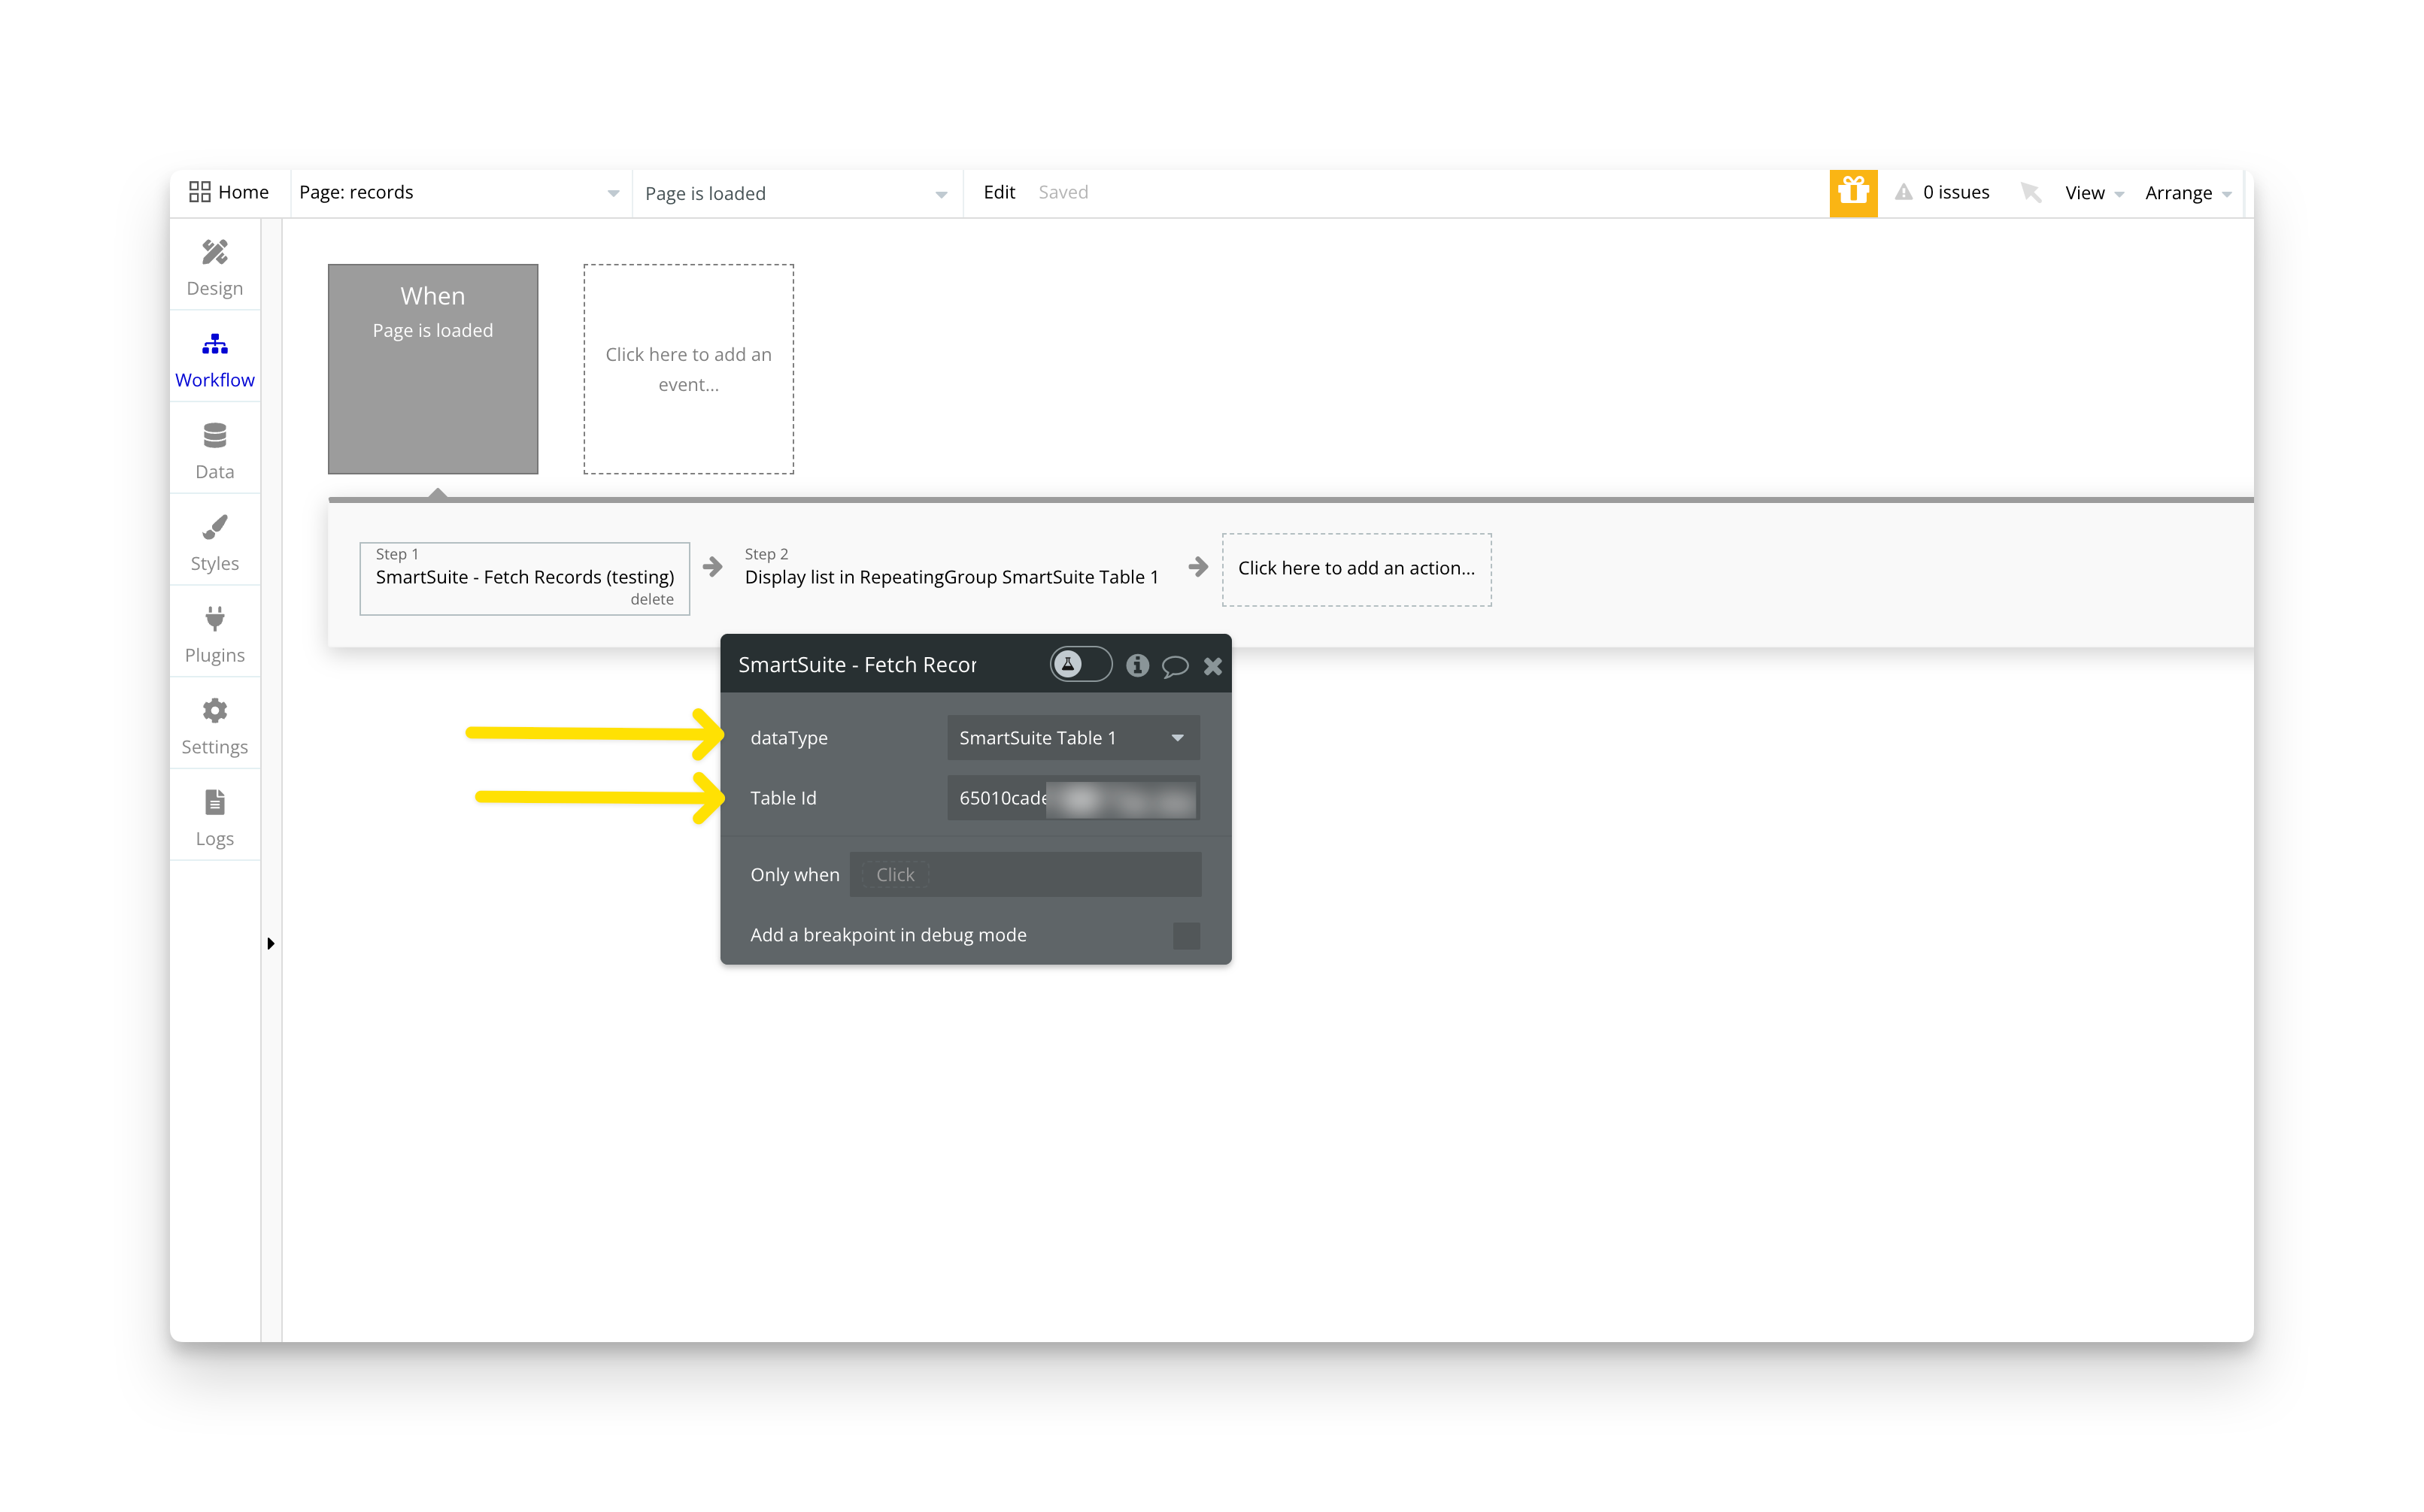
Now in workflows, we can add a new workflow on page load to fetch the data be sure that you add the same “table Id” that you used for the format that you imported into Bubble
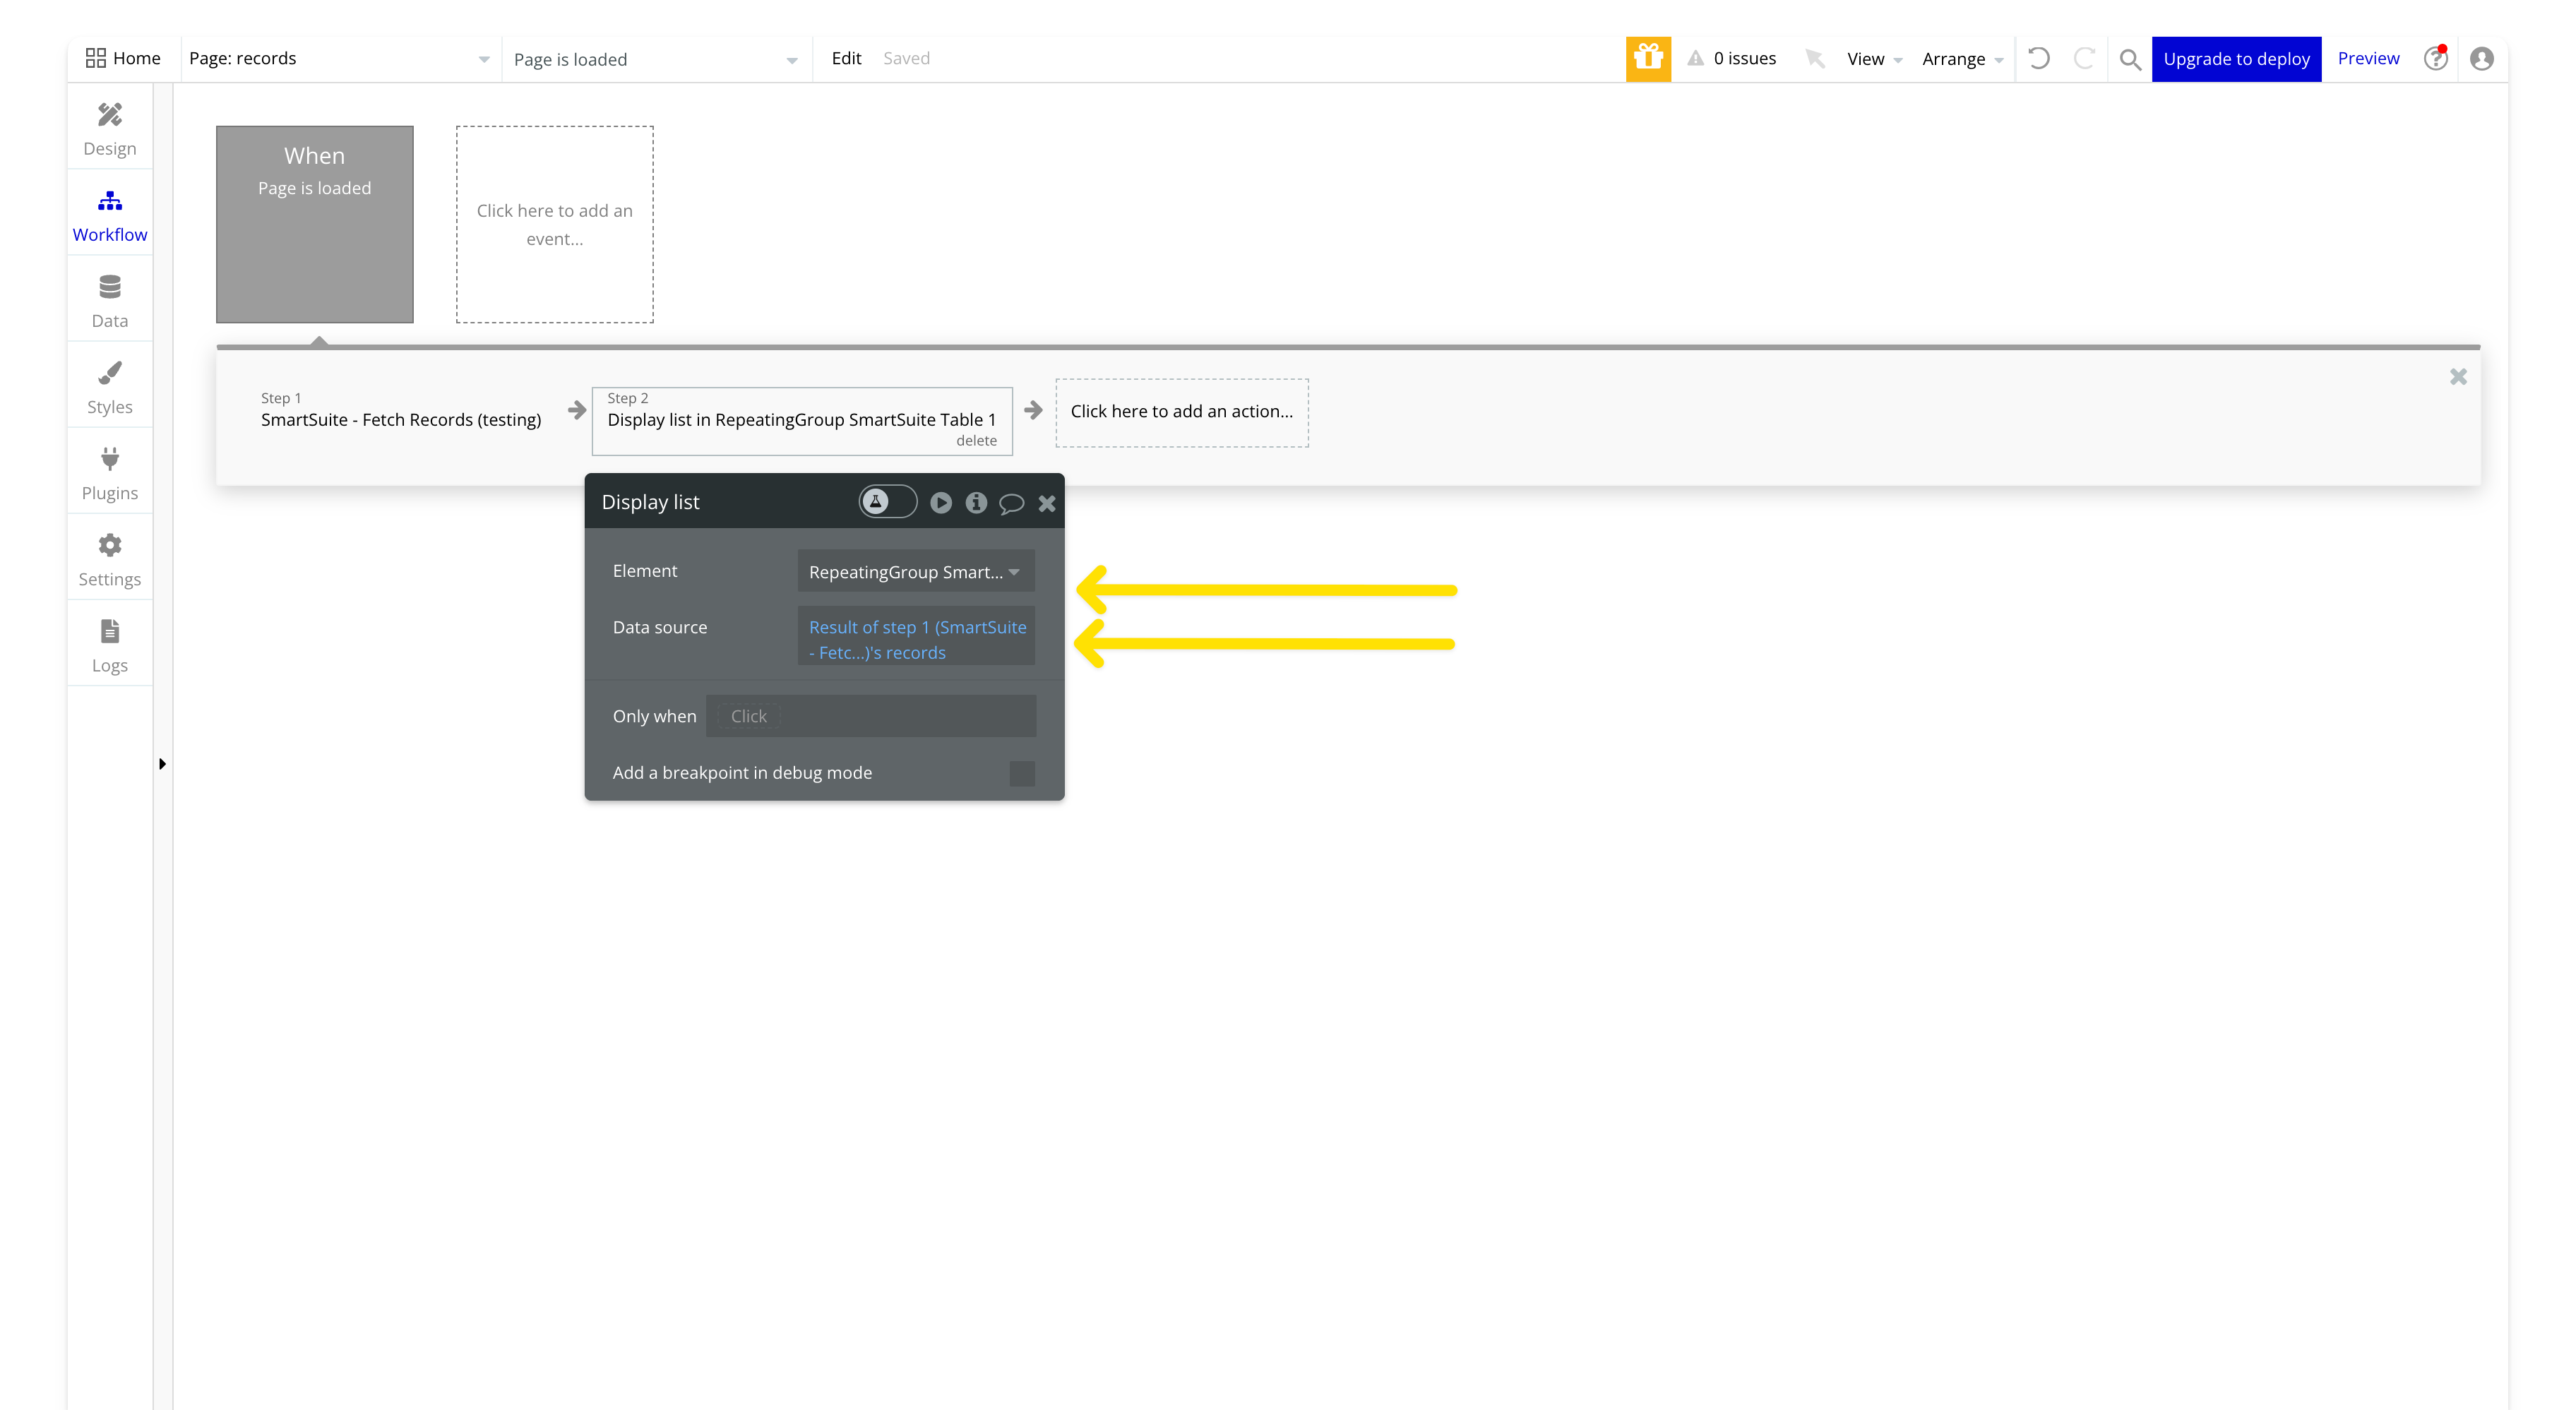
Then add an action to display that data in the repeating group
Then let’s try it out, hit preview and then we shall see our records display
And that's a wrap! With these techniques, you can create a variety of interfaces on top of SmartSuite solutions. There are numerous ways to take your integration further:
- Enhance functionality by adding actions such as updating records in SmartSuite, deleting records, and more.
- Fine-tune the integration with sorting, filters, and limits.
- Create elements for easier setup
If you decide to try out any parts of this, I’d love to hear from you! Feel free to reach out to hey@lunchpaillabs.com
.png?table=block&id=9ba33ac6-8e12-48f6-b980-4333b612ec56&cache=v2)

.png?table=block&id=d3cc914a-2c82-4faa-9285-acd1c6d94edb&cache=v2)