.png?table=block&id=7ec32668-139b-4795-a1da-74d6cece9049&cache=v2)
Do not index
In this guide, we'll create a Postman app for Zapier, showcasing how to connect Postman's API with Zapier's extensive ecosystem of third-party applications.
What is a Zapier “app”?
Zapier apps are Zapier’s form of integrations. You create a Node.js app using your chosen API and then share it on Zapier.
What we’ll build
We're creating a simplified version of the app discussed in How to Plan a Postman App for Zapier. The app will include the following:
- Polls Postman's APIs for new collections at regular intervals
- Allows users to set their preferred polling frequency—ranging from every 1-15 minutes (based on the Zapier plan), to once an hour, daily, or weekly
- Establishes a Zapier trigger for integration with over 7,000 apps
For step-by-step instructions on building the app, keep reading. Alternatively, you can follow along on the GitHub repository or experiment with the private version of the app.
Important Note on API Polling and Limits: This integration regularly checks Postman's APIs for new collections. Frequent polling can quickly use up your monthly Postman API call quota, which is limited to 1,000 calls for Free plans, 10,000 for Basic plans, and 100,000 for Professional plans. To avoid exceeding these limits, please adjust the polling frequency of this integration carefully.
Prerequisites
Ensure you have the following before starting:
- Postman account with an existing collection for testing
1. Install the Platform CLI and Log In
For building Zapier integrations, we can use either Zapier's Platform UI or Platform CLI. In this tutorial, we'll opt for the Platform CLI. Let's dive in.
Ensure you meet the Platform CLI requirements before proceeding. Start by switching to Node.js 18 using:
nvm use v18
If you don't have this version of Node.js, you'll be prompted to download it. Next, install the Platform CLI tool with:
npm install -g zapier-platform-cli
To log in, if you use single sign-on (SSO), enter:
zapier login --sso
Otherwise, a simple:
zapier login
will suffice. Now that you're logged in, we're ready to initialize the app.
2. Initialize a New Zapier App
Now, let's set up a new Zapier app.
Begin by initiating a new app with the
zapier init command, specifying your integration's folder name:
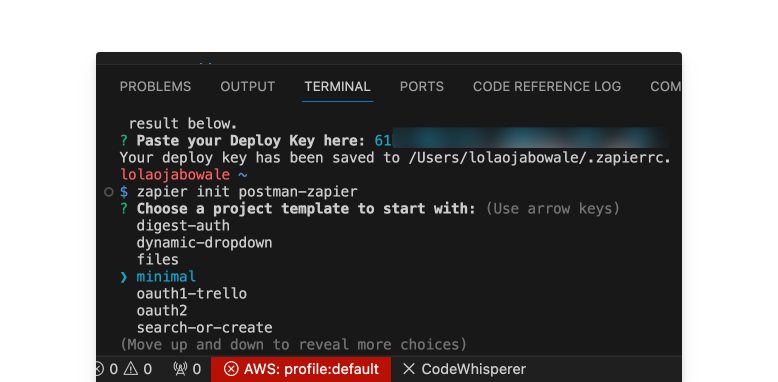
zapier init postman-zapier
You'll be presented with various templates. For this tutorial, we'll start with the
minimal template.
After selecting your template, navigate to your project's directory:
cd postman-zapier
Next, install the necessary dependencies with:
npm install
In VSCode, you can open your project's directory by running:
code -r .
With that, your
postman-zapier app is ready for development!3. Zapier trigger command
Next, we'll delve into development to create our trigger—an event in Postman that initiates a Zap. Our focus will be on building a trigger for when a new collection is created in Postman.
The Zapier CLI offers a convenient command to generate a new trigger. Execute the following command, naming the trigger 'collection':
zapier scaffold trigger collectionAfter running the command, you'll notice a few key changes: a new
triggers folder containing the initial trigger code, an updated index.js linking to our trigger, and a test folder set up for trigger testing.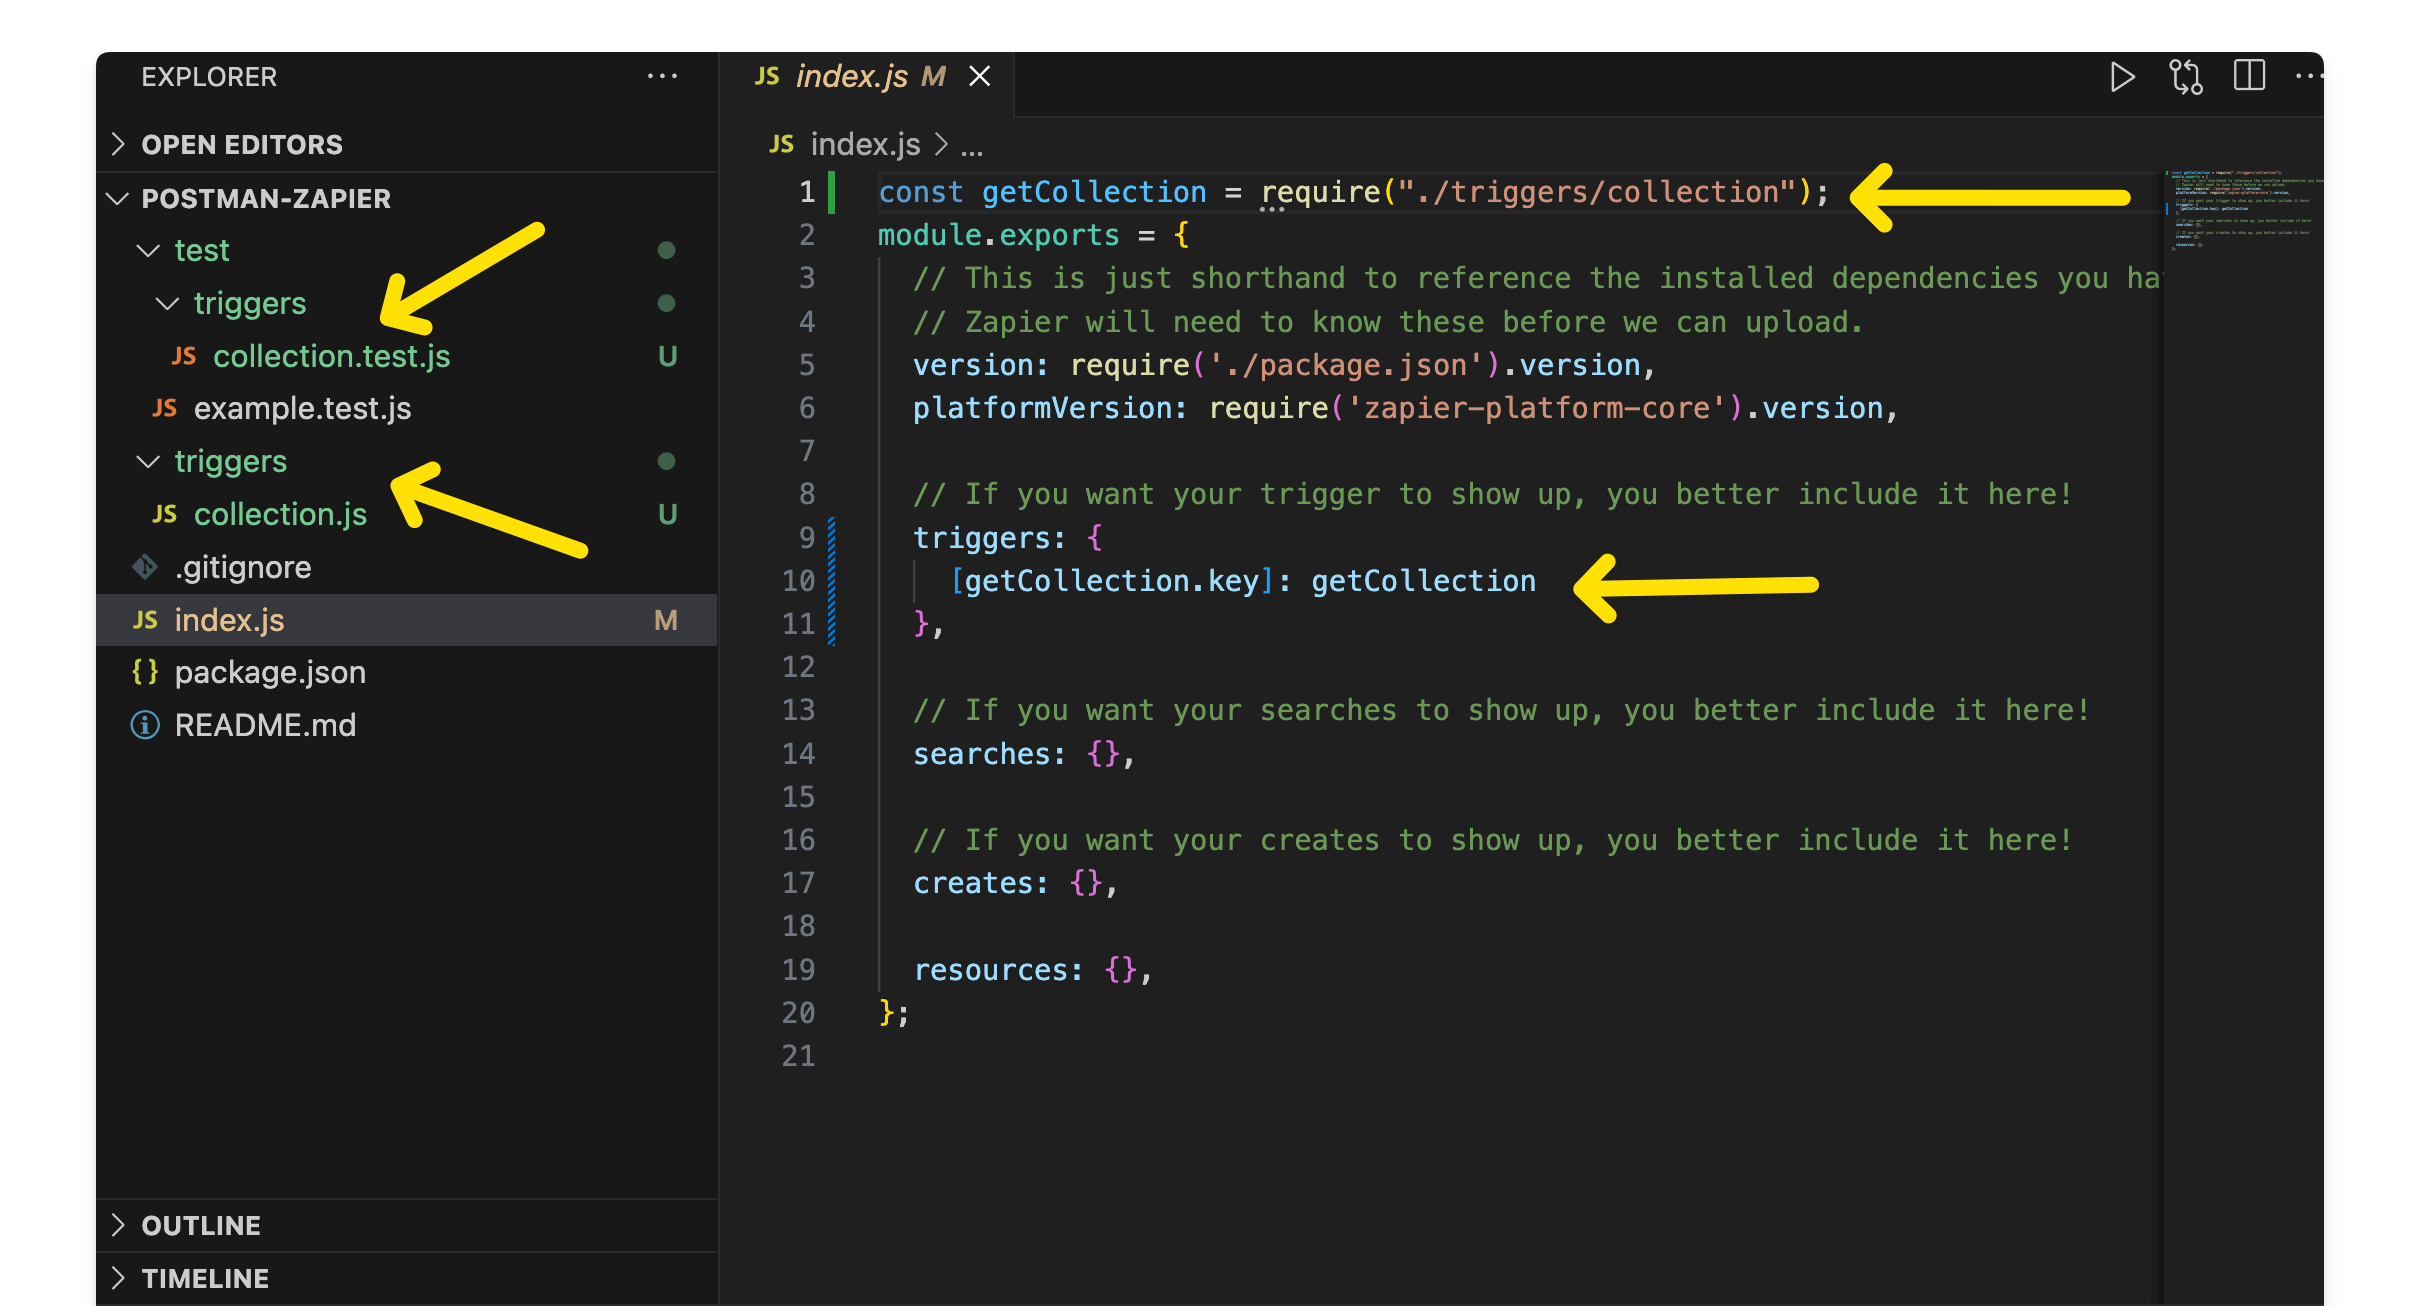
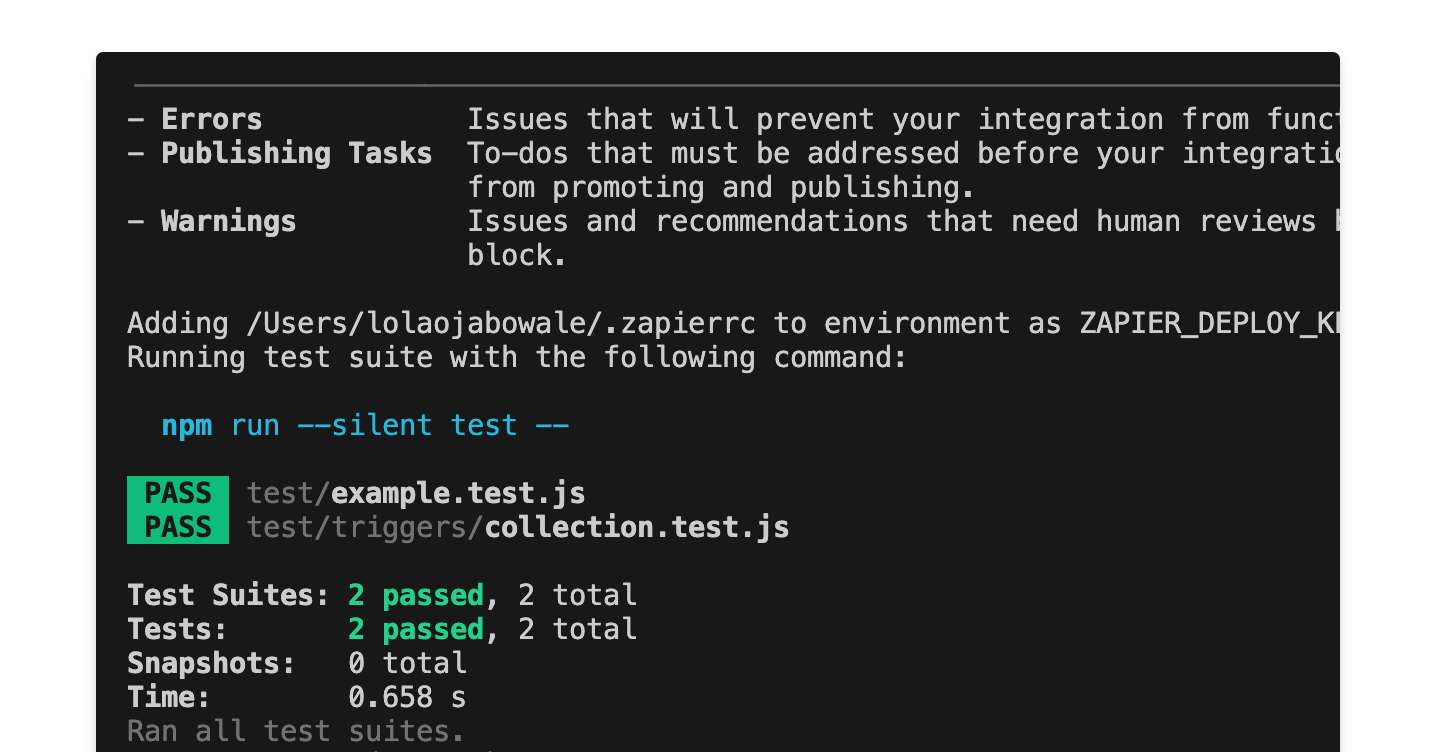
To ensure everything is set up correctly, run
zapier test. This command not only runs npm test but also validates your integration's structure and configures additional environment variableszapier testWith everything verified and in place, we can proceed to authenticating our app
4. Authenticating with Postman
To enable our triggers, we first need to authenticate Postman. Zapier supports several authentication methods such as basic auth, OAuth, API key, session auth, and digest auth. For this tutorial, we'll use an API key.
Start by creating an authentication constant in the
index.js file. According to Postman's documentation, we need to include an X-Api-Key header in every request. Here’s how to set it up:
const authentication = {
  type: "custom",
  fields: [
    {
      key: "apiKey",
      label: "API key",
      required: true,
      helpText:
        "Find the API Key in your [app settings page](https://postman.co/settings/me/api-keys)",
    },
  ],
};
This code above includes the type of authentication and the fields required for authentication.
Then create a function that tests the validity of the API key supplied by the user
const test = (z, bundle) => {
  return z
    .request({
      url: "https://api.getpostman.com/me",
      headers: {
        "X-Api-Key": bundle.authData.apiKey,
      },
    })
    .then((response) => {
      if (response.status === 200) {
        const data = z.JSON.parse(response.content);
        const username = data.user.username;
        return {
          username: username,
        };
      }
      // If the response is not 200, throw an error
      throw new z.errors.Error("Invalid API Key", response.status);
    });
};
Update
authentication to include the Postman username as the connection label and our test function.const authentication = {
type: "custom",
fields: [
{
key: "apiKey",
label: "API key",
required: true,
helpText:
"Find the API Key in your [app settings page](https://postman.co/settings/me/api-keys)",
},
],
test: test,
connectionLabel: "{{username}}",
};To apply the API key to all requests, create a function called
addApiKeyToHeader:const addApiKeyToHeader = (request, z, bundle) => {
if (bundle.authData.apiKey) {
request.headers['X-Api-Key'] = bundle.authData.apiKey;
}
return request
}Add
authentication and a beforeRequest section to the module.exports in order to complete the index.js://authenticating with Postman
authentication: authentication,
beforeRequest: [addApiKeyToHeader],Next, we’ll try it out
5. Testing authentication
To test the authentication. Create a
.env file at the root of your project with your Postman API key:API_KEY='your-api-key-here'Then, in your collection test scripts, ensure your bundle includes the API key:
 const bundle = { inputData: {}, authData: {
      apiKey: process.env.API_KEY,
    }, };
And create a new file for testing authentication within your /tests folder
authentication.test.js:const zapier = require("zapier-platform-core");
// Use this to make test calls into your app:
const App = require("../index");
const appTester = zapier.createAppTester(App);
// read the `.env` file into the environment, if available
zapier.tools.env.inject();
describe("custom auth", () => {
it("passes authentication and returns json", async () => {
const bundle = {
inputData: {},
authData: {
apiKey: process.env.API_KEY,
},
};
const authTestResult = await appTester(App.authentication.test, bundle);
expect(authTestResult)?.toBeDefined();
});
});
Run
zapier test to verify everything works as expected. zapier testIf all goes well, your authentication setup is complete and ready for action.
6. Building the trigger
With our authentication in place and tests running smoothly, we're ready to construct our trigger. Navigate to
collection.js within the triggers folder, and let's refine the trigger code.First, set up input fields in the module exports. Given Postman’s API limits, users should control the frequency of Zapier API calls to conserve their API quota. By default, Zapier polls every 1-15 minutes, which can quickly exhaust API usage!
  inputFields: [
      {
        key: "polling_frequency",
        label: "Polling Frequency",
        type: "string",
        choices: {
          default: "Default (Zapier default interval)",
          hour: "Once an hour",
          day: "Once a day",
          week: "Once a week",
        },
        helpText: "Select how often you want the polling to occur.",
        required: true,
        altersDynamicFields: false,
      },
    ],
Next, we’ll work on our
perform function, we'll initialize it and set up essential variables for managing the polling mechanism. These include tracking the current time, the last poll time, and setting the polling frequency, which can be hourly, daily, or weekly, with a default option as a fallback:const perform = async (z, bundle) => {
const currentTime = new Date();
const lastPoll = await z.cursor.get();
const pollingFrequency = bundle.inputData.polling_frequency || "default";
Then poll the API based on the chosen frequency and the time elapsed since the last successful poll. This step helps in avoiding unnecessary API calls, preserving API usage limits
let shouldPoll = false;
switch (pollingFrequency) {
  case "hour":
    shouldPoll = !lastPoll || currentTime - new Date(lastPoll) >= 3600000;
    break;
  case "day":
    shouldPoll = !lastPoll || currentTime - new Date(lastPoll) >= 86400000; // 24 hours in milliseconds
    break;
  case "week":
    shouldPoll = !lastPoll || new Date(lastPoll) < new Date(currentTime.getTime() - 7 * 86400000); // 7 days in milliseconds
    break;
  default:
    shouldPoll = true;
    break;
}
If polling is required, make an API request to fetch data. After a successful request, update the cursor to the current time. If polling is not necessary, re-sets the cursor to the last poll time to prevent expiration.
if (shouldPoll) {
  try {
    const response = await z.request({
      url: "https://api.getpostman.com/collections",
      method: "GET",
    });
    await z.cursor.set(currentTime.toISOString()); // Update cursor after successful poll
    return response.data.collections;
  } catch (error) {
    throw new z.errors.Error("Failed to fetch collections."); // Error handling
  }
} else {
  if (lastPoll) {
    await z.cursor.set(lastPoll); // Re-set cursor to keep it from expiring
  }
  return [];
}
Then expand the sample data to reflect a more detailed structure of the API response, incorporating fields such as
owner, createdAt, updatedAt, uid, and isPublic. Refer to Postman's documentation for successful response formats.sample: {
id: "example_id",
name: "Example Collection",
owner: "example_owner",
createdAt: "2020-01-01T00:00:00Z",
updatedAt: "2020-01-02T00:00:00Z",
uid: "example_uid",
isPublic: true,
}
Next, define the
outputFields. These output fields assign user-friendly labels to the data returned by your trigger, enhancing clarity for users unfamiliar with the data structure.
Populate these fields based on the field schema:
• key: the field from the sample data
• label: name displayed to users
• type: the type for statics sample data
• helpText: A human readable description of the field
• primary: the primary key for deduplication
outputFields: [
      { key: 'id', label: 'ID', helpText: 'The unique identifier for the collection.' },
      { key: 'name', label: 'Collection Name', helpText: 'The name of the collection.' },
      { key: 'owner', label: 'Owner', helpText: 'The owner of the collection.' },
      { key: 'createdAt', label: 'Created At', type: 'datetime', helpText: 'The date and time when the collection was created.' },
      { key: 'updatedAt', label: 'Updated At', type: 'datetime', helpText: 'The date and time when the collection was last updated.' },
      { key: 'uid', label: 'UID', helpText: 'The unique identifier for the collection in Postman.', primary: true},
      { key: 'isPublic', label: 'Is Public', type: 'boolean', helpText: 'Indicates whether the collection is public or private.' }
    ]
And that’s it for this section, here’s the full code for the trigger.
After applying these updates, conduct another test in Zapier. Although the test should succeed, you may see a warning about date/time formatting. Should you encounter any primary key errors, check your package.json and ensure you're using Zapier platform core version 15.6.1 or higher. Update if necessary by running:
npm install -g zapier-platform-core updateHere are the issues we found:
┌────────────────┬──────────────────────────────────────────────────────────────────────────────────────────┐
│ Category │ Warnings │
│ Method │ triggers.collection │
│ Description │ need to verify date/time format in latest successful task, but doesn't have a Zap (T003) │
│ Link │ https://platform.zapier.com/docs/integration-checks-reference#T003 │
└────────────────┴──────────────────────────────────────────────────────────────────────────────────────────┘Zapier test provides valuable feedback through warnings, errors, and publishing tasks, helping to fine-tune apps before their official release. Warnings suggest enhancements for better user experience but don't impede app publication. Resolving errors and publishing tasks are mandatory before launch.The above warning about verifying date/time formats typically arises when the app handles dates but hasn't been tested in a live Zap yet. To address this, we'll proceed to the publication phase in the following section and then test our Zap in action!
7. Publishing
Now, let's move on to publishing our integration. If this is your first time pushing your project to Zapier, start by registering your integration using the command:
zapier registerThis command will guide you through a series of initial questions to set up your integration's metadata. The questions include:
- The title of your integration (minimum of 2 characters required).
- A short description of your app (140 characters max).
- The homepage URL of your app (optional).
- Whether you're building a public or private integration.
- Your relationship with the app you're integrating with Zapier.
- The category that best fits your app.
- Whether to subscribe to updates about your integration.
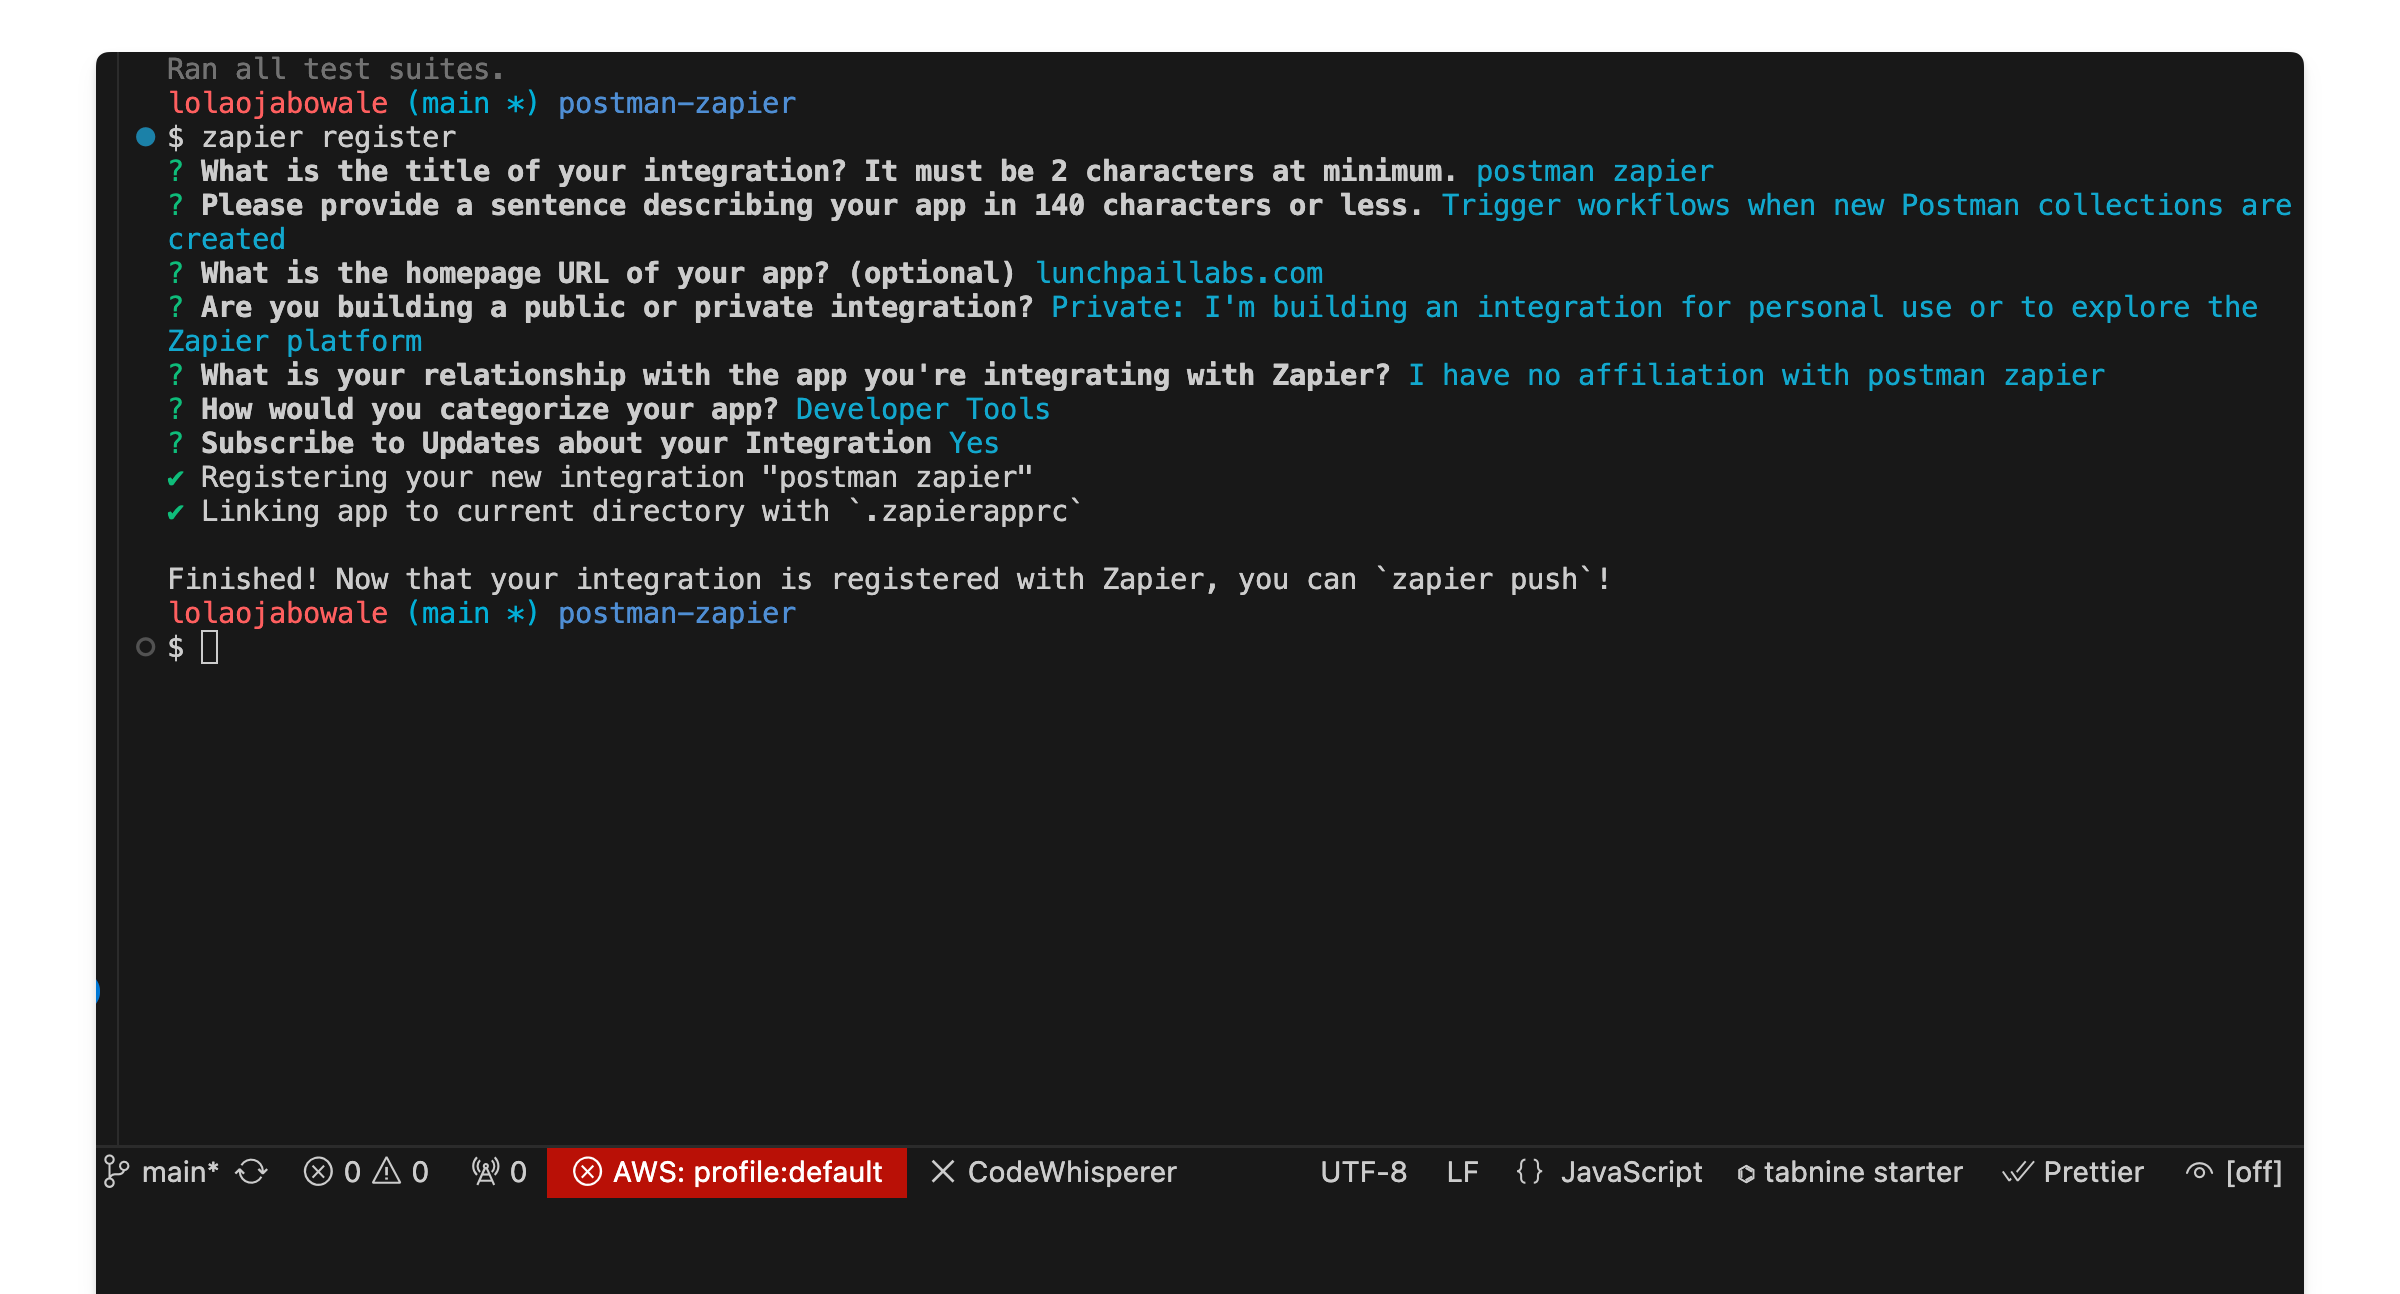
Feel free to answer these questions in a way that best represents your integration. For this walkthrough, ensure you choose the option for a private integration.
Once you've completed the registration, it's time to push your integration to Zapier's platform:
zapier pushWith your integration pushed, we're ready to move on to the next exciting part—testing it out!
8. Trying it out
It's time to put our integration to the test. Start by heading to your Zapier dashboard and creating a new Zap.
Start a new Zap by clicking on "Create" to start the setup process. Search for your app in the trigger setup. Select "New Collection" event as the trigger for your Zap.
Next, link your Postman account to Zapier using your API Key, which can be found on your Postman app settings page. Once connected, you'll see the connection label we set up earlier.

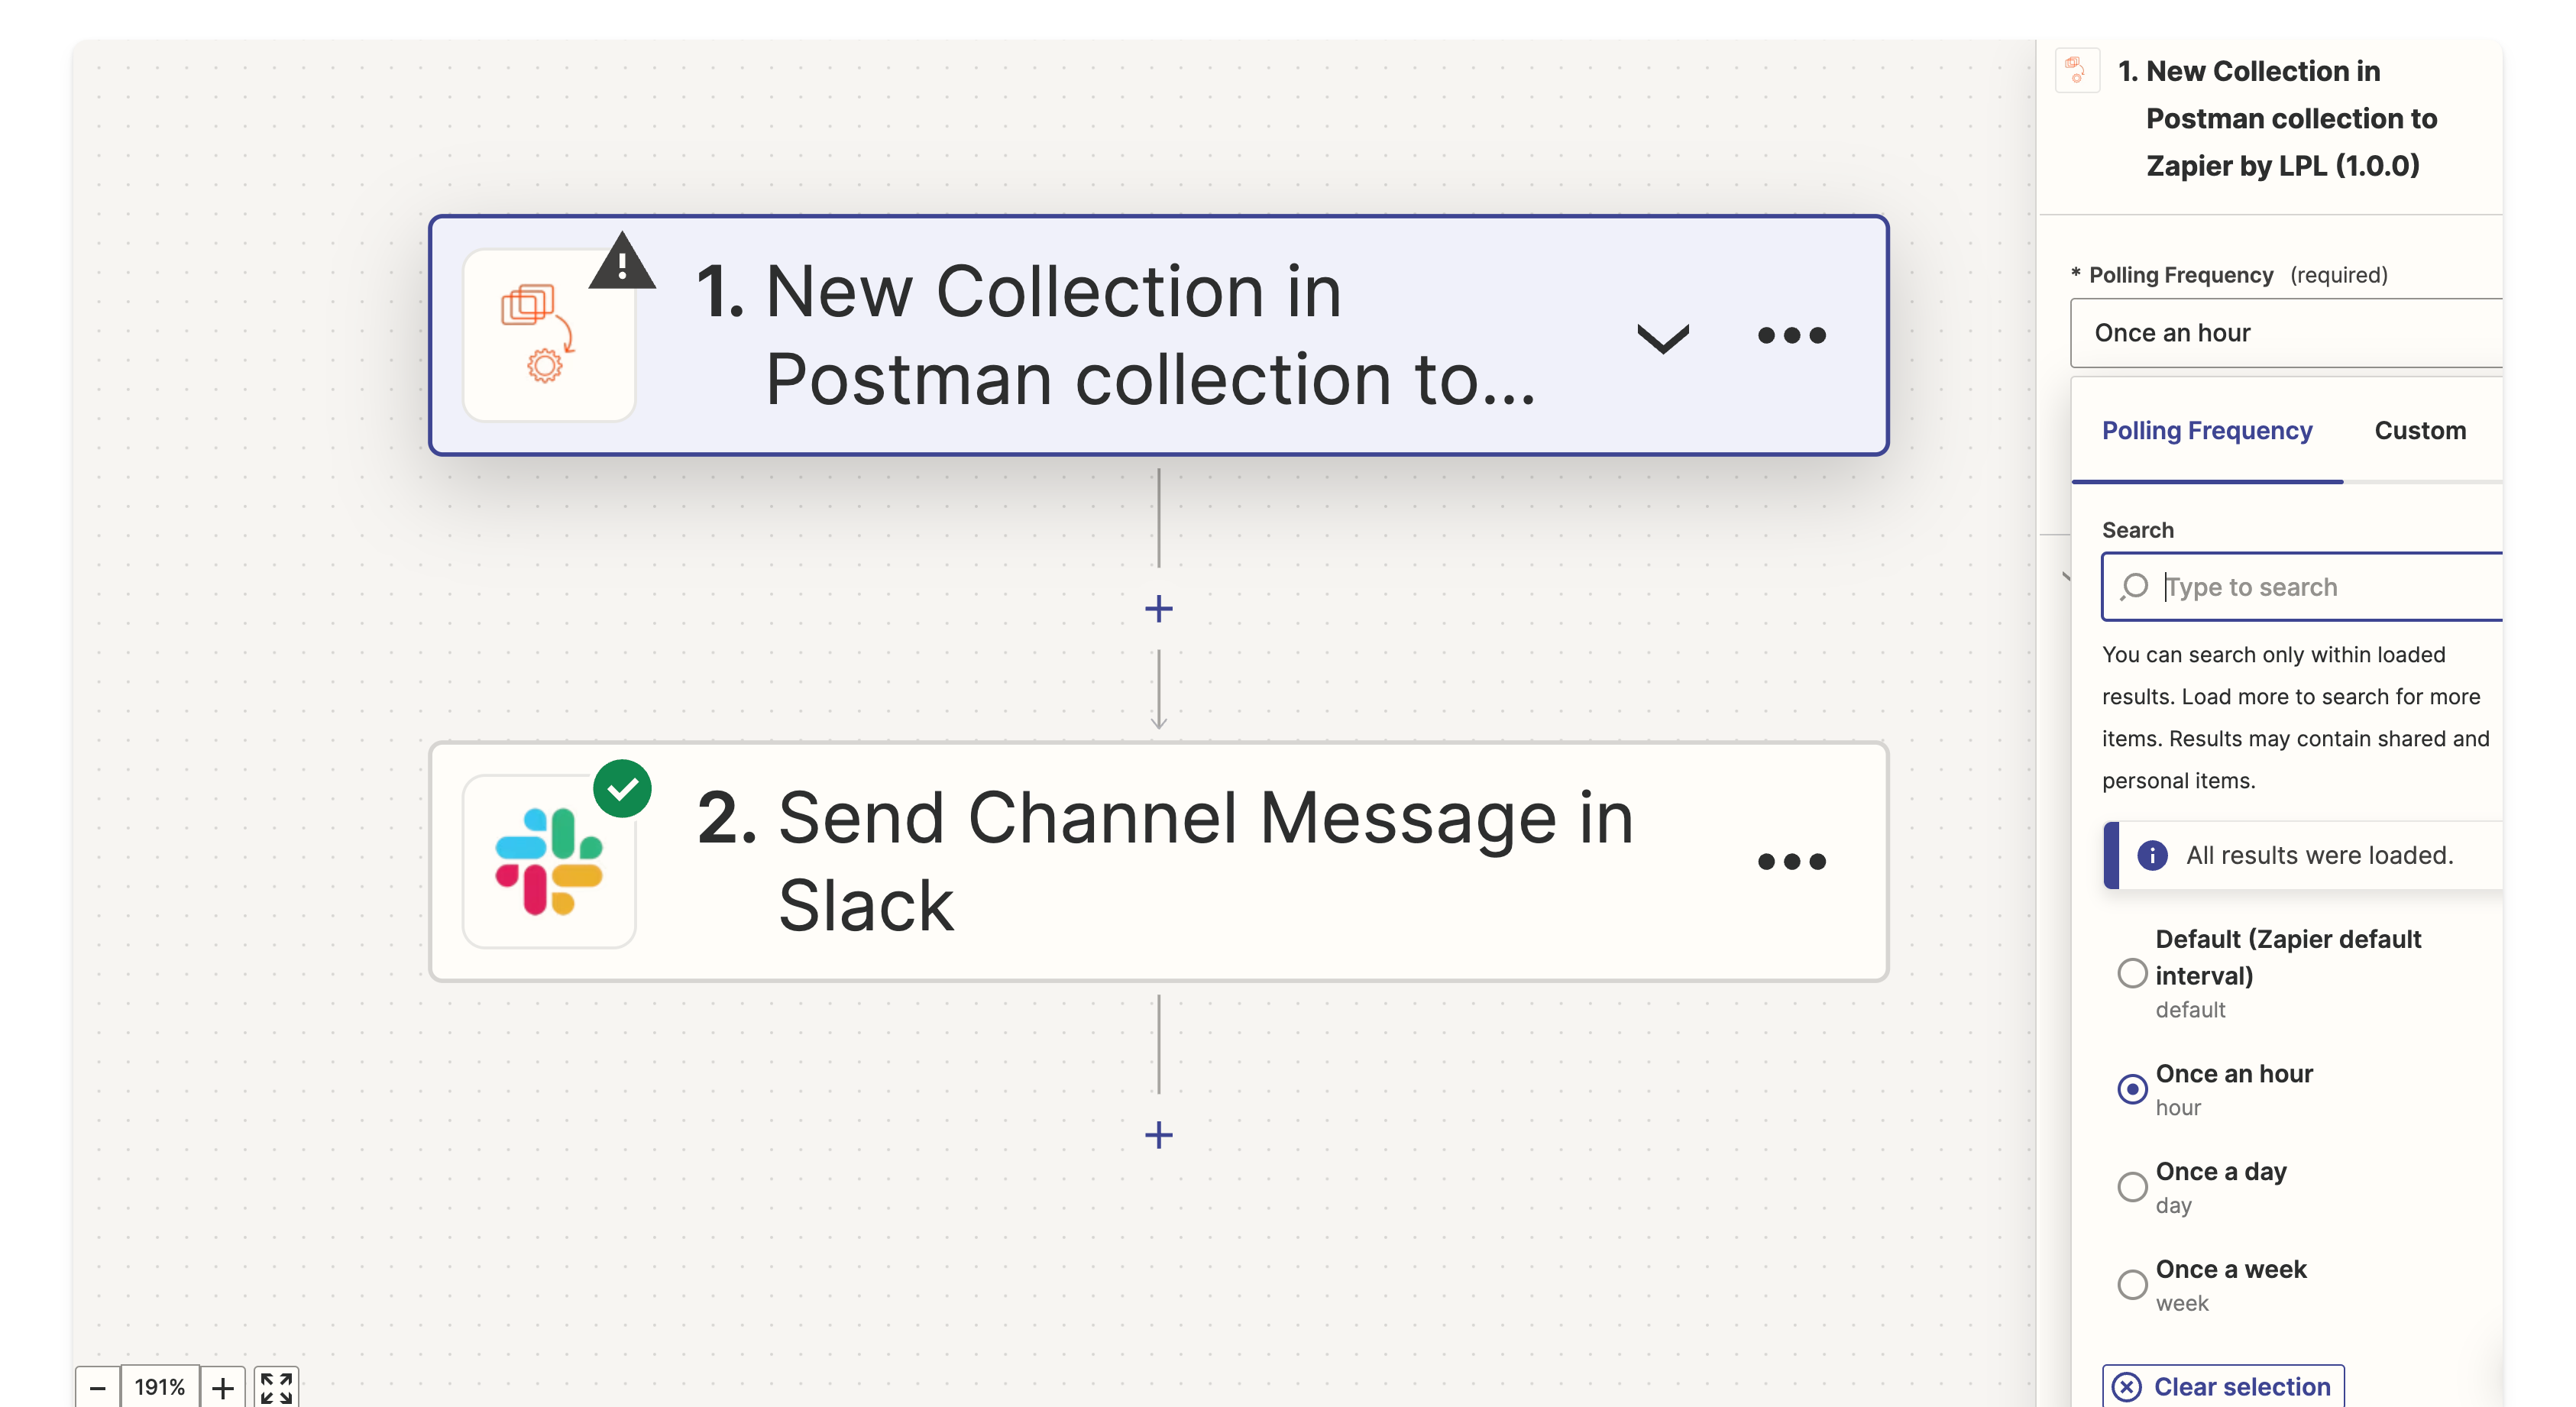
Set the polling frequency to control how often the integration makes calls to Postman's API.
Run a test to ensure the trigger is functioning correctly. If everything is set up right, you should see a successful test result.

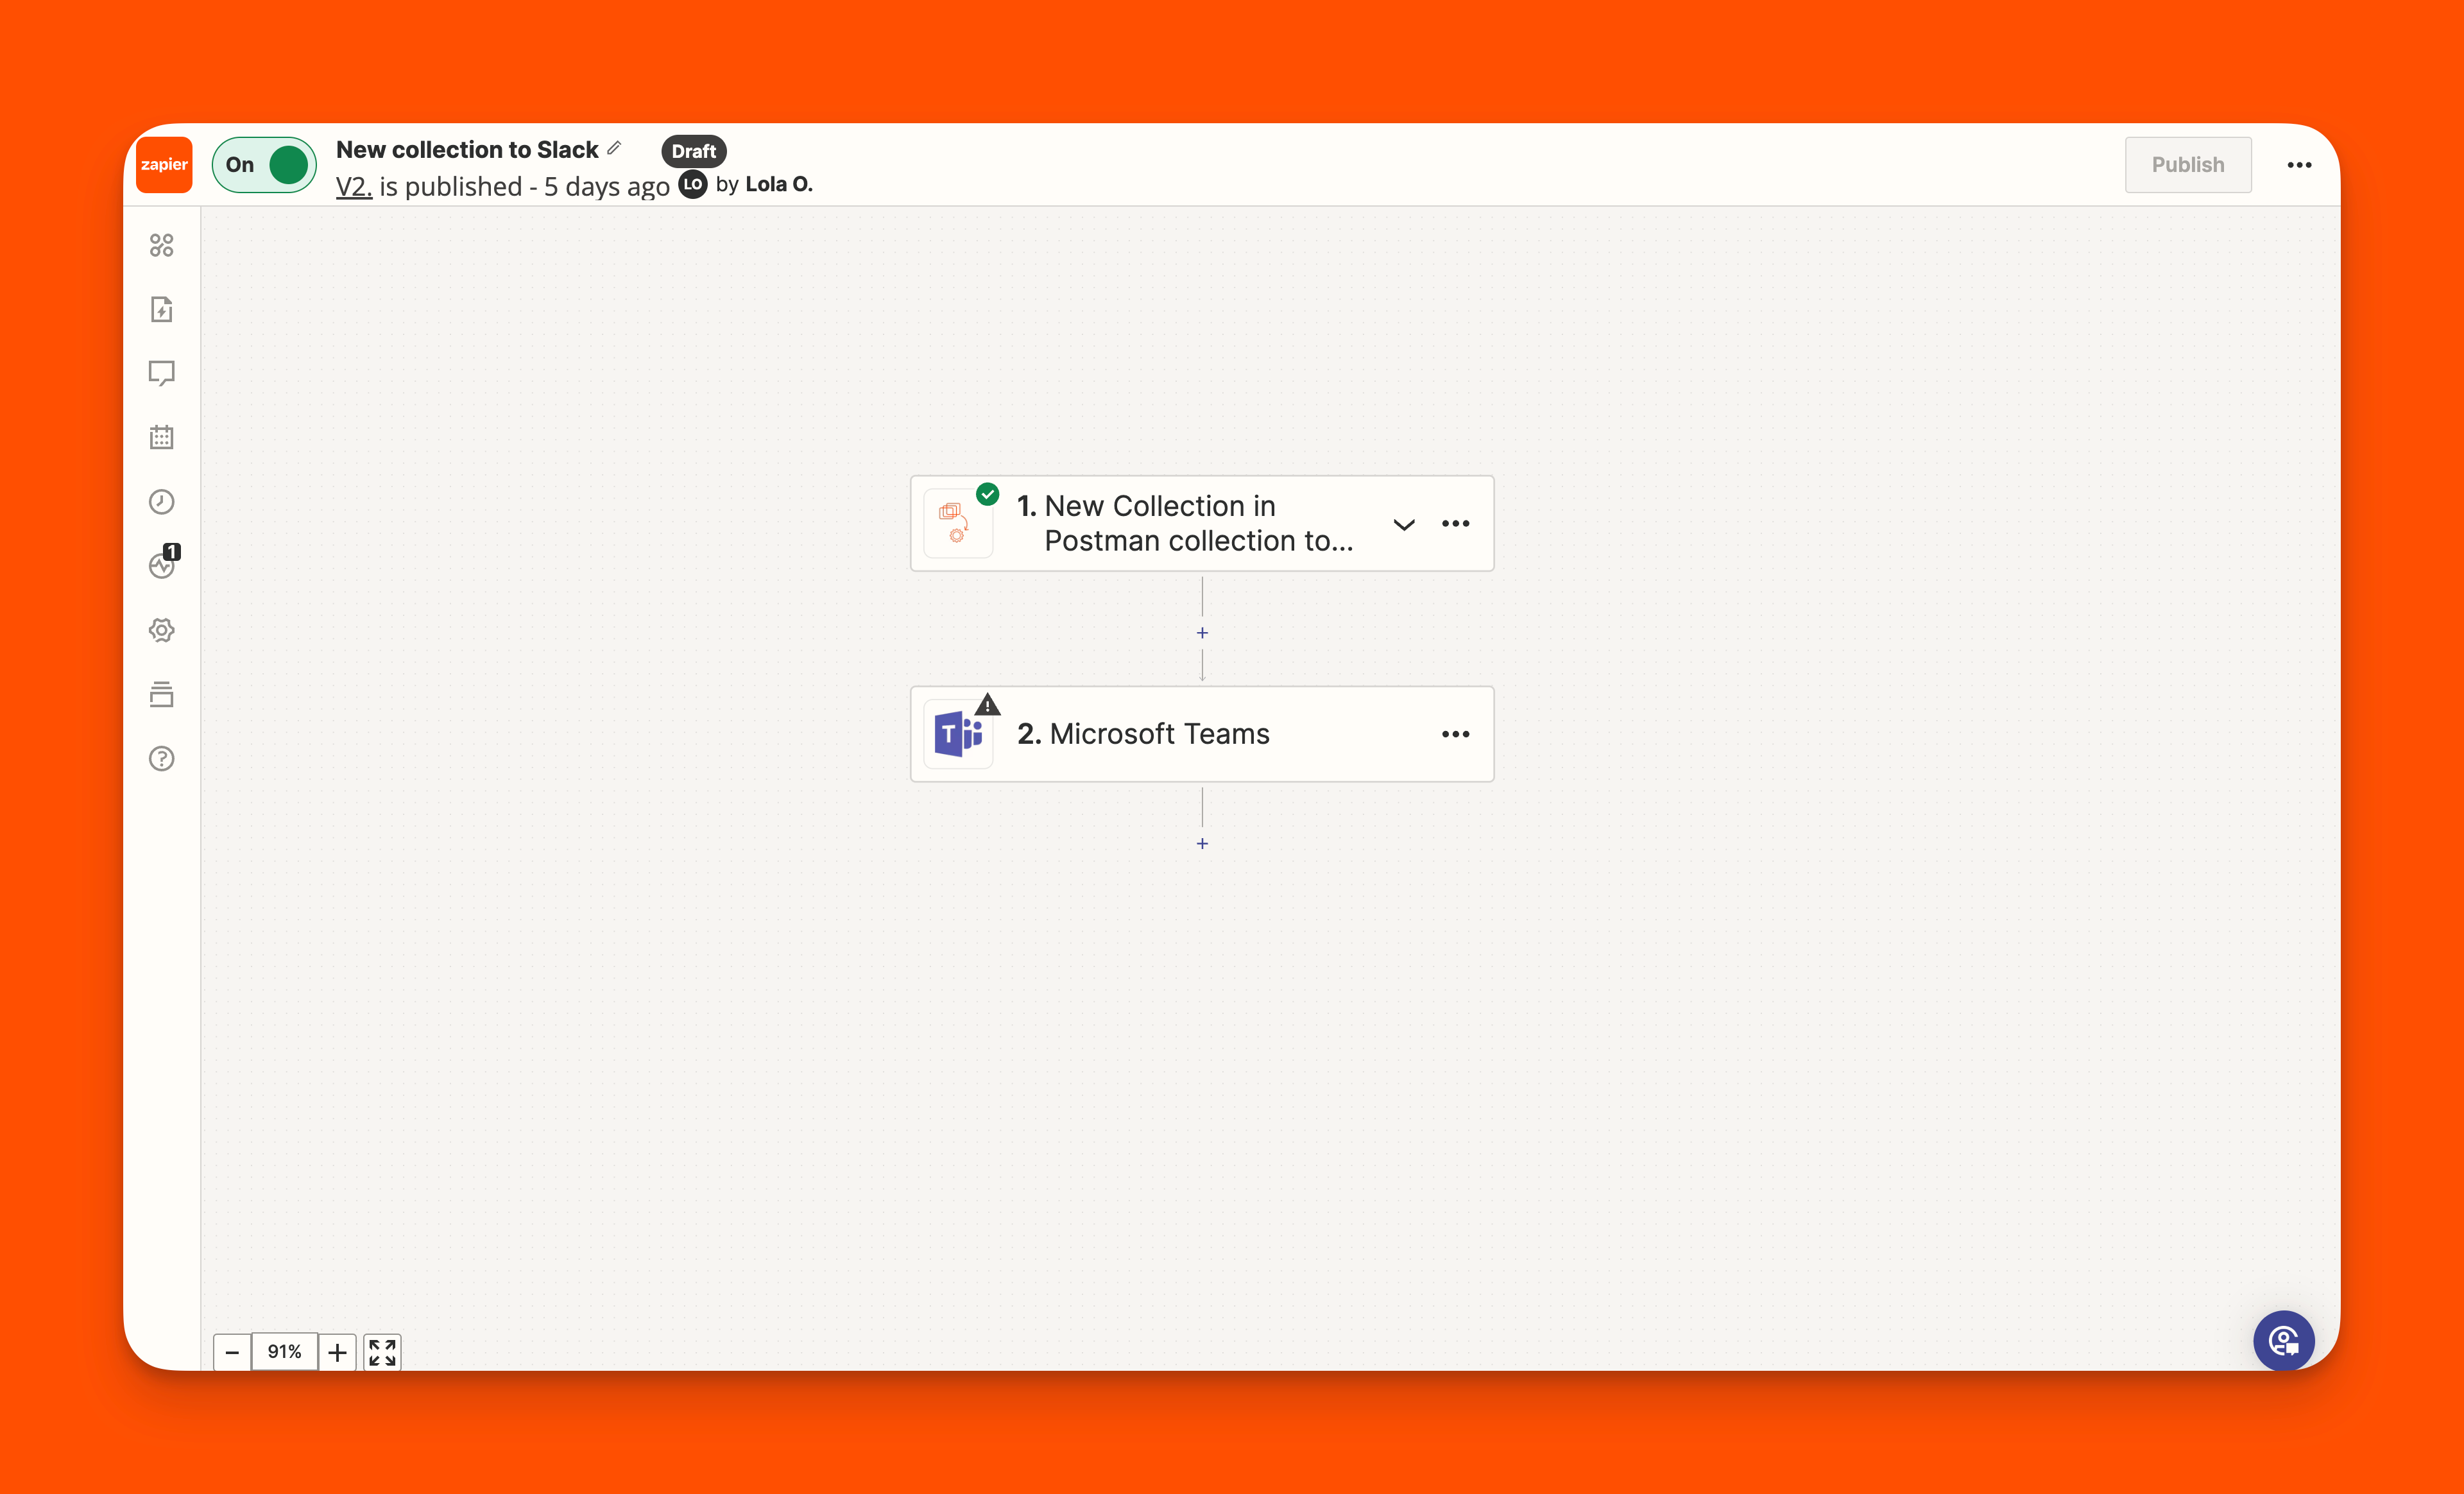
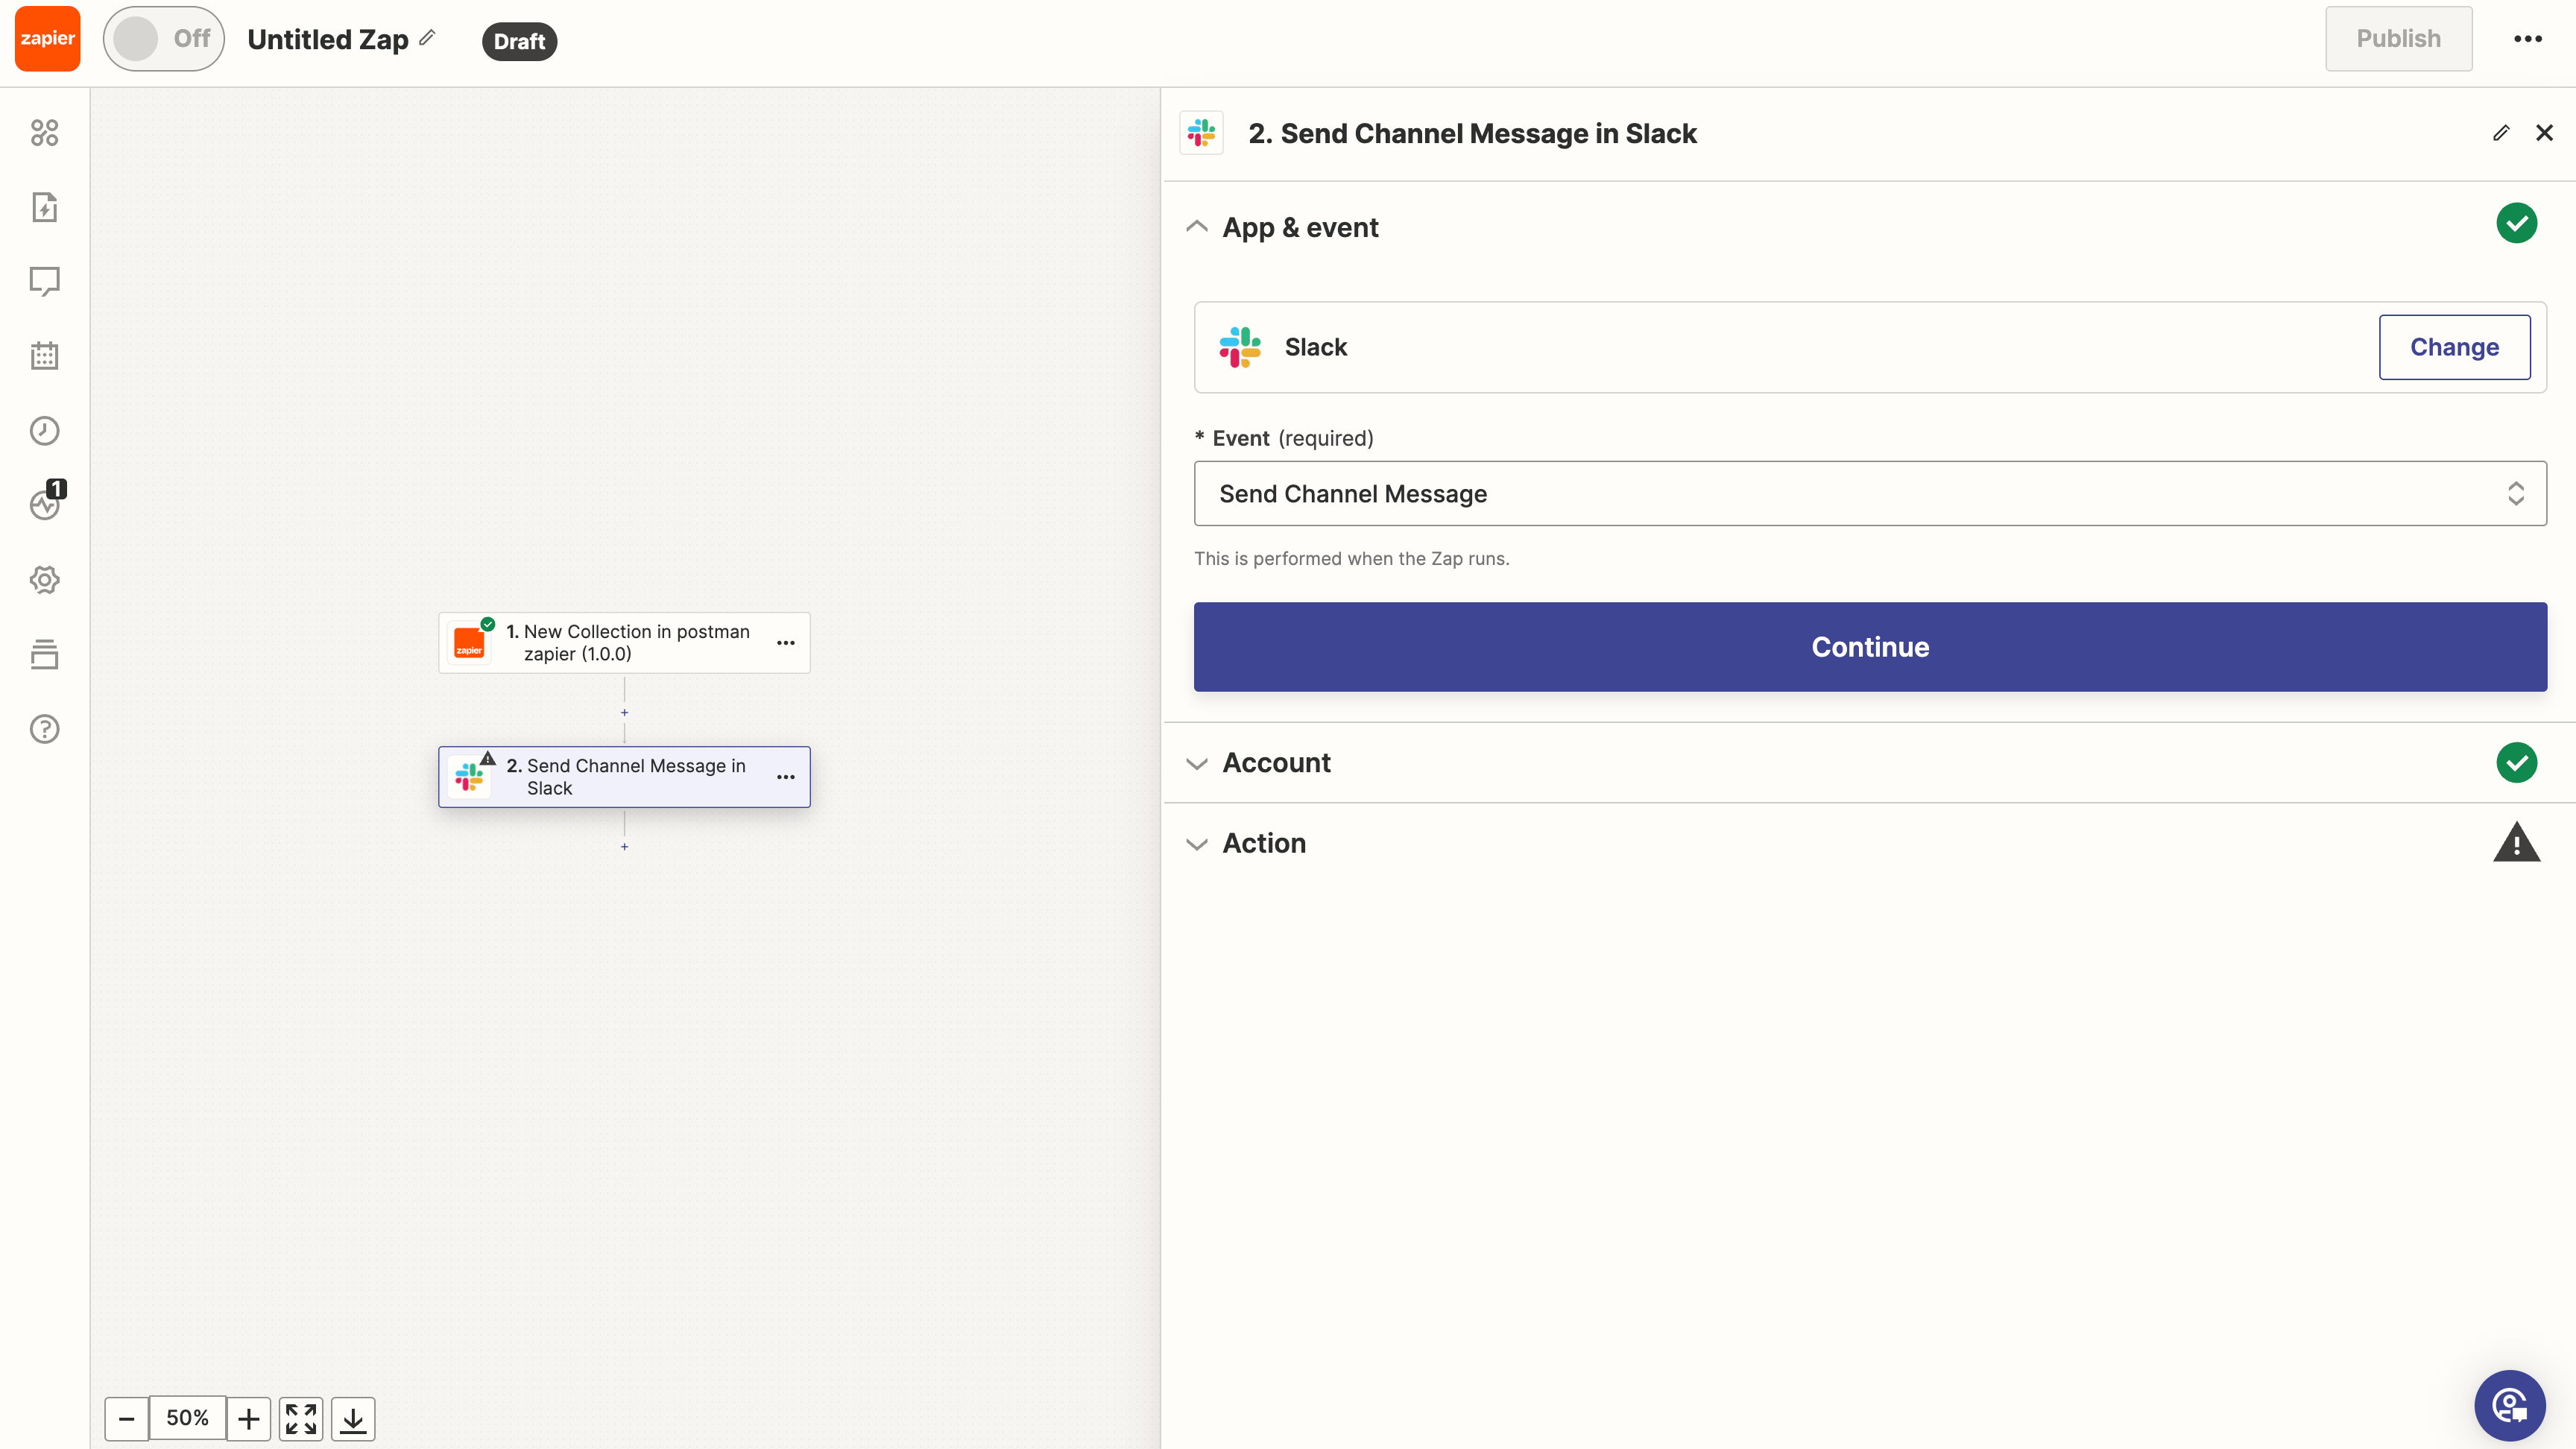
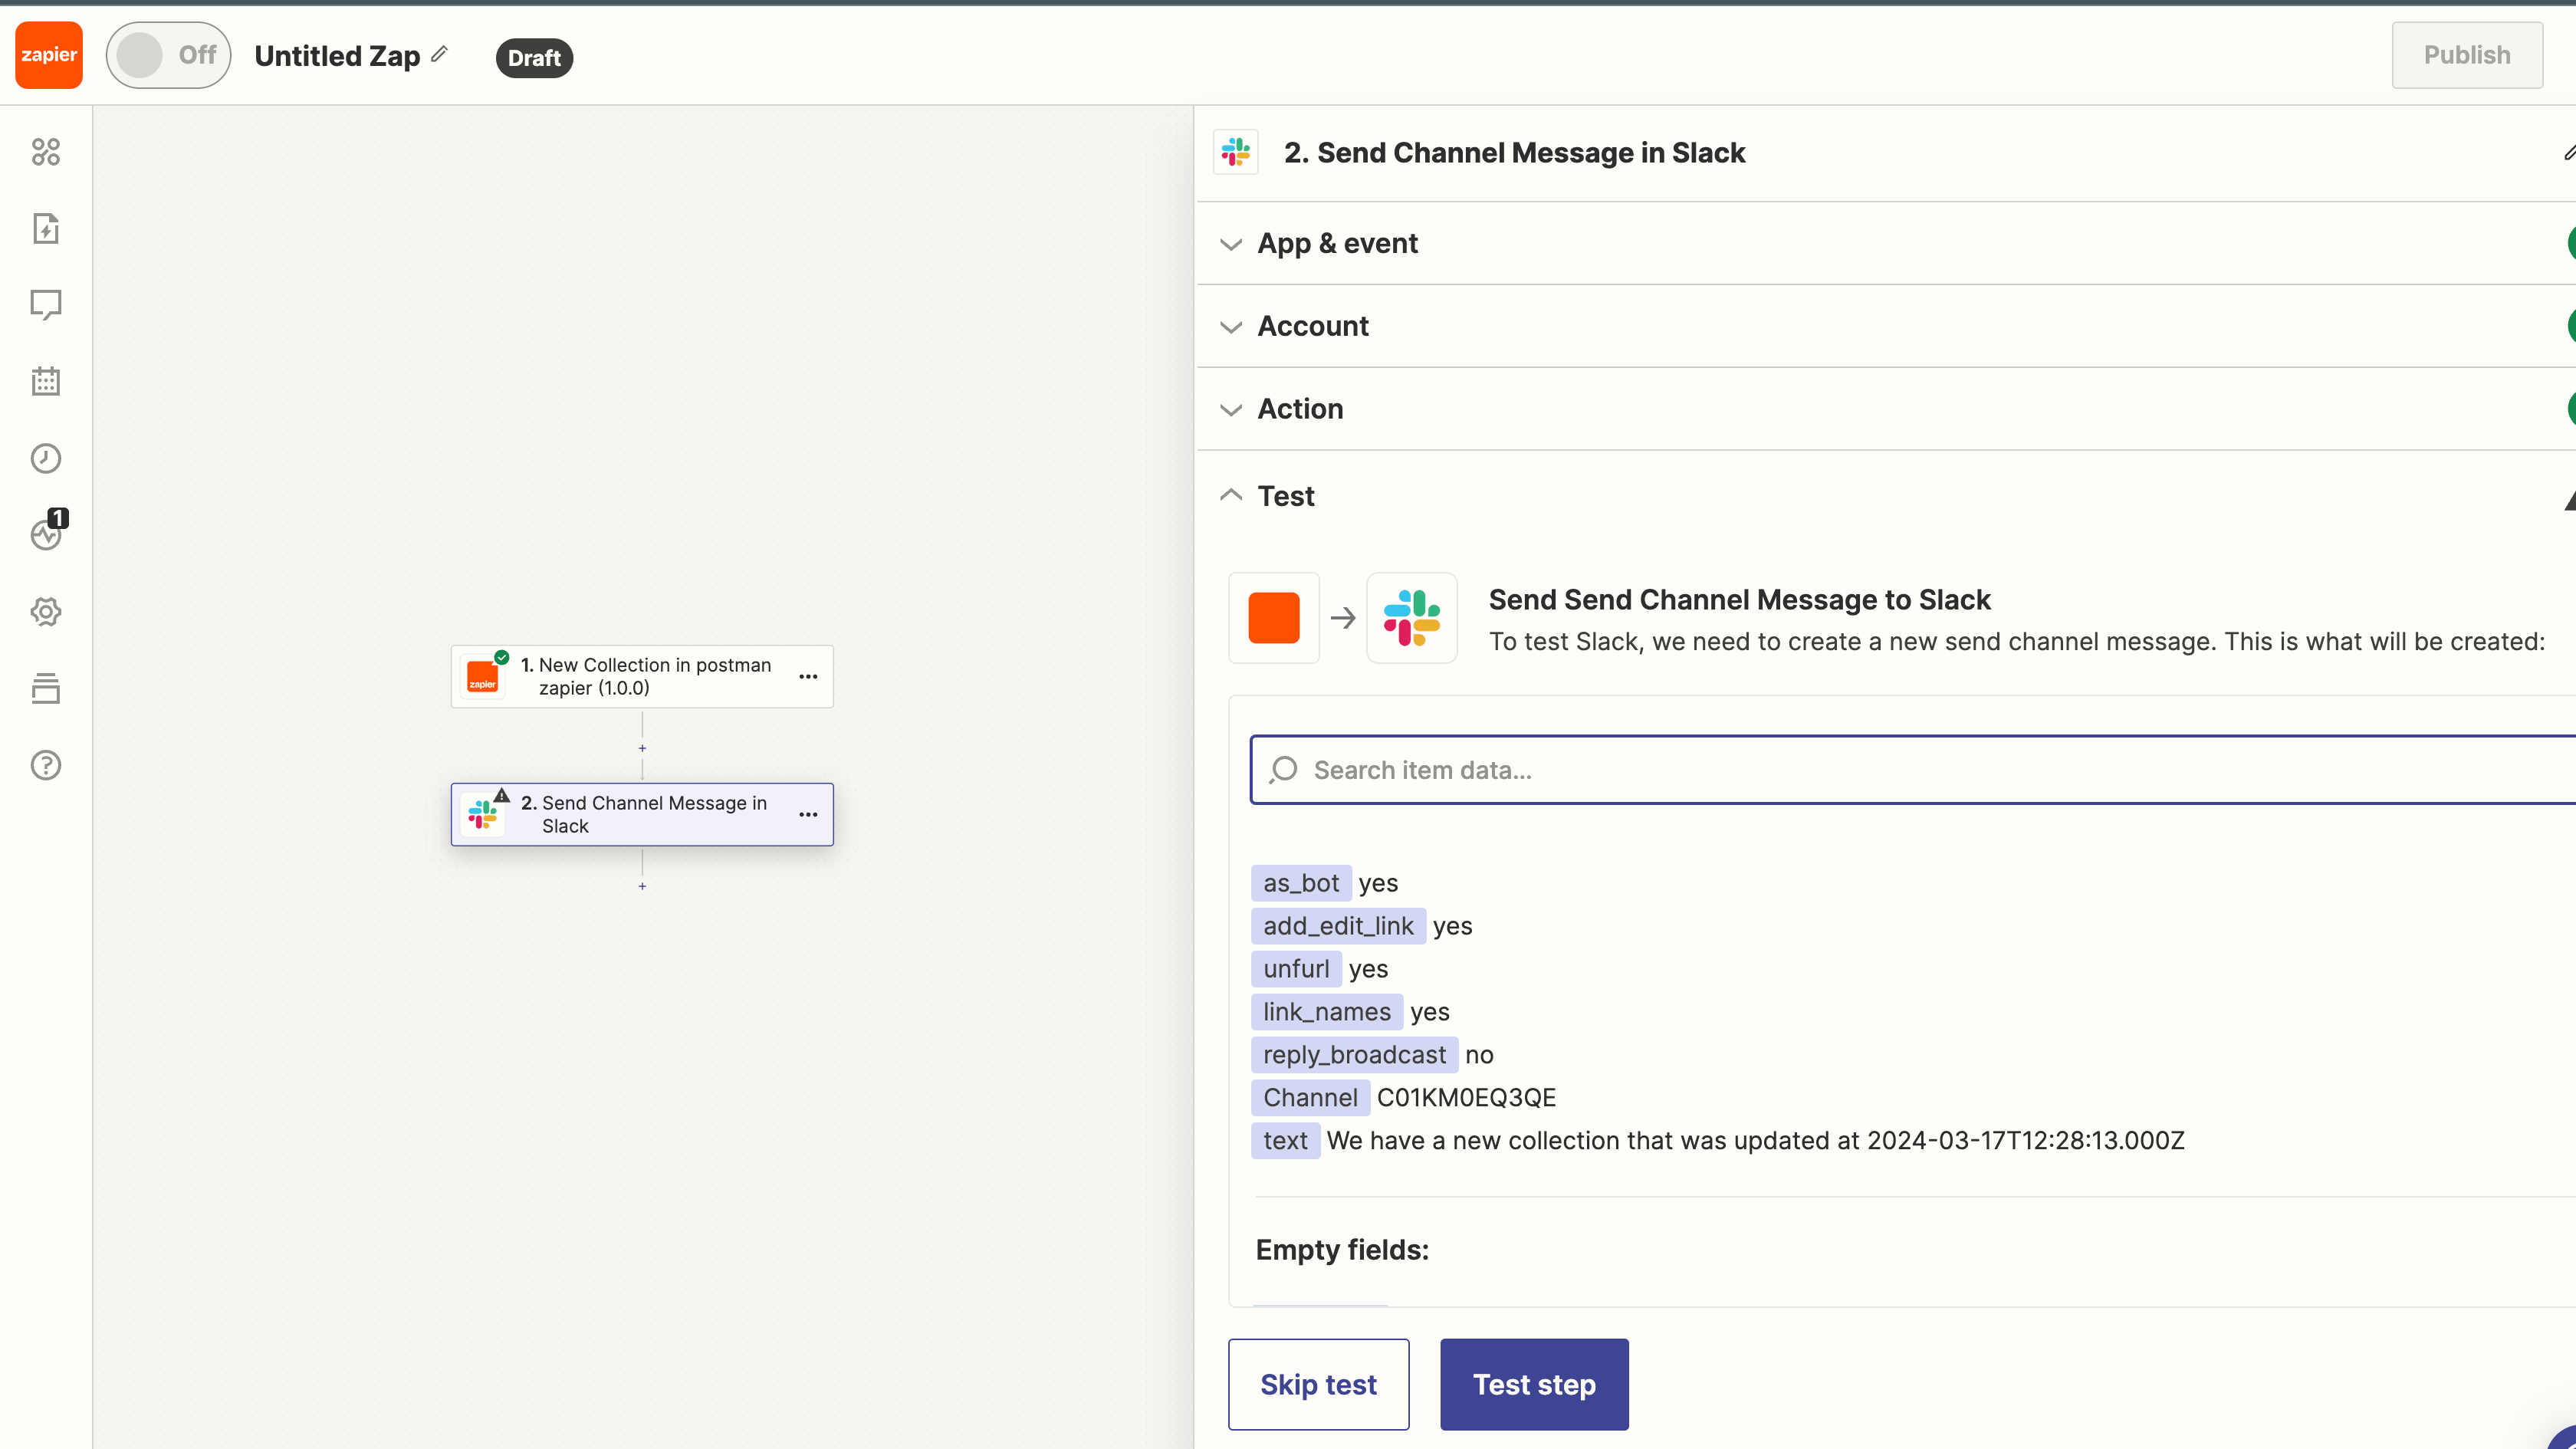
For demonstration purposes, let's set up a simple action, such as sending a Slack message or an email, whenever a new collection is detected.
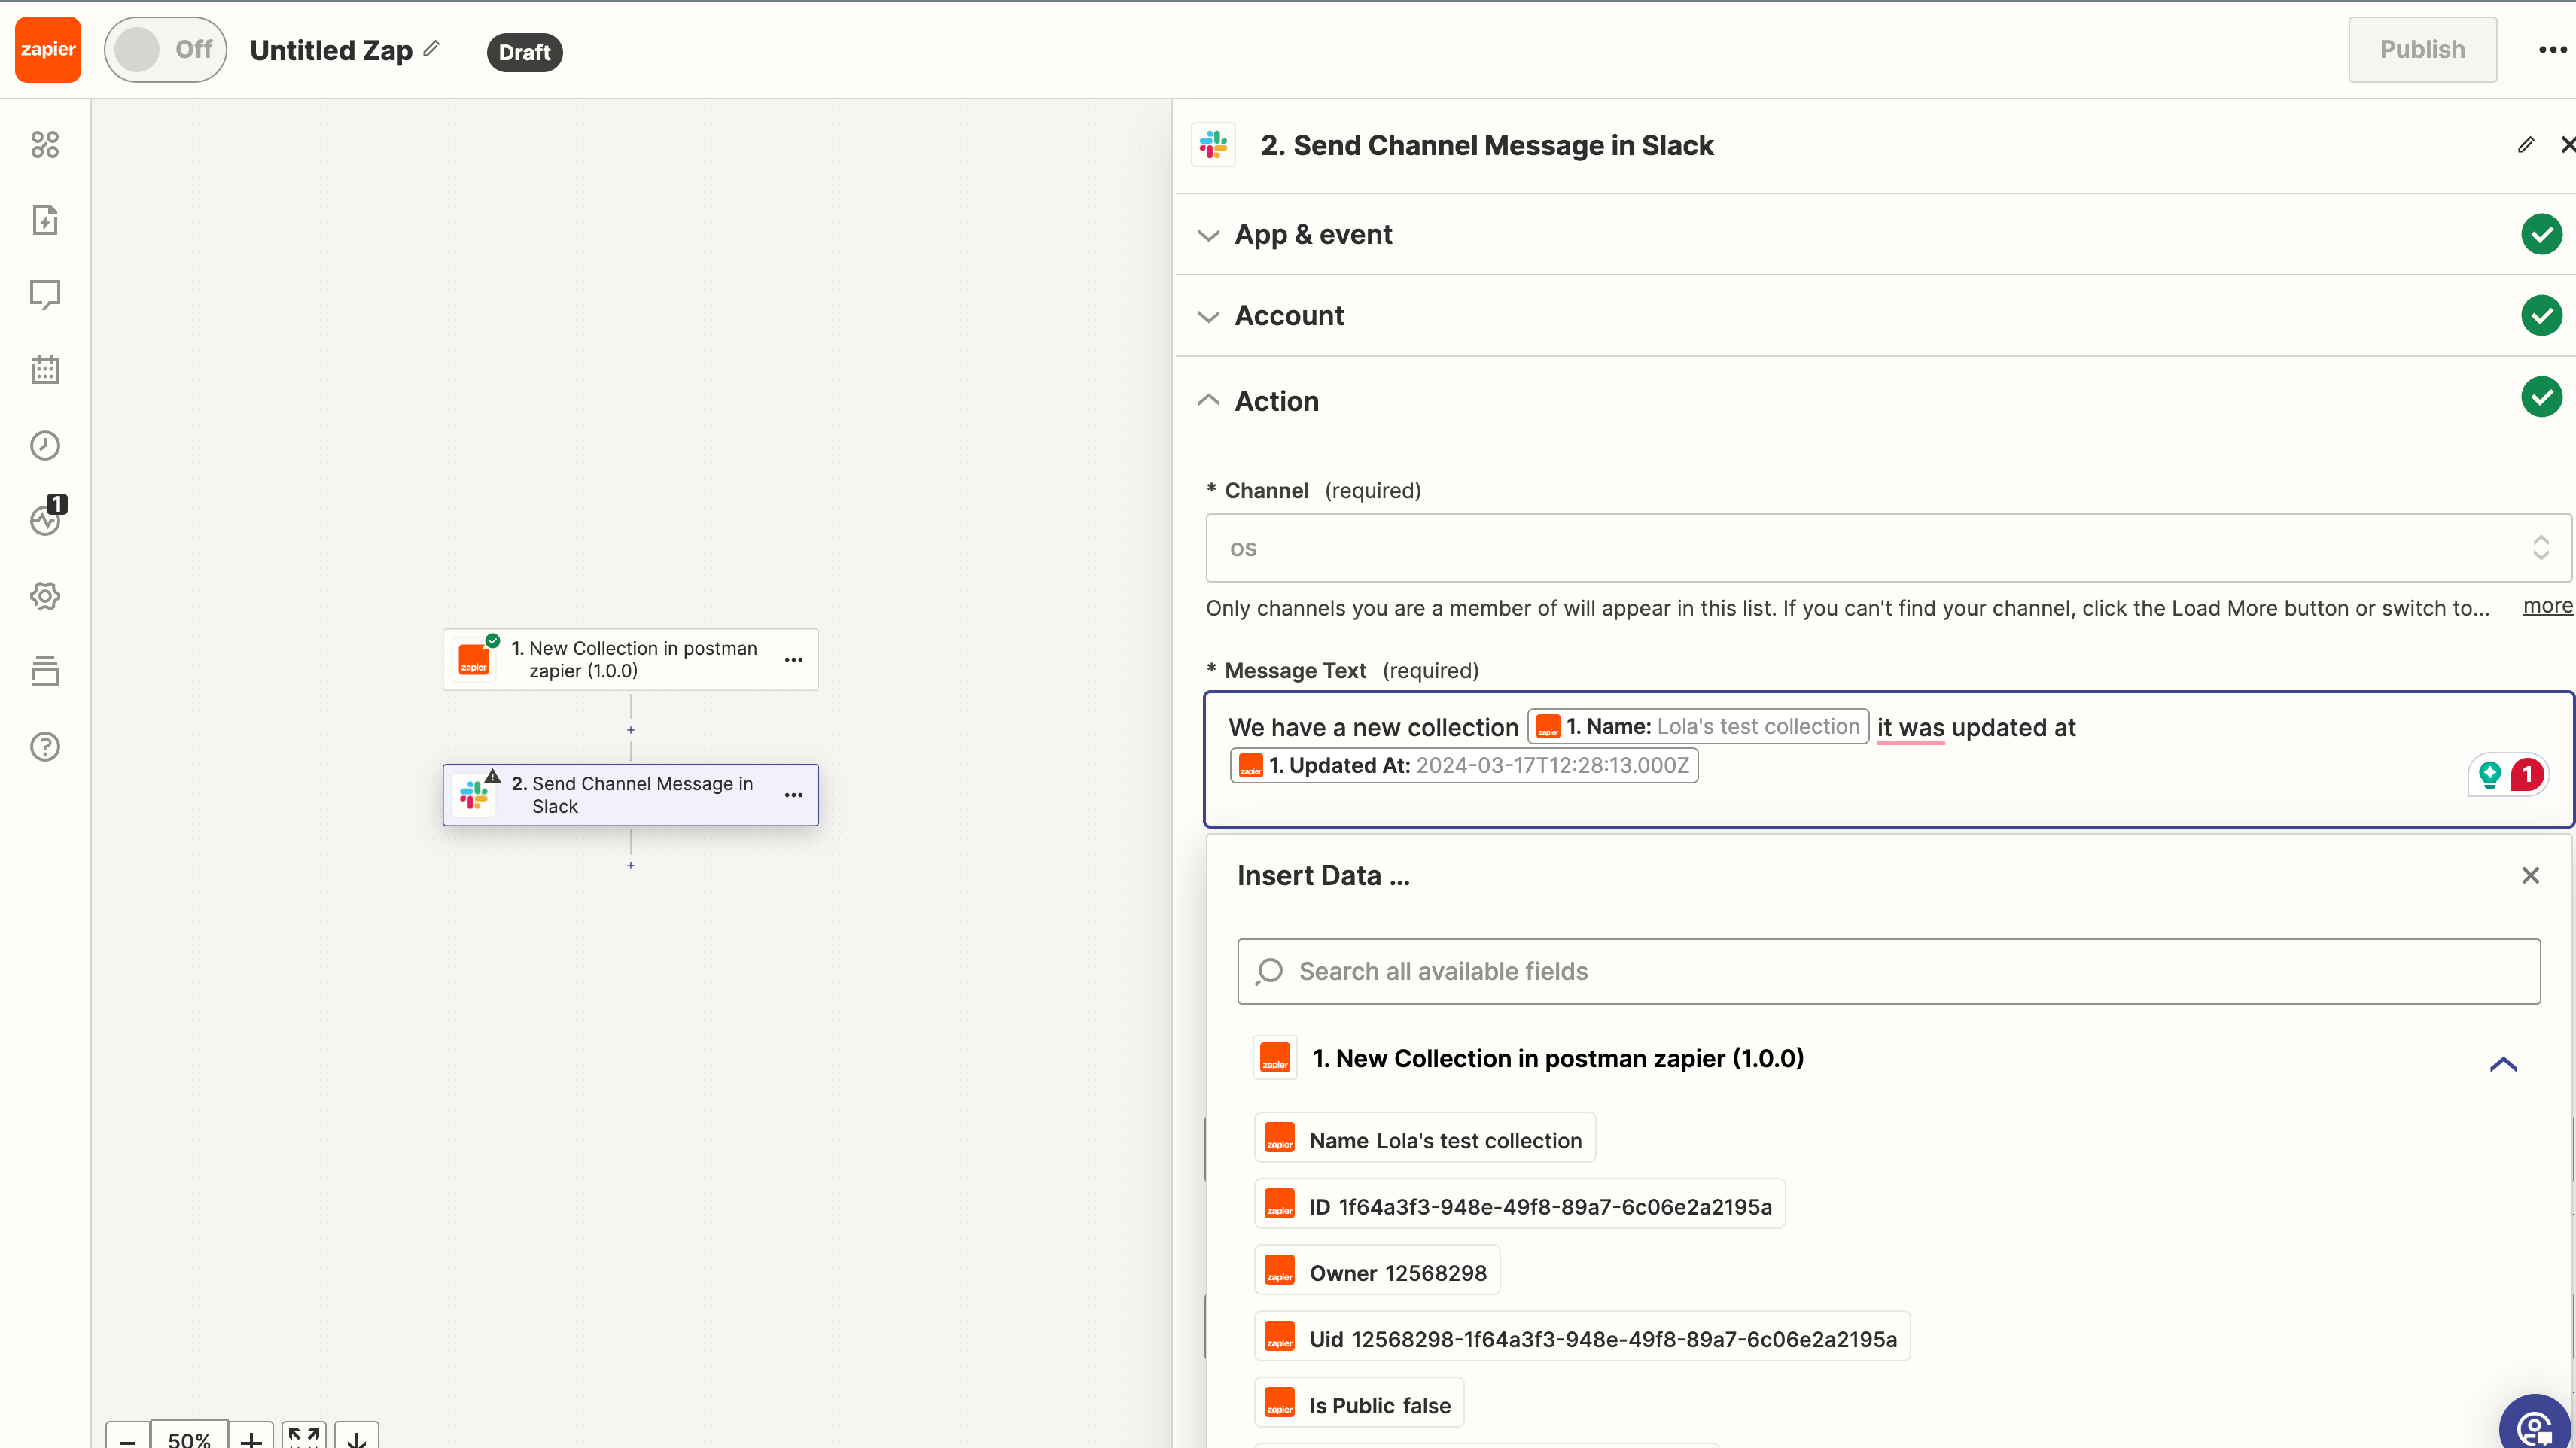
Craft a message to be sent by your action. For instance, it could notify you about the new collection and its update time.
Run a final test of your Zap to confirm all steps are working as intended.
Once your Zap is enabled and a new collection is created in Postman, the Zap should trigger the action you've set up. Successfully running this Zap will also address the previous warning about verifying the date/time format, as Zapier will now see a live example.
Conclusion
That wraps up our introduction to building a basic Postman app for Zapier! While we've only scratched the surface with a simple trigger for new collections, the potential to expand and enhance this integration is vast. Here are some ideas to take this app further:
- Extend Collection Monitoring: Utilize additional Postman collection endpoints to track more specific events and data, adding depth to our app's triggers.
- Explore More Postman APIs: Branch out from collections to poll addition Postman APIs
- Use Postman’s SDK: Employ Postman's Collection SDK for advanced trigger development, enabling sophisticated data handling.
- Build Actions: Introduce actions that allow users to make changes in Postman based on triggers from other Zapier connected apps
If you try this out, let me know! Drop a note with your Postman x Zapier app creations.
.png?table=block&id=9ba33ac6-8e12-48f6-b980-4333b612ec56&cache=v2)


.png?table=block&id=022fb557-ace9-4417-8815-1a831c989f2e&cache=v2)